Update: Passed the validation, still not indexed
I just noticed that I passed the "Duplicate without user-select canonical" check a good week ago, after doing the modifications in Adding canonical links for category and tag pages in Bludit 3.16.2.
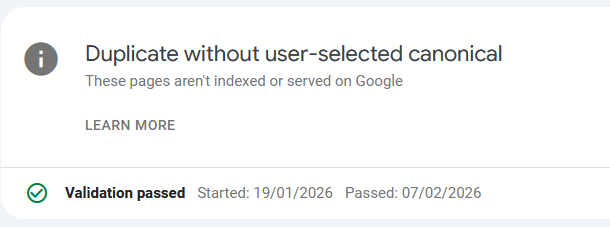
Still nothing changed regarding the indexing.
Update end.
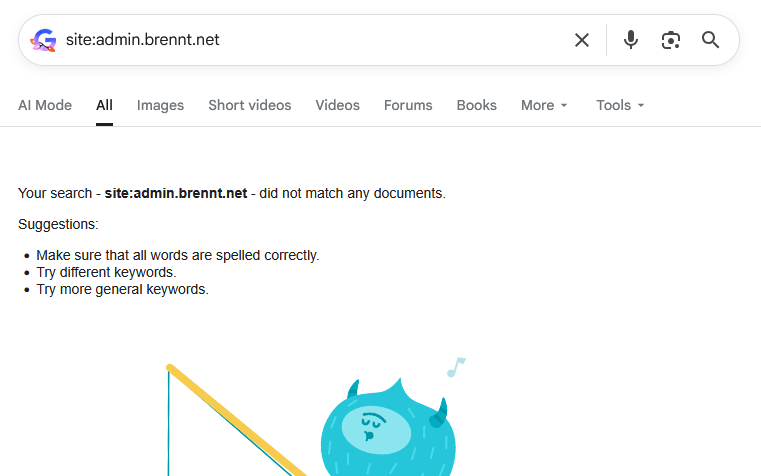
If you do a search in Google specifically for this blog, it will show up empty. Zero posts found, zero content shown. In the last weeks less and less content was shown until we reached point zero on December 28th, 2025.
And I have absolutely no clue about the reason. Only vague assumptions.
I do remember my site being definitely indexed and several results being shown. This was how I spotted lingering DNS entries from other peoples long-gone web projects still pointing to the IP of my server. Which I blogged about in "It's always DNS." in November 2024.
This lead me to implement a HTTP-Rewrite rule to redirect the requests for those domains to a simple txt-file asking the people in a nice way to remove those old DNS entries. This can still be found here: https://admin.brennt.net/please-delete.txt
However since December 19th 2025 no pages are indexed anymore.
HTTP-302, the first mistake?
And maybe here I made the first mistake which perhaps contributed to this whole situation. As according to the Apache documentation on the Redirect flag HTTP-302 "Found" is used as the default status code to be used. Not the HTTP-301 "Moved permanently" status code. Hence I signaled Google "Hey, the content only moved temporarily".
And this Apache configuration DOES send a HTTP-302:
# Rewrite for old, orphaned DNS records from other people..
RewriteEngine On
<If "%{HTTP_HOST} == 'berufungimzentrum.at'">
    RewriteRule "^(.*)$" "https://admin.brennt.net/please-delete.txt"
</If>
Anyone having some knowledge in SEO/SEM will tell you to avoid HTTP-302 in order to not be punished for "duplicate content". And yeah, I did know this too, once. Sometime, years ago. But I didn't care too much and had forgotten about this.
And my strategy to rewrite all URLs for the old, orphaned domains to this txt-file lead to a situation where the old domains were still seen as valid and the content indexed through them (my blog!) as valid content.
Then suddenly my domain appeared too, but the old domains were still working and all requests temporarily redirected to some other domain (admin.brennt.net - my blog..). Hence I assume that currently my domain is flagged for duplicate content or being some kind of "link-farm" and therefore not indexed.
And I have no clue if this situation will resolve itself automatically or when.
A slow but steady decline
Back to the beginning. Around mid of October 2025 I grew curious how my blog shows up in various search engines. And I was somewhat surprised. Only around 20 entries where shown for my blog. Why? I had no clue. While I could understand that the few posts, which garnered some interest and were shared on various platforms, were listed first, this didn't explain why only so few pages were shown.
I started digging.
The world of search engines - or: Who maintains an index of their own
The real treasure trove which defines what a search engine can show you in the results is its index. Only if a site is included in its index it is known to the search engine. Everything else is treated like it doesn't exist.
However not every search engine maintains its own index. https://seirdy.one/posts/2021/03/10/search-engines-with-own-indexes/ has a good list of search engines and if they are really autonomous in maintaining their own index or not. Based on this I did a few tests with search engines for this blog. I solely used the following search parameter: site:admin.brennt.net
| Search Engine |
Result |
| Google |
No results |
| Bing |
Results found |
| DuckDuckGo |
Results found |
| Ecosia |
Results found if using Bing, no results with Google |
| Brave |
Results found |
| Yandex |
Results found |
Every single search engine other than Google properly indexes my blog. Some have recent posts some are lagging behind a few weeks. This however is fine and solely depends on the crawler and index update cycles of the search engine operator.
My webserver logs also prove this to be true. Zero visitors with a referrer from Google, but a small and steady number from Bing, DuckDuckGo and others.
So why does only Google have problem with my site?
Can we get insights with the Google Search Console?
I went to the Google Search Console and verified admin.brennt.net as my domain. Now I was able to have a deep dive into what Google reported about my blog.
robots.txt
My first assumption was that the robots.txt was somehow awry but given how basic my robots.txt is I was dumbfounded on where it was wrong. "Maybe I missed some crucial technical development?" was the best guess I had. No, a quick search revealed that nothing has changed regarding the robots.txt and Google says my robots.txt is fine.
 Just for the record, this is my robots.txt. As plain, boring and simple as it can be.
User-agent: *
Allow: /
Sitemap: https://admin.brennt.net/sitemap.xml
Inside the VirtualHost for my blog I use the following Rewrite to allow HTTP and HTTPS-Requests for the robots.txt to succeed. As normally all HTTP-Requests are redirected to HTTPS. The Search Console however complained about being an error present with the HTTP robots.txt..
RewriteEngine On
# Do not rewrite HTTP-Requests to robots.txt
<If "%{HTTP_HOST} == 'admin.brennt.net' && %{REQUEST_URI} != '/robots.txt'">
    RewriteRule "(.*)"      "https://%{HTTP_HOST}%{REQUEST_URI}" [R=301] [L]
</If>
But this is just house keeping. As that technical situation was already present when my blog was properly indexed. If at all, this should lead to my blog being ranked or indexed better, and not vanish..
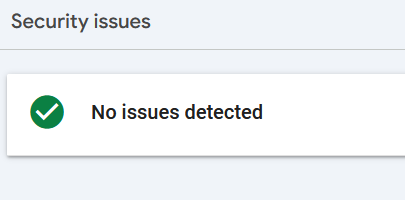
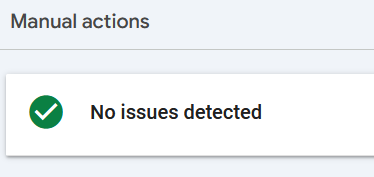
Are security or other issues the problem?
The search console has the "Security & Manual Actions" menu. Under it are these two mentioned reports about Security issues and issues requiring manual interaction.
Again, no. Everything is fine.
Is my sitemap or RSS-Feed to blame?
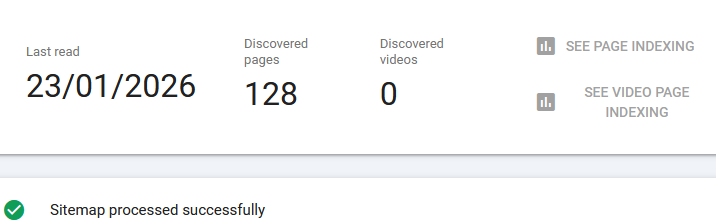
I read some people who claim that Google accidentally read their RSS-Feed as Sitemap. And that excluding a link to their RSS-Feed in the sitemap.xml did the trick. While a good point, my RSS-Feed https://admin.brennt.net/rss.xml isn't listed in my sitemap. Uploading the Sitemap in the Search Console also showed no problems. Not in December 2025 and not in January 2026.
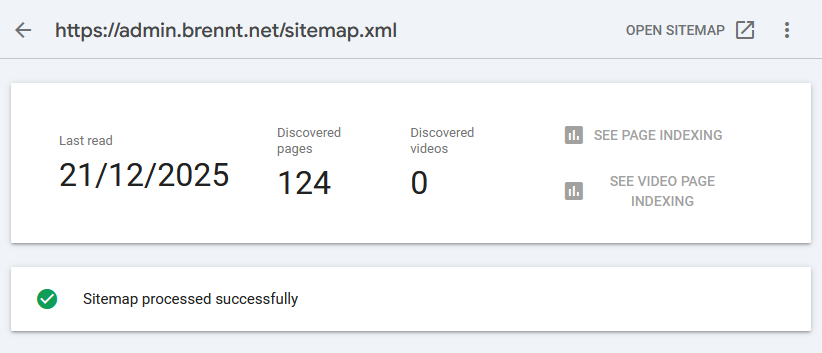
It even successfully picked up the newly creating articles.
However even that doesn't guarantee that Google will index your site. It's just one minor technical detail checked for validity.
"Crawled - currently not indexed" the bane of Google
Even the "Why pages aren't indexed" report didn't provide much insight. Yes, some links deliver a 404. Perfectly fine, I deleted some tags, hence those links now end in a 404. And the admin login page is marked with noindex. Also as it should be.
The "Duplicate without user-selected canoncial" took me a while to understand, but it boils down to this: Bludit has categories and tags. If you click on such a category-/tag-link you will be redirected to an automatically generated page showing all posts in that category/with that tag. However, the Bludit canonical-plugin currently doesn't generate these links for category or tag views. Hence I fixed it myself.
Depending on how I label my content some of these automatically generated pages can look the same i.e. a page for category A can show the exact same posts as the page for tag B. What a user then has to do is define a canonical link in the HTML source code to make it possible to properly distinguish these sites and tell Google that, yes, the same content is available under different URLs and this is fine (this is especially a problem with bigger sites being online for many years).
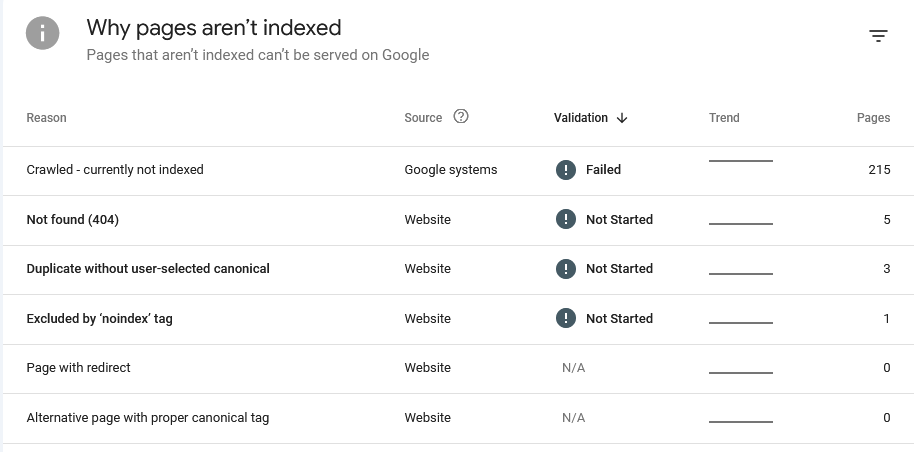
But none of these properly explain why my site isn't indexed anymore. As most importantly: All these issues were already present when my blog was indexed. Google explains the various reasons on its "Page indexing report" help page.
There we learn that "Crawled - currently not indexed" means:
The page was crawled by Google but not indexed. It may or may not be indexed in the future; no need to resubmit this URL for crawling.
Source: https://support.google.com/webmasters/answer/7440203#crawled
And that was the moment I hit a wall. Google is crawling my blog. Nothing technical prevents Google from doing so. The overall structure is fine, no security issues or other issues (like phishing or other fraudulent activities) are done under this domain.
So why isn't Google showing my blog!? Especially since all other search engines don't seem to have an issue with my site.
Requesting validation
It also didn't help that Google itself had technical issues which prevented the page indexing report from being up-to-date. Instead I had to work with old data at that time.
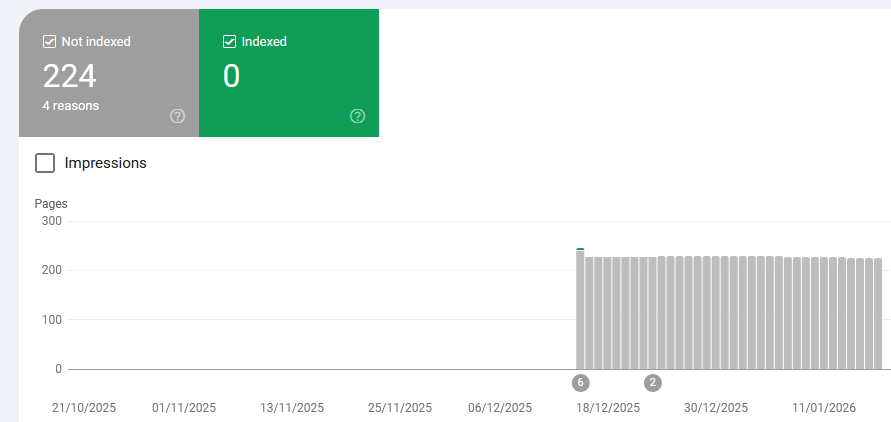
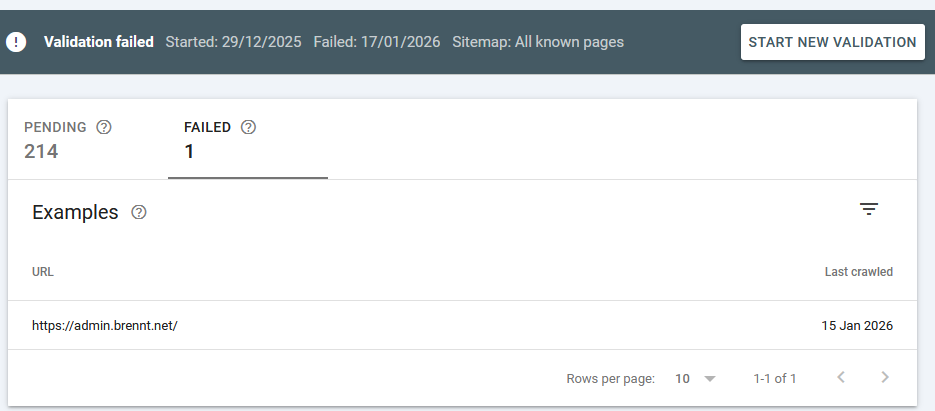
I submitted my Sitemap and hoped that this will fix the issue. Alas it didn't. While the sitemap was retrieved and processed near instantly and showed a Success-Status along with the info that it discovered 124 pages... None of them were added.
I requested a re-validation and the search console told me it can take a while (they stated around 2 weeks, but mine took more like 3-4 weeks).
Fast-forward to January 17th 2026 and the result was in: "Validation failed"
What this means is explained here: https://support.google.com/webmasters/answer/7440203#validation
The reason is not really explained, but I took with me the following sentence:
You should prioritize fixing issues that are in validation state "failed" or "not started" and source "Website".
So I went to fix the "Duplicate without user-selected canonical" problem, as all others (404, noindex) are either no problems or are there intentionally. This shouldn't be a problem however, as Google itself writes the following regarding validation:
It might not always make sense to fix and validate a specific issue on your website: for example, URLs blocked by robots.txt are probably intentionally blocked. Use your judgment when deciding whether to address a given issue.
With that being fixed, I requested another validation in mid-January 2026. And now I have to wait another 2-8 weeks. *sigh*
A sudden realization
And then it hit me. I vaguely remember that Google scores pages based on links from other sites. Following the mantra: "If it's good quality content, people will link to it naturally." My blog isn't big. I don't have that many backlinks. And I don't to SEO/SEM.
But my blog was available under at least one domain which had a bit of backlink traffic - traffic I can still see in my webserver logs today!
Remember how my blog's content was first also reachable under this domain? Yep. My content was indexed under this domain. Then I changed the webserver config so that this isn't the case anymore. Now I send a proper HTTP-410 "Gone". With that... Did I nuke all the (borrowed) reputation my blog did possess?
If that should be the case (I have yet to dig into this topic..) the question will likely be: How does Google treat a site which backlinks vanished, or more technical, how to properly move content from one domain to another. And is there anything I can do afterwards to fix this, if I did it wrong.
Anything else?
If you are familiar with the topic and have an idea what I can check, feel free to comment. As currently I'm at my wits end.