Integrating Isso into Bludit via Apache2 and WSGI

Photo by Sébastien BONNEVAL: https://www.pexels.com/photo/women-posting-notes-on-brown-board-7393948/
Isso is a comment system designed to be included in static sites. As Bludit is a static site generator and has no comment system on its own this is a perfect fit. 😀 Also the comments are stored in a local SQLite DB which means all data stays locally on this server and no external account registration is required.
Comment moderation is of course possible via a small admin backend.
Introduction
I actually tried to separate methods of setting up and integrating Isso in my Bludit instance.
The start was always a Python virtualenv as I didn't want to install all packages and libraries system-wide. After that, I tried two approaches as I wasn't sure which one I liked better.
First approach:
- Python virtualenv
- Isso started via Systemd Unit on localhost:8080
ProxyPass&ProxyPassReversedirectives in the Apache vHost configuration forwarding the relevant URIs to Isso on http://localhost:8080
Second approach:
- Python virtualenv
- Isso integrated via mod_wsgi into Apache
In the end, I went with the second approach as it spared me a Systemd Unit and activating the mod_proxy & mod_proxy_http in Apache. Also the whole integration was done with one WSGI file and 8 lines in the vHost.
But as I got both to a working condition I document them here nonetheless.
Creating the Python virtualenv
Creating the virtualenv is a necessary step for both paths. Generally, you can omit it if you want to install the Python packages system-wide, but as I'm still testing the software I didn't want this.
Here I followed the Install from PyPi documentation from Isso.
root@admin ~# mkdir /opt/isso
root@admin ~# apt-get install python3-dev python3-virtualenv sqlite3 build-essential
# Switching back to our non-root user
root@admin ~# exit
user@admin:~$ cd /opt/isso
user@admin:/opt/isso$ virtualenv --download /opt/isso
user@admin:/opt/isso$ source /opt/isso/bin/activate
(isso) user@admin:/opt/isso$ pip install isso

# After that I ran an upgrade for isso to get the latest package
(isso) user@admin:/opt/isso$ pip install --upgrade isso

# Also we can already create an directory for the SQLite DB where the comments get stored
# Note: This MUST be writeable by the user running isso. So either the user the Systemd unit runs under, or, in my case: the Apache2 user
(isso) user@admin:/opt/isso$ mkdir /opt/isso/db

# To change the ownership I need to become root again
# I choose www-data:adm to allow myself write-access as the used non-root user is part of that group
root@admin ~# chown www-data:adm/opt/isso/db
root@admin ~# chmod 775 /opt/isso/db
With pip list we can get an overview of all installed packages and their versions.
(isso) user@admin:/opt/isso$ pip list
Package       Version
------------- -------
bleach        6.1.0
cffi          1.16.0
html5lib      1.1
isso          0.13.0
itsdangerous  2.2.0
jinja2        3.1.4
MarkupSafe    2.1.5
misaka        2.1.1
pip           20.3.4
pkg-resources 0.0.0
pycparser     2.22
setuptools    44.1.1
six           1.16.0
webencodings  0.5.1
werkzeug      3.0.3
wheel         0.34.2
Isso configuration file
My isso.cfg looked like the following. The documentation is here: https://isso-comments.de/docs/reference/server-config/
(isso) user@admin:/opt/isso$ cat isso.cfg
[general]
dbpath = /opt/isso/db/comments.db
host = https://admin.brennt.net/
max-age = 15m
log-file = /var/log/isso/isso.log
[moderation]
enabled = true
approve-if-email-previously-approved = false
purge-after = 30d
[server]
listen = http://localhost:8080/
public-endpoint = https://admin.brennt.net/isso
[guard]
enabled = true
ratelimit = 2
direct-reply = 3
reply-to-self = false
require-author = true
require-email = false
[markup]
options = strikethrough, superscript, autolink, fenced-code
[hash]
salt = Eech7co8Ohloopo9Ol6baimi
algorithm = pbkdf2
[admin]
enabled = true
password = YOUR-PASSWORD-HERE
This meant I needed to create the /var/log/isso directory and set the appropriate rights.
But I want to raise your attention towards the following line public-endpoint = https://admin.brennt.net/isso here I added /isso to the host as else we will run in problems as both Isso and Bludit are using the /admin URI for backend access.
While this can be changed in Isso when you hack the code and, as far as it could tell, also in Bludit. I didn't want to do this, as these are modifications which will always cause additional work when an update of either Isso or Bludit is done. Therefore I added the /isso URI and adapted the ReverseProxy/WSGI configuration accordingly. Then everything works out of the box.
Decide how to proceed
Now you need to decide if you want to go with the first or second approach. Depending on this either start with point 1a) Creating the Systemd unit file or 2) Apache2 + WSGI configuration
1a) Creating the Systemd unit file
The following unit file will start Isso. Store it under /etc/systemd/system/isso.service.
[Unit]
Description=Isso Comment Server

[Service]
Type=simple
User=user
WorkingDirectory=/opt/isso
ExecStart=/opt/isso/bin/isso -c /opt/isso/isso.cfg
Restart=on-failure
RestartSec=5

[Install]
WantedBy=multi-user.target
Then activate it and start the service.
root@admin /opt/isso # vi /etc/systemd/system/isso.service
root@admin /opt/isso # systemctl daemon-reload
root@admin /opt/isso # systemctl start isso.service
root@admin /opt/isso # systemctl status isso.service
● isso.service - Isso Comment Server
     Loaded: loaded (/etc/systemd/system/isso.service; enabled; vendor preset: enabled)
     Active: active (running) since Wed 2024-07-24 23:19:48 CEST; 1s ago
   Main PID: 1272753 (isso)
      Tasks: 2 (limit: 9489)
     Memory: 24.1M
        CPU: 191ms
     CGroup: /system.slice/isso.service
             └─1272753 /opt/isso/bin/python /opt/isso/bin/isso -c /opt/isso/isso.cfg

Jul 24 23:19:48 admin systemd[1]: Started Isso Comment Server.
Jul 24 23:19:48 admin isso[1272753]: 2024-07-24 23:19:48,475 INFO: Using configuration file '/opt/isso/isso.cfg'
The logfile should now also have an entry that the service is started:
root@admin /opt/isso # cat /var/log/isso/isso.log
Using database at '/opt/isso/db/comments.db'
connected to https://admin.brennt.net/
1b) Writing the Apache2 ReverseProxy configuration
This is the relevant part of the Apache ReverseProxy configuration.
Note: I used the ReverseProxy configuration before adding the /isso URI to the public-endpoint parameter in the isso.cfg. I adapted the ProxyPass and ProxyPassReverse rules accordingly, but these may not worked as displayed here and you have to troubleshoot it a bit yourself.
# Isso comments directory
<Directory /opt/isso/>
        Options -Indexes +FollowSymLinks -MultiViews
        Require all granted
</Directory>

<Proxy *>
        Require all granted
</Proxy>

ProxyPass "/isso/" "http://localhost:8080/isso/"
ProxyPassReverse "/isso/" "http://localhost:8080/isso/"
ProxyPass "/isso/isso-admin/" "http://localhost:8080/isso/admin/"
ProxyPassReverse "/isso/isso-admin/" "http://localhost:8080/isso/admin/"
ProxyPass "/isso/login" "http://localhost:8080/isso/login"
ProxyPassReverse "/isso/login" "http://localhost:8080/isso/login"
After a configtest we restart apache2.
root@admin ~# apache2ctl configtest
Syntax OK
root@admin ~# systemctl restart apache2.service
Now that this part is complete, continue with point 3) Integrating Isso into Bludit.
2) Apache2 + WSGI configuration
WSGI has the benefit that we can offer our Python application via Apache with no changes to the application and have it easily accessible via HTTP(S). As this is the first WSGI application on this server I need to install and activate mod_wsgi for Apache2 and create the isso.wsgi file which is used by mod_wsgi to load the application.
This is my changed /opt/isso/isso.wsgi file.
import os
import site
import sys

# Remember original sys.path.
prev_sys_path = list(sys.path)

# Add the new site-packages directory.
site.addsitedir("/opt/isso/lib/python3.9/site-packages")

# Reorder sys.path so new directories at the front.
new_sys_path = []
for item in list(sys.path):
    if item not in prev_sys_path:
        new_sys_path.append(item)
        sys.path.remove(item)
sys.path[:0] = new_sys_path

from isso import make_app
from isso import dist, config

application = make_app(
config.load(
    config.default_file(),
    "/opt/isso/isso.cfg"))
Installing mod_wsgi, as there is an apache2_invoke in Debian I don't need to activate the module via a2enmod wsgi.
root@admin ~# apt-get install libapache2-mod-wsgi-py3
Reading package lists... Done
Building dependency tree... Done
Reading state information... Done
The following NEW packages will be installed:
  libapache2-mod-wsgi-py3
0 upgraded, 1 newly installed, 0 to remove and 0 not upgraded.
Need to get 99.5 kB of archives.
After this operation, 292 kB of additional disk space will be used.
Get:1 http://deb.debian.org/debian bullseye/main amd64 libapache2-mod-wsgi-py3 amd64 4.7.1-3+deb11u1 [99.5 kB]                                                                                                       Fetched 99.5 kB in 0s (3,761 kB/s)
Selecting previously unselected package libapache2-mod-wsgi-py3.                                                                                                                                                     (Reading database ... 57542 files and directories currently installed.)
Preparing to unpack .../libapache2-mod-wsgi-py3_4.7.1-3+deb11u1_amd64.deb ...
Unpacking libapache2-mod-wsgi-py3 (4.7.1-3+deb11u1) ...
Setting up libapache2-mod-wsgi-py3 (4.7.1-3+deb11u1) ...
apache2_invoke: Enable module wsgi
Then we add the necessary Directory & WSGI directives to the vHost:
# Isso comments directory
<Directory /opt/isso/>
        Options -Indexes +FollowSymLinks -MultiViews
        Require all granted
</Directory>

# For isso comments
WSGIDaemonProcess isso user=www-data group=www-data threads=5
WSGIScriptAlias /isso /opt/isso/isso.wsgi
After an configtest we restart apache2.
root@admin ~# apache2ctl configtest
Syntax OK
root@admin ~# systemctl restart apache2.service
Now that this part is complete, continue with point 3) Integrating Isso into Bludit.
3) Integrating Isso into Bludit
Now we need to integrate Isso into Bludit in two places:
- The
<script>-Tag containing the configuration and necessary Javascript code - The
<section>-Tag which will actually display the comments and comment form.
For 1. we need to find a place which is always loaded. No matter if we are on the main side or view a single article. For point 2 we must identify the part which renders single page articles and add it after the article.
These places are of course depending on the theme you use. As I use the Solen-Theme for Bludit I can use the following places:
- File
bl-themes/solen-1.2/php/header-library.php, after line 28 add the<script>-Tag.-
[...]
<link rel="preload" href="https://fonts.googleapis.com/css2?family=Quicksand:wght@300;400;500;600;700&display=swap" as="style" onload="this.onload=null;this.rel='stylesheet'"><noscript><link href="https://fonts.googleapis.com/css2?family=Quicksand:wght@300;400;500;600;700&display=swap" rel="stylesheet"></noscript>

<script data-isso="/isso/"
        data-isso-css="true"
        data-isso-css-url="null"
        data-isso-lang="en"
        data-isso-max-comments-top="10"
        data-isso-max-comments-nested="5"
        data-isso-reveal-on-click="5"
        data-isso-sorting="newest"
        data-isso-avatar="true"
        data-isso-avatar-bg="#f0f0f0"
        data-isso-avatar-fg="#9abf88 #5698c4 #e279a3 #9163b6 ..."
        data-isso-vote="true"
        data-isso-vote-levels=""
        data-isso-page-author-hashes="f124cf6b2f01,7831fe17a8cd"
        data-isso-reply-notifications-default-enabled="false"
        src="/isso/js/embed.min.js"></script>

<!-- Load Bludit Plugins: Site head -->
<?php Theme::plugins('siteHead'); ?>
-
- File
bl-themes/solen-1.2/php/page.php, line 12. This file takes care of displaying the content for single page articles. To add the comments and comment form, we need to place the<section>-Tag after the<div class="article_spacer"></div>-Tag. By doing that we have a the Tag-List and a small horizontal line as optical separator between content and comments.
-
Change:
</article> <div class="article_spacer"></div> </div> <div class="section_wrapper"> - To:
                </article>
                <div class="article_spacer"></div>
                <section id="isso-thread">
                    <noscript>Javascript needs to be activated to view comments.</noscript>
                </section>
            </div>
            <div class="section_wrapper">
-
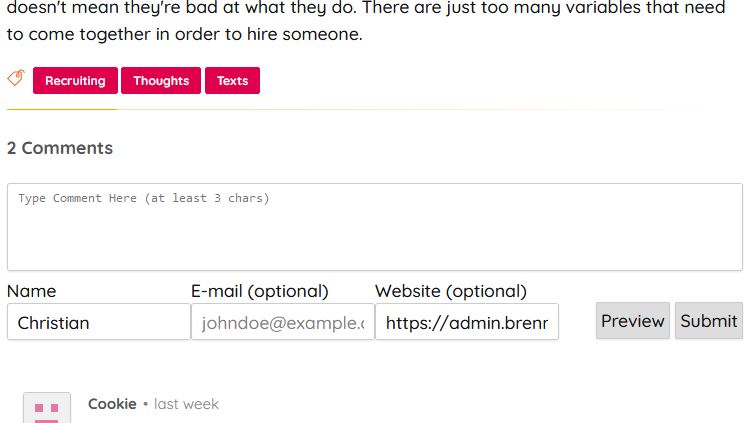
After a reload you should see the comment form below your article content, but above the article tags.
Like in this example screenshot:
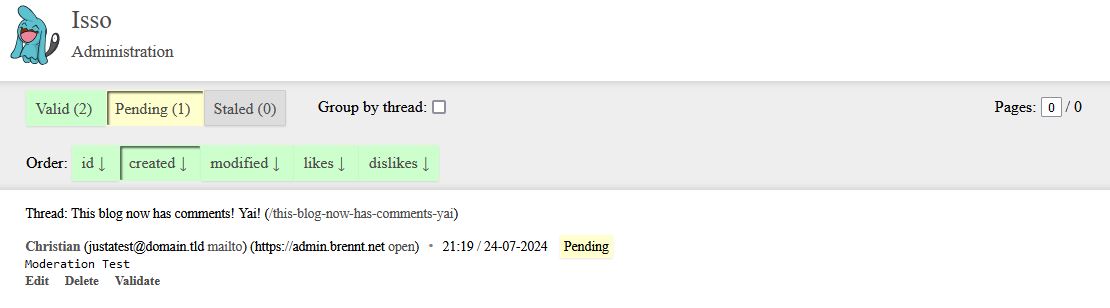
Admin backend
A picture says more than a dozen sentences, so here is a screenshot of the Admin backend with a comment awaiting moderation. Using my configuration you can access it via http://host.domain.tld/isso/admin/.
Changing the /admin URI for Isso
Issos admin backend is reachable via /admin per-default. If, for whatever reason, you can't set public-endpoint = https://host.domain.tld/prefix with a prefix of your choice, but have to use host.domain.tld, this can still be changed in the source code.
Note: The following line numbers are for version 0.13.0 and change can at anytime. Also I haven't tested this thoroughly, so go with this at your own risk.
Grep'ing for /admin we learn that this is defined in the site-packages/isso/views/comments.py (NOT site-packages/isso/db/comments.py) file.
# Finding the right comments.py
(isso) user@admin:/opt/isso$ find . -type f -wholename *views/comments.py
./lib/python3.9/site-packages/isso/views/comments.py
Now open ./lib/python3.9/site-packages/isso/views/comments.py with your texteditor of choice and navigate to line 113 and 1344.
Line 113:
Change: ('admin', ('GET', '/admin/'))
    To: ('admin', ('GET', '/isso-admin/'))
Line 1344:
Change: '/admin/',
To: '/isso-admin/',Of course you can change /isso-admin/ to anything you like. But keep in mind this will be overwritten once you update Isso.
Troubleshooting
AH01630: client denied by server configuration
[authz_core:error] [pid 1257781:tid 1257781] AH01630: client denied by server configuration: /opt/isso/isso.wsgiThis error was easy to fix. I simply forgot the needed Directory directive in my Apaches vHost configuration.
Adding the following block to the vHost fixed that:
# Isso comments directory
<Directory /opt/isso/>
        Options -Indexes +FollowSymLinks -MultiViews
        Require all granted
</Directory>
ModuleNotFoundError: No module named 'isso'
This one is easy to fix and was just an oversight on my end. I forgot to change the example path to the site-packages directory from my virtualenv. Hence the install isso package couldn't be located.
[wsgi:error] [pid 1258908:tid 1258908] mod_wsgi (pid=1258908): Failed to exec Python script file '/opt/isso/isso.wsgi'.
[wsgi:error] [pid 1258908:tid 1258908] mod_wsgi (pid=1258908): Exception occurred processing WSGI script '/opt/isso/isso.wsgi'.
[wsgi:error] [pid 1258908:tid 1258908] Traceback (most recent call last):
[wsgi:error] [pid 1258908:tid 1258908]   File "/opt/isso/isso.wsgi", line 3, in <module>
[wsgi:error] [pid 1258908:tid 1258908]     from isso import make_app
[wsgi:error] [pid 1258908:tid 1258908] ModuleNotFoundError: No module named 'isso'
I changed the following:
# Add the new site-packages directory.
site.addsitedir("/path/to/isso_virtualenv")
To the correct path:
# Add the new site-packages directory.
site.addsitedir("/opt/isso/lib/python3.9/site-packages")
Your path can of course be different. Just execute an find . -type d -name site-packages inside your virtualenv and you should get the correct path as result.
SyntaxError: unexpected EOF while parsing
On https://isso-comments.de/docs/reference/deployment/#mod-wsgi Isso lists some WSGI example config files to work with. However all but one have a crucial syntax error: A missing closing bracket at the end.
If you get an error like this:
[wsgi:error] [pid 1259079:tid 1259079] mod_wsgi (pid=1259079, process='', application='admin.brennt.net|/isso'): Failed to parse Python script file '/opt/isso/isso.wsgi'.
[wsgi:error] [pid 1259079:tid 1259079] mod_wsgi (pid=1259079): Exception occurred processing WSGI script '/opt/isso/isso.wsgi'.
[wsgi:error] [pid 1259079:tid 1259079]    File "/opt/isso/isso.wsgi", line 14
[wsgi:error] [pid 1259079:tid 1259079]
[wsgi:error] [pid 1259079:tid 1259079]     ^
[wsgi:error] [pid 1259079:tid 1259079] SyntaxError: unexpected EOF while parsing
Be sure to check if every opening bracket has a closing one. Usually you just need to add one ) at the end of the last line and that's it.
SystemError: ffi_prep_closure(): bad user_data (it seems that the version of the libffi library seen at runtime is different from the 'ffi.h' file seen at compile-time)
This one baffled me at first and I had to search for an answer. Luckily StackOverflow came to the rescue: https://stackoverflow.com/a/70694565
The solution was rather easy. First install the libffi-dev package, than recompile the cffi with the command in the answer inside the virtualenv. After that the error was gone.
root@admin /opt/isso # apt-get install libffi-dev
Reading package lists... Done
Building dependency tree... Done
Reading state information... Done
The following NEW packages will be installed:
  libffi-dev
0 upgraded, 1 newly installed, 0 to remove and 0 not upgraded.
Need to get 56.5 kB of archives.
After this operation, 308 kB of additional disk space will be used.
Get:1 http://deb.debian.org/debian bullseye/main amd64 libffi-dev amd64 3.3-6 [56.5 kB]
Fetched 56.5 kB in 0s (2,086 kB/s)
Selecting previously unselected package libffi-dev:amd64.
(Reading database ... 57679 files and directories currently installed.)
Preparing to unpack .../libffi-dev_3.3-6_amd64.deb ...
Unpacking libffi-dev:amd64 (3.3-6) ...
Setting up libffi-dev:amd64 (3.3-6) ...
Processing triggers for man-db (2.9.4-2) ...
Then switch back to the non-root user for the virtualenv and recompile the package.
(isso) user@admin:/opt/isso$ pip install --force-reinstall --no-binary :all: cffi
Collecting cffi
  Using cached cffi-1.16.0.tar.gz (512 kB)
  Installing build dependencies ... done
  Getting requirements to build wheel ... done
    Preparing wheel metadata ... done
Collecting pycparser
  Using cached pycparser-2.22.tar.gz (172 kB)
Skipping wheel build for pycparser, due to binaries being disabled for it.
Building wheels for collected packages: cffi
Building wheel for cffi (PEP 517) ... done
  Created wheel for cffi: filename=cffi-1.16.0-cp39-cp39-linux_x86_64.whl size=379496 sha256=cd91c1e57d0f3b6e5d23393c0aa436da657cd738262ab29d13ab665b2ad2a66c
Stored in directory: /home/user/.cache/pip/wheels/49/dd/bc/ce13506ca37e8052ad8f14cdfc175db1b3943e5d7bce7718e3
Successfully built cffi
Installing collected packages: pycparser, cffi
  Attempting uninstall: pycparser
    Found existing installation: pycparser 2.22
    Uninstalling pycparser-2.22:
      Successfully uninstalled pycparser-2.22
    Running setup.py install for pycparser ... done
  Attempting uninstall: cffi
    Found existing installation: cffi 1.16.0
    Uninstalling cffi-1.16.0:
      Successfully uninstalled cffi-1.16.0
Successfully installed cffi-1.16.0 pycparser-2.22
TypeError: load() got an unexpected keyword argument 'multiprocessing'
On https://isso-comments.de/docs/reference/deployment/#mod-wsgi Isso lists some WSGI example config files to work with. Using them brought up this error message.
To my shame I couldn't fix this one. From my understanding the syntax, etc. was correct but I couldn't find any really helpful answer. Therefore I remove that from the provided WSGI files and the error vanished.
Note: The missing closing bracket at the end has already been added here.
import os
import site
import sys

# Remember original sys.path.
prev_sys_path = list(sys.path)

# Add the new site-packages directory.
site.addsitedir("/path/to/isso_virtualenv")

# Reorder sys.path so new directories at the front.
new_sys_path = []
for item in list(sys.path):
    if item not in prev_sys_path:
        new_sys_path.append(item)
        sys.path.remove(item)
sys.path[:0] = new_sys_path

from isso import make_app
from isso import dist, config

application = make_app(
config.load(
    config.default_file(),
    "/path/to/isso.cfg"))
Other articles
- Adding Isso Comments to Hugo: https://stiobhart.net/2017-02-24-isso-comments/
- How to Install Isso on Debian Latest: https://ipv6.rs/tutorial/Debian_Latest/Isso/
- Deploying Isso Commenting System Under Nginx With Docker: https://linuxhandbook.com/deploy-isso-comment/
- Comments for a static website with ISSO: https://tobru.ch/comments-for-a-static-website-with-isso/
Alternatives
I also found Remark42 (Official Website, GitHub) and might try that at a later time. So if Isso isn't after your liking, maybe have a look at that one.