I run a Pi-hole installation on each of my Raspberry 3 & 4. As I do like to keep my DNS queries as much under my control as I can, I also installed Unbound to serve as recursive DNS server. This way all DNS queries will be handled by my Raspberry Pis.
Pi-hole is already installed using one of the following methods: https://github.com/pi-hole/pi-hole/#one-step-automated-install. If you don't have that done yet, do it first.
There is a good guide at the Pi-hole website which I will basically following.
https://docs.pi-hole.net/guides/dns/unbound/
root@host:~# apt install unbound
Regarding the configuration file I go with the one in the guide. However as I did have some problems in that past I needed to troubleshoot I include the following lines regarding loglevels and verbosity:
root@host:~# head /etc/unbound/unbound.conf.d/pihole.conf
server:
    # If no logfile is specified, syslog is used
    logfile: "/var/log/unbound/unbound.log"
    val-log-level: 2
    # Default is 1
    #verbosity: 4
    verbosity: 1

    interface: 127.0.0.1
    port: 5335
root@host:~#
You can add that if you want but it's not needed to make Unbound work.
Next the guide tells us to download the root hints. A file maintained by Internic which contains information about the 13 DNS root name servers. Under Debian we don't need to download the named.root file from Internic as shown in the guide. Debian has its own package for that: dns-root-data.
It no only contains information about the 13 DNS root name servers but also the needed DNSSEC keys (also called root trust anchors). And together with unattended-upgrades we even automate updating that. Saving us the creation of a Cronjob or systemd timer.
root@host:~# apt install dns-root-data
In order for Unbound to have a directory and logfile to write into we need to create that:
root@host:~# mkdir -p /var/log/unbound
root@host:~# touch /var/log/unbound/unbound.log
root@host:~# chown unbound /var/log/unbound/unbound.log
As we are running under Debian we now need to tweak the Unbound config a little bit. Else we will get problems with DNSSEC. For this we are deleting a Debian generated file from Unbound and comment out the unbound_conf= line in /etc/resolvconf.conf so that it isn't included anymore.
root@host:~# sed -Ei 's/^unbound_conf=/#unbound_conf=/' /etc/resolvconf.conf
root@host:~# rm /etc/unbound/unbound.conf.d/resolvconf_resolvers.conf
Now all that is left is restarting Unbound.
root@host:~# systemctl restart unbound.service
Testing DNS resolution:
root@host:~# dig pi-hole.net @127.0.0.1 -p 5335

; <<>> DiG 9.18.33-1~deb12u2-Raspbian <<>> pi-hole.net @127.0.0.1 -p 5335
;; global options: +cmd
;; Got answer:
;; ->>HEADER<<- opcode: QUERY, status: NOERROR, id: 46191
;; flags: qr rd ra; QUERY: 1, ANSWER: 1, AUTHORITY: 0, ADDITIONAL: 1

;; OPT PSEUDOSECTION:
; EDNS: version: 0, flags:; udp: 1232
;; QUESTION SECTION:
;pi-hole.net.                   IN      A

;; ANSWER SECTION:
pi-hole.net.            300     IN      A       3.18.136.52

;; Query time: 169 msec
;; SERVER: 127.0.0.1#5335(127.0.0.1) (UDP)
;; WHEN: Sun May 25 18:21:25 CEST 2025
;; MSG SIZE  rcvd: 56
And to verify & falsify DNSSEC. This request must return an A-Record for dnssec.works.
root@host:~# dig dnssec.works @127.0.0.1 -p 5335

; <<>> DiG 9.18.33-1~deb12u2-Raspbian <<>> dnssec.works @127.0.0.1 -p 5335
;; global options: +cmd
;; Got answer:
;; ->>HEADER<<- opcode: QUERY, status: NOERROR, id: 14076
;; flags: qr rd ra ad; QUERY: 1, ANSWER: 1, AUTHORITY: 0, ADDITIONAL: 1

;; OPT PSEUDOSECTION:
; EDNS: version: 0, flags:; udp: 1232
;; QUESTION SECTION:
;dnssec.works.                  IN      A

;; ANSWER SECTION:
dnssec.works.           3600    IN      A       46.23.92.212

;; Query time: 49 msec
;; SERVER: 127.0.0.1#5335(127.0.0.1) (UDP)
;; WHEN: Sun May 25 18:22:52 CEST 2025
;; MSG SIZE  rcvd: 57
This request will not result in an A-Record.
root@host:~# dig fail01.dnssec.works @127.0.0.1 -p 5335

; <<>> DiG 9.18.33-1~deb12u2-Raspbian <<>> fail01.dnssec.works @127.0.0.1 -p 5335
;; global options: +cmd
;; Got answer:
;; ->>HEADER<<- opcode: QUERY, status: SERVFAIL, id: 1552
;; flags: qr rd ra; QUERY: 1, ANSWER: 0, AUTHORITY: 0, ADDITIONAL: 1

;; OPT PSEUDOSECTION:
; EDNS: version: 0, flags:; udp: 1232
;; QUESTION SECTION:
;fail01.dnssec.works.           IN      A

;; Query time: 19 msec
;; SERVER: 127.0.0.1#5335(127.0.0.1) (UDP)
;; WHEN: Sun May 25 18:23:41 CEST 2025
;; MSG SIZE  rcvd: 48
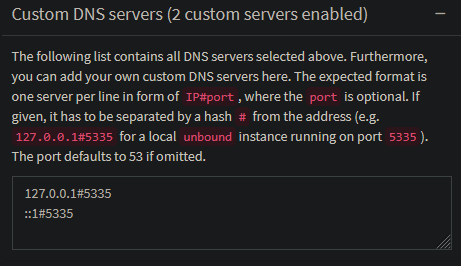
Now all that is left to connect our Pi-hole with Unbound. Logon to your Pi-hole website and navigate to Settings -> DNS. Expand the line Custom DNS servers and enter to IP and Port to our Unbound server. 127.0.0.1#5335 for IPv4 and ::1#5335 for IPv6. If you don't use one of these two just don't add the line. After that hit "Save & Apply" and we are done.
Creating a logrotate config for Unbound
Sadly Unbound still doesn't deliver a logrotate config with its package. Therefore I just copy & paste from my previous article Howto properly split all logfile content based on timestamps - and realizing my own fallacy.
root@host:~# cat /etc/logrotate.d/unbound
/var/log/unbound/unbound.log {
        monthly
        missingok
        rotate 12
        compress
        delaycompress
        notifempty
        sharedscripts
        create 644
        postrotate
                /usr/sbin/unbound-control log_reopen
        endscript
}
Troubleshooting
fail01.dnssec.works timed out
The host fail01.dnssec.works tends to not answer requests sometimes. Others noticed this too. dig will only show the following message:
root@host:~# dig fail01.dnssec.works @127.0.0.1 -p 5335
;; communications error to 127.0.0.1#5335: timed out
;; communications error to 127.0.0.1#5335: timed out
;; communications error to 127.0.0.1#5335: timed out

; <<>> DiG 9.18.33-1~deb12u2-Raspbian <<>> fail01.dnssec.works @127.0.0.1 -p 5335
;; global options: +cmd
;; no servers could be reached
If that is the case, just execute the command again. Usually it will work the second time. Or just wait a few minutes. Sometimes the line ;; communications error to 127.0.0.1#5335: timed out will be printed, but the dig query will work after that nonetheless.