Feuerfest

Just the private blog of a Linux sysadmin

Why too many automatisms in DNS are bad (Pi-hole, FTL (dns.reply.host), mDNS/Avahi, etc.)

A small pre-preface for users who followed the "Ultimate Pi-hole Setup" tutorial from the YouTuber WunderTech

If you used the configuration files he provided on his homepage: https://www.wundertech.net/ultimate-pi-hole-setup/ you will experience the exact same problems sooner or later.

The reason is that the VIPs from keepalived are not bound on a separate dummy interface and hence the pihole-FTL process will take them into account when dynamically building the hostname and choosing the "correct IPs".

You HAVE to at least enable dns.reply.host in the /etc/pihole/pihole.toml to mark the static IP used for the server Pi-hole is running on.

Jump to The solution if you are not interested in the details.

Preface

One of the main reasons why I have my homelab is to hone my skills. And today was a day this happened.

From my one of my LAN hosts I wanted to connect to my Raspberry4 (raspi4.lan, IP: 192.168.178.8) via SSH. This host is configured as the secondary/backup instance in keepalived for the DNS VIP (192.168.178.100).

The reality however was different:

user@lanadmin:~$ ssh raspi4.lan
@@@@@@@@@@@@@@@@@@@@@@@@@@@@@@@@@@@@@@@@@@@@@@@@@@@@@@@@@@@
@    WARNING: REMOTE HOST IDENTIFICATION HAS CHANGED!     @
@@@@@@@@@@@@@@@@@@@@@@@@@@@@@@@@@@@@@@@@@@@@@@@@@@@@@@@@@@@
IT IS POSSIBLE THAT SOMEONE IS DOING SOMETHING NASTY!
Someone could be eavesdropping on you right now (man-in-the-middle attack)!
It is also possible that a host key has just been changed.
The fingerprint for the ED25519 key sent by the remote host is
SHA256:xxxxxxxxxxxxxxxxxxxxxxxxxxxxxxxxxxxxx
Please contact your system administrator.
Add correct host key in /home/user/.ssh/known_hosts to get rid of this message.
Offending ECDSA key in /home/user/.ssh/known_hosts:10
  remove with:
  ssh-keygen -f '/home/user/.ssh/known_hosts' -R 'raspi4.lan'
Host key for raspi4.lan has changed and you have requested strict checking.
Host key verification failed.
user@lanadmin:~$  ssh-keygen -f '/home/user/.ssh/known_hosts' -R 'raspi4.lan'
# Host raspi4.lan found: line 8
# Host raspi4.lan found: line 9
# Host raspi4.lan found: line 10
/home/user/.ssh/known_hosts updated.
Original contents retained as /home/user/.ssh/known_hosts.old

Granted I don't log on often onto raspi4.lan as everything is automated and monitored and the Pi-hole config is synced via Nebula-Sync from raspi3.lan. So I suspected I didn't purge the entries related to raspi4.lan from my ~/.ssh/known_hosts file after I re-installed that system a while ago.

user@lanadmin:~$ ssh raspi4.lan
The authenticity of host 'raspi4.lan (ULA:ffff)' can't be established.
ED25519 key fingerprint is SHA256:xxxxxxxxxxxxxxxxxxxxxxxxxxxxxxxxxxxxxxxxxx
This host key is known by the following other names/addresses:
    ~/.ssh/known_hosts:5: raspi3.lan
    ~/.ssh/known_hosts:12: 192.168.178.9
Are you sure you want to continue connecting (yes/no/[fingerprint])? yes
Warning: Permanently added 'raspi4.lan' (ED25519) to the list of known hosts.
Linux raspi3 6.1.21-v8+ #1642 SMP PREEMPT Mon Apr  3 17:24:16 BST 2023 aarch64
###############################
## Primary Pi-hole instance! ##
###############################
Last login: Fri Jul 24 21:46:36 2026 from w.x.y.z

user@raspi3:~$

Huh? How did I end up on raspi3.lan, when I clearly entered raspi4.lan as the host to connect to? Something is very wrong.

Sadly I overlooked that the IP SSH provided did list the IPv6 VIP (ending in :ffff) which is plain wrong, but it shouldn't take long for me to discover that..

Overview over the current setup

We have two Raspberry Pi's in this setup. 

Host A: Raspberry 3
IPv4: 192.168.178.9/24
IPv6: ULA:9/64
Hostname: raspi3.lan
Keepalived: Primary

Host B: Raspberry 4
IPv4: 192.168.178.8/24
IPv6: ULA:8/64
Hostname: raspi4.lan
Keepalived: Secondary

The three used VIPs are:
VIPv4: 192.168.178.100/32 (DNS: pihole.lan) and 192.168.178.101/32 unused, just for testing
VIPv6: ULA:ffff/128 (DNS: pihole.lan)

Both Raspberries run a Pi-hole instance with unbound and keepalived. The VIPs are automatically configured on eth0 on the primary instance. raspi3.lan has the primary keepalived role.

It's always DNS™

At first I suspected that I screwed up when I created my local DNS entries, but no the Local DNS records in my Pi-Hole setup are fine. The IPs for the hosts and vip match. The config is synced with nebula-sync from raspi3.lan to raspi4.lan, so no room for typos there. Nevertheless I accessed both WebUIs and checked independently, wouldn't be the first time a sync-mechanism failed. However, everything was in order.

A dig however showed the problem clearly:

root@lanadmin:~# dig -t a raspi3.lan +noall +answer
raspi3.lan.             0       IN      A       192.168.178.9
root@lanadmin:~# dig -t a raspi4.lan +noall +answer
raspi4.lan.             0       IN      A       192.168.178.100

The /etc/resolv.conf of that system is:

root@lanadmin:~# cat /etc/resolv.conf
domain lan
search lan
nameserver 192.168.178.8
nameserver 192.168.178.9

So raspi4.lan is queried first, than raspi3.lan. And I forgot to change the nameserver to the VIP...

/etc/hosts was also fine. Only standard entries for the .8 on raspi4.lan and .9 on raspi3.lan. In short: the local eth0 system IPs with the corresponding FQDN and hostname.

getent hosts however was a bit strange too. It returned the loopback address when each host asked for it's own name:

root@raspi3:~# getent hosts raspi3.lan
::1             raspi3.lan
root@raspi3:~# getent hosts raspi4.lan
192.168.178.8   raspi4.lan

root@raspi4:~# getent hosts raspi4.lan ::1 raspi4.lan root@raspi4:~# getent hosts raspi3.lan 192.168.178.9 raspi3.lan

Hence I suspected Avahi (mDNS) as it's installed and listed before the dns resolution in /etc/nsswitch.conf:

root@raspi4:~# grep hosts /etc/nsswitch.conf
hosts:          files mdns4_minimal [NOTFOUND=return] dns

But several hard facts speak against this.

  1. Avahi only works for entries ending in .local
  2. dig doesn't use libnss and therefore doesn't honor mDNS/Avahi at all, but it still showed the wrong IPs

These two facts effectively eliminated Avahi/mDNS as the source of the problem. Avahi was however responsible for returning the loopback address when the host queried for it's own IP. After all mdns4_minimal was listed before dns in /etc/nsswitch.conf. So that works as designed, but doesn't help at all during troubleshooting as it just adds to the confusion..

The hosts don't know themselves...

At my wits end I took a step back and decided to check DNS from a third host against both raspi3.lan (192.168.178.9) and raspi4.lan (192.168.178.8) how both resolve the DNS A-Records of each other.

# Querying for the IPv4 of raspi3.lan
# Against raspi3.lan
root@lanadmin:~# dig @192.168.178.9 raspi3.lan +noall +answer
raspi3.lan.             0       IN      A       192.168.178.101
# Against raspi4.lan
root@lanadmin:~# dig @192.168.178.8 raspi3.lan +noall +answer
raspi3.lan.             0       IN      A       192.168.178.9

Querying for the IPv4 of raspi4.lan

Against raspi4.lan

root@lanadmin:~# dig @192.168.178.8 raspi4.lan +noall +answer raspi4.lan. 0 IN A 192.168.178.100

Against raspi3.lan

root@lanadmin:~# dig @192.168.178.9 raspi4.lan +noall +answer raspi4.lan. 0 IN A 192.168.178.8

This is looks strange.

Whenever we ask a Raspberry itself for it's own IP we get a wrong result.
Querying 192.168.178.9 (raspi3.lan) to resolve raspi3.lan returns 192.168.178.101.
Querying 192.168.178.8 (raspi4.lan) to resolve raspi4.lan returns 192.168.178.100.

How? Avahi was ruled out. There was no DHCP at play and the static DNS entries are correct.

Something was messing with my setup.

Is it Pi-hole?

I diff'd the /etc/pihole/pihole.toml suspecting I missed something in that, as I knew that the pihole.toml isn't sync by nebula-sync, but there was nothing.

user@lanadmin:~$ diff -u <(ssh 192.168.178.8 sudo cat /etc/pihole/pihole.toml) <(ssh 192.168.178.9 sudo cat /etc/pihole/pihole.toml)
--- /dev/fd/63  2026-07-25 03:44:15.628030101 +0200
+++ /dev/fd/62  2026-07-25 03:44:15.628030101 +0200
@@ -1,7 +1,7 @@
 # Pi-hole configuration file (v6.7)
 # Encoding: UTF-8
 # This file is managed by pihole-FTL
-# Last updated on 2026-07-14 10:31:50 CEST
+# Last updated on 2026-07-24 23:26:54 CEST

[dns]

Upstream DNS Servers to be used by Pi-hole. If this is not set, Pi-hole will not

I searched a bit and stumbled upon a setting regarding FTL: dns.domain and dns.expandHosts.

  [dns.domain]
    # The DNS domain used by your Pi-hole.
    #
    # This DNS domain is purely local. FTL may answer queries from its local cache and
    # configuration but *never* forwards any requests upstream *unless* you have
    # configured a dns.revServer exactly for this domain. In the latter case, all queries
    # for this domain are sent exclusively to this server (including reverse lookups).
    #
    # For DHCP, this has two effects; firstly it causes the DHCP server to return the
[... removed as DHCP is not relevant in this case ...]
    #
    # You can disable setting a domain by setting this option to an empty string.
    #
    # Allowed values are:
    #     Any valid domain
    name = "lan"

So the FTL-Cache will be queried for records ending in .lan, which is fine as it's my local domain and requests for .lan shouldn't leave my home network. Additionally I understood the sentence "but never forwards any requests upstream" as: These requests don't even hit Unbound or dnsmasq.

expandHosts makes sure the FQDN is added to /etc/hosts. Something I already did manually (or the Debian installer).

  # If set, the domain is added to simple names (without a period) in /etc/hosts in the
  # same way as for DHCP-derived names
  #
  # Allowed values are:
  #     true or false
  expandHosts = true ### CHANGED, default = false

From what I read online pihole-FTL builds the FQDN of the local system itself completely independent from settings in /etc/hosts + dns.domain. Could this be a lead?

How do we verify the entry is actually in the cache and contains the wrong IP? Glad I asked myself! The command killall -USR1 pihole-FTL
dumps the cache entries from dnsmasq into /var/log/pihole/pihole.log.

root@raspi4:~# killall -USR1 pihole-FTL
root@raspi4:~# vi /var/log/pihole/pihole.log
Jul 25 02:49:12 dnsmasq[1147]: time 1784940552
Jul 25 02:49:12 dnsmasq[1147]: cache size 10000, 0/141 cache insertions re-used unexpired cache entries.
[...]
Jul 25 02:49:12 dnsmasq[1147]: Host        Address            Flags      Expires      Source
Jul 25 02:49:12 dnsmasq[1147]: ----------- ------------------ ---------- ------------ ------------
Jul 25 02:49:12 dnsmasq[1147]: pihole.lan  192.168.178.100    4FRI   H                /etc/pihole/hosts/custom.list
Jul 25 02:49:12 dnsmasq[1125]: raspi4.lan  192.168.178.8      4FRI   H                /etc/hosts
Jul 25 02:49:12 dnsmasq[1125]: raspi3.lan  192.168.178.9      4FRI   H                /etc/pihole/hosts/custom.list

Well, that only proves my assumption that local static DNS records are NOT honored, if the hostname matches the host on which Pi-hole is running. We can clearly see that the entry for raspi4.lan has a source of /etc/hosts and not /etc/pihole/hosts/custom.list, while the record for raspi3.lan is taken from /etc/pihole/hosts/custom.list.

This proves that some, currently unknown, automatism is at work and goes horribly wrong.

If nothing helps, try rebooting

As I had no real trace of where to look next, I now focused on trying to re-produce the issue. After all, if it was just some quirk of a non-restarted service utilizing some old file - only present in the cache of it's processes file handles.. As raspi4.lan currently was the secondary node for keepalived, it didn't own the VIPs. Hence I stopped the keepalived process on raspi3.lan, forcing a failover to raspi4.lan. After making sure raspi4.lan had the VIPs I rebooted the system.

It gets stranger...

After the reboot, in order to get a bit more insight, I executed several dig queries and watched the log simultaneously. All @ip's are IPs which are currently present on the eth0 interface of the raspi4.lan host.

Those were the commands:

root@lanadmin:~# dig @192.168.178.8 raspi4.lan +noall +answer
raspi4.lan.             0       IN      A       192.168.178.100
root@lanadmin:~# dig @192.168.178.100 raspi4.lan +noall +answer
raspi4.lan.             0       IN      A       192.168.178.100
root@lanadmin:~# dig @192.168.178.101 raspi4.lan +noall +answer
raspi4.lan.             0       IN      A       192.168.178.100

On raspi4.lan, just to have everything neatly together:

root@raspi4:~# killall -USR1 pihole-FTL

And this showed up in the logfile:

root@raspi4:~# tail -f /var/log/pihole/pihole.log |grep "raspi4.lan"
Jul 25 02:58:17 dnsmasq[1125]: query[A] raspi4.lan from 192.168.178.7
Jul 25 02:58:17 dnsmasq[1125]: Pi-hole hostname raspi4.lan is 192.168.178.100
Jul 25 02:58:17 dnsmasq[1125]: query[A] raspi4.lan from 192.168.178.7
Jul 25 02:58:17 dnsmasq[1125]: Pi-hole hostname raspi4.lan is 192.168.178.100
Jul 25 02:58:17 dnsmasq[1125]: query[A] raspi4.lan from 192.168.178.7
Jul 25 02:58:17 dnsmasq[1125]: Pi-hole hostname raspi4.lan is 192.168.178.100
Jul 25 02:58:36 dnsmasq[1125]: raspi4.lan   192.168.178.8     4FRI   H     /etc/hosts

And here I tilted a bit. Why does the log state "Pi-hole hostname raspi4.lan is 192.168.178.100" but then, just seconds later state that the IP retrieved from /etc/hosts is 192.168.178.8? At least the IP 192.168.178.100 was reliably returned for all queries towards IPs on the eth0 interface of raspi4.lan with the goal to resolve the name raspi4.lan. It wasn't some kind of race-condition nor did it feel like a bug.

And just to be sure, I tried logging into raspi4.lan from lanadmin.lan:

user@lanadmin:~$ ssh raspi4.lan
@@@@@@@@@@@@@@@@@@@@@@@@@@@@@@@@@@@@@@@@@@@@@@@@@@@@@@@@@@@
@    WARNING: REMOTE HOST IDENTIFICATION HAS CHANGED!     @
@@@@@@@@@@@@@@@@@@@@@@@@@@@@@@@@@@@@@@@@@@@@@@@@@@@@@@@@@@@
IT IS POSSIBLE THAT SOMEONE IS DOING SOMETHING NASTY!
Someone could be eavesdropping on you right now (man-in-the-middle attack)!
It is also possible that a host key has just been changed.
The fingerprint for the ED25519 key sent by the remote host is
SHA256:xxxxxxxxxxxxxxxxxxxxxxxxxxxxxxxxxxxxxxxxxxxxxxxxxxxxx.
Please contact your system administrator.
Add correct host key in /home/user/.ssh/known_hosts to get rid of this message.
Offending ED25519 key in /home/user/.ssh/known_hosts:16
  remove with:
  ssh-keygen -f '/home/user/.ssh/known_hosts' -R 'raspi4.lan'
Host key for raspi4.lan has changed and you have requested strict checking.
Host key verification failed.
user@lanadmin:~$ host raspi4.lan
raspi4.lan has address 192.168.178.100
raspi4.lan has IPv6 address fd6d:ULA:ffff

Nope, still the same problem. Only that this time I would have actually logged on to the right host, as the IP was currently owned by raspi4.lan. Nonetheless did the hostname still resolve to the wrong IP.

I had no idea why the IP kept changing. Yes, I had provided no specific IP for pihole-FTL to listen on, but this should never lead to such an behaviour. I decided to read through /etc/pihole/pihole.toml, if only to set a specific listener address and do a bit more troubleshooting.

Finally: Enlightenment

Revelation hit me, when I read the [dns.reply.host] block. The describe behaviour matched the observed one perfectly!

    [dns.reply.host]
      # Use a specific IPv4 address for the Pi-hole host? By default, FTL determines the
      # address of the interface a query arrived on and uses this address for replying to A
      # queries with the most suitable address for the requesting client.
      #
      # This setting can be used to use a fixed, rather than the dynamically obtained,
      # address when Pi-hole responds to the following names:
      # - "pi.hole"
      # - "<the device's hostname>"
      # - "pi.hole.<local domain>"
      # - "<the device's hostname>.<local domain>"
      #
      # Allowed values are:
      #     true or false
      force4 = false
  # Custom IPv4 address for the Pi-hole host
  #
  # Allowed values are:
  #     A valid IPv4 address or empty string ("")
  IPv4 = ""

  # Use a specific IPv6 address for the Pi-hole host? See description for the IPv4
  # variant above for further details.
  #
  # Allowed values are:
  #     true or false
  force6 = false

  # Custom IPv6 address for the Pi-hole host
  #
  # Allowed values are:
  #     A valid IPv6 address or empty string ("")
  IPv6 = ""</code></pre>

As it can be clearly seen, static IPs for the local hostname were disabled. This made FTL choose a new "best matching" IP for each received query. Which is such a strange mechanism to implement! Why obscure such things!?

Why design such a ... mechanism?

And then it hit me.. Novice and inexperienced users. Pi-hole is a DNS and Ad-Blocker. Primarily aimed at home users. And those lack knowledge and experience. I'm a frequent reader of subreddits like r/selfhosted or r/HomeServer so I know full well how many users struggle with IPs, interface bindings, file rights, etc. All the basic stuff one learns over time but can be pretty hard for people new to Linux.

I suspect this mechanism was developed to ease the usage of Pi-hole, to just "make it work" no matter what. Alas.. This caused way more trouble for an experienced user this way. And this is why I don't really like that they implemented this mechanism. It's just one of these automatisms which ignore standards and work without following an established process. Effectively hindering novice users to learn "How it is normally done"?

The solution

The fix was rather easy. Just enable dns.reply.host for IPv4 and IPv6 and set the corresponding IPs. Then restart the service. Done. Below is the config for raspi4.lan.

    [dns.reply.host]
      # Use a specific IPv4 address for the Pi-hole host? By default, FTL determines the
      # address of the interface a query arrived on and uses this address for replying to A
      # queries with the most suitable address for the requesting client.
      #
      # This setting can be used to use a fixed, rather than the dynamically obtained,
      # address when Pi-hole responds to the following names:
      # - "pi.hole"
      # - "<the device's hostname>"
      # - "pi.hole.<local domain>"
      # - "<the device's hostname>.<local domain>"
      #
      # Allowed values are:
      #     true or false
      force4 = true ### CHANGED, default = false
  # Custom IPv4 address for the Pi-hole host
  #
  # Allowed values are:
  #     A valid IPv4 address or empty string ("")
  IPv4 = "192.168.178.8" ### CHANGED, default = ""

  # Use a specific IPv6 address for the Pi-hole host? See description for the IPv4
  # variant above for further details.
  #
  # Allowed values are:
  #     true or false
  force6 = true ### CHANGED, default = false

  # Custom IPv6 address for the Pi-hole host
  #
  # Allowed values are:
  #     A valid IPv6 address or empty string ("")
  IPv6 = "fd6d:ULA:8" ### CHANGED, default = ""</code></pre>

Please note that I obscured parts of my ULA IPv6 address.

Why didn't I notice sooner?

Then there is always this question which creeps into ones mind: Why didn't I notice it sooner? Why did it work for so long?

At least in this case the answer is simple: I rarely need to login into these systems.

Other improvements

Dummy network interface for VIPs

Apparently it is also better to create a dummy network device and let keepalived bind the VIPs to that interface. One big advantage is that dummy interfaces don't reply to ARP-Requests at all. Which is a crucial problem in HA setup. And also one point WunderTech didn't mention with one word in his tutorial..

VRRP-Scripts to check DNS service availbility/healthiness

In the current setup keepalived will only switch to another machine if it stops sending out VRRP-Announcements, which usually only happens when a machine fails completely (power cut or really catastrophic failures). If just the pihole-FTL service, Unbound or any other piece of software - apart from keepalived - fails nothing will happen.

For this, keepalived supports the execution of VRRP-scripts. These will be executed every few seconds and are there to check service availbility/healthiness and trigger a failover if the script execution fails or doesn't exit successfully.

I plan to write a blog post about that too. When it is ready, I will link it here.
Comments

How to fix Pi-hole FTL error: EDE: DNSSEC bogus

If you are instead searching for an explanation of the error code have a look at RFC 8914.

I noticed that the DNS resolution on my secondary Pi-hole instance wasn't working. host wouldn't resolve a single DNS name. As the /etc/resolv.conf included only the DNS servers running on localhost (127.0.0.1 and ::1) DNS resolution didn't work at all. Naturally I started looking at the Pi-hole logfiles.

/var/log/pihole/pihole.log would log this for all domains.

Jun  4 00:02:54 dnsmasq[4323]: query 1.de.pool.ntp.org from 127.0.0.1
Jun  4 00:02:54 dnsmasq[4323]: forwarded 1.de.pool.ntp.org to 127.0.0.1#5335
Jun  4 00:02:54 dnsmasq[4323]: forwarded 1.de.pool.ntp.org to ::1#5335
Jun  4 00:02:54 dnsmasq[4323]: validation 1.de.pool.ntp.org is BOGUS
Jun  4 00:02:54 dnsmasq[4323]: reply error is SERVFAIL (EDE: DNSSEC bogus)

Ok that was a first hint. I checked /var/log/pihole/FTL.log and there would be this message repeated all over again.

2025-06-03 00:02:52.505 CEST [841/T22762] ERROR: Error NTP client: Cannot resolve NTP server address: Try again
2025-06-03 00:02:52.509 CEST [841/T22762] INFO: Local time is too inaccurate, retrying in 600 seconds before launching NTP server

NTP is not the culprit

I checked the local time and it matched the time on the primary Pi-hole instance. Strange. I even opened https://uhr.ptb.de/ which is the official time clock for Germany (yes, per law). And it matched to the second. timedatectl would also print the correct time for both UTC and CEST and state that the system clock is synchronized.

root@host:~# timedatectl
               Local time: Wed 2025-06-04 00:51:07 CEST
           Universal time: Tue 2025-06-03 22:51:07 UTC
                 RTC time: n/a
                Time zone: Europe/Berlin (CEST, +0200)
System clock synchronized: yes
              NTP service: active
          RTC in local TZ: no

What the heck was going on?

Unbound leftovers

I googled "EDE: DNSSEC bogus" dnsmasq and found the solution in https://www.reddit.com/r/pihole/comments/zsrjzn/2_piholes_with_unbound_breaking_dns/.

Turns out I forgot to execute two critical steps.

  1. I didn't delete /etc/unbound/unbound.conf.d/resolvconf_resolvers.conf
  2. I didn't comment out the line starting with unbound_conf= in /etc/resolvconf.conf

Or they came back, when I updated that Raspberry from Debian Bullseye to Bookworm today. Anyway after doing these two steps and restarting Unbound it now works flawlessly.

And I learned which files are not kept in sync by nebula-sync. 😉

Comments

Installing Unbound as recursive DNS server on my PiHole

I run a Pi-hole installation on each of my Raspberry 3 & 4. As I do like to keep my DNS queries as much under my control as I can, I also installed Unbound to serve as recursive DNS server. This way all DNS queries will be handled by my Raspberry Pis.

Pi-hole is already installed using one of the following methods: https://github.com/pi-hole/pi-hole/#one-step-automated-install. If you don't have that done yet, do it first.

There is a good guide at the Pi-hole website which I will basically following.

https://docs.pi-hole.net/guides/dns/unbound/

root@host:~# apt install unbound

Regarding the configuration file I go with the one in the guide. However as I did have some problems in that past I needed to troubleshoot I include the following lines regarding loglevels and verbosity:

root@host:~# head /etc/unbound/unbound.conf.d/pihole.conf
server:
    # If no logfile is specified, syslog is used
    logfile: "/var/log/unbound/unbound.log"
    val-log-level: 2
    # Default is 1
    #verbosity: 4
    verbosity: 1
interface: 127.0.0.1
port: 5335

root@host:~#

You can add that if you want but it's not needed to make Unbound work.

Next the guide tells us to download the root hints. A file maintained by Internic which contains information about the 13 DNS root name servers. Under Debian we don't need to download the named.root file from Internic as shown in the guide. Debian has its own package for that: dns-root-data.

It no only contains information about the 13 DNS root name servers but also the needed DNSSEC keys (also called root trust anchors). And together with unattended-upgrades we even automate updating that. Saving us the creation of a Cronjob or systemd timer.

root@host:~# apt install dns-root-data

In order for Unbound to have a directory and logfile to write into we need to create that:

root@host:~# mkdir -p /var/log/unbound
root@host:~# touch /var/log/unbound/unbound.log
root@host:~# chown unbound /var/log/unbound/unbound.log

As we are running under Debian we now need to tweak the Unbound config a little bit. Else we will get problems with DNSSEC. For this we are deleting a Debian generated file from Unbound and comment out the unbound_conf= line in /etc/resolvconf.conf so that it isn't included anymore.

root@host:~# sed -Ei 's/^unbound_conf=/#unbound_conf=/' /etc/resolvconf.conf
root@host:~# rm /etc/unbound/unbound.conf.d/resolvconf_resolvers.conf

Now all that is left is restarting Unbound.

root@host:~# systemctl restart unbound.service

Testing DNS resolution:

root@host:~# dig pi-hole.net @127.0.0.1 -p 5335

; <<>> DiG 9.18.33-1~deb12u2-Raspbian <<>> pi-hole.net @127.0.0.1 -p 5335 ;; global options: +cmd ;; Got answer: ;; ->>HEADER<<- opcode: QUERY, status: NOERROR, id: 46191 ;; flags: qr rd ra; QUERY: 1, ANSWER: 1, AUTHORITY: 0, ADDITIONAL: 1

;; OPT PSEUDOSECTION: ; EDNS: version: 0, flags:; udp: 1232 ;; QUESTION SECTION: ;pi-hole.net. IN A

;; ANSWER SECTION: pi-hole.net. 300 IN A 3.18.136.52

;; Query time: 169 msec ;; SERVER: 127.0.0.1#5335(127.0.0.1) (UDP) ;; WHEN: Sun May 25 18:21:25 CEST 2025 ;; MSG SIZE rcvd: 56

And to verify & falsify DNSSEC. This request must return an A-Record for dnssec.works.

root@host:~# dig dnssec.works @127.0.0.1 -p 5335

; <<>> DiG 9.18.33-1~deb12u2-Raspbian <<>> dnssec.works @127.0.0.1 -p 5335 ;; global options: +cmd ;; Got answer: ;; ->>HEADER<<- opcode: QUERY, status: NOERROR, id: 14076 ;; flags: qr rd ra ad; QUERY: 1, ANSWER: 1, AUTHORITY: 0, ADDITIONAL: 1

;; OPT PSEUDOSECTION: ; EDNS: version: 0, flags:; udp: 1232 ;; QUESTION SECTION: ;dnssec.works. IN A

;; ANSWER SECTION: dnssec.works. 3600 IN A 46.23.92.212

;; Query time: 49 msec ;; SERVER: 127.0.0.1#5335(127.0.0.1) (UDP) ;; WHEN: Sun May 25 18:22:52 CEST 2025 ;; MSG SIZE rcvd: 57

This request will not result in an A-Record.

root@host:~# dig fail01.dnssec.works @127.0.0.1 -p 5335

; <<>> DiG 9.18.33-1~deb12u2-Raspbian <<>> fail01.dnssec.works @127.0.0.1 -p 5335 ;; global options: +cmd ;; Got answer: ;; ->>HEADER<<- opcode: QUERY, status: SERVFAIL, id: 1552 ;; flags: qr rd ra; QUERY: 1, ANSWER: 0, AUTHORITY: 0, ADDITIONAL: 1

;; OPT PSEUDOSECTION: ; EDNS: version: 0, flags:; udp: 1232 ;; QUESTION SECTION: ;fail01.dnssec.works. IN A

;; Query time: 19 msec ;; SERVER: 127.0.0.1#5335(127.0.0.1) (UDP) ;; WHEN: Sun May 25 18:23:41 CEST 2025 ;; MSG SIZE rcvd: 48

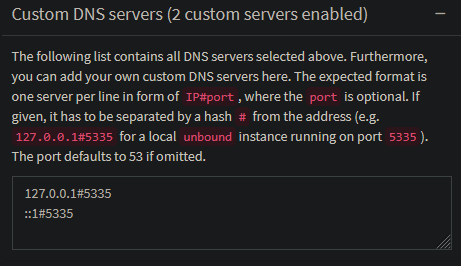
Now all that is left to connect our Pi-hole with Unbound. Logon to your Pi-hole website and navigate to Settings -> DNS. Expand the line Custom DNS servers and enter to IP and Port to our Unbound server. 127.0.0.1#5335 for IPv4 and ::1#5335 for IPv6. If you don't use one of these two just don't add the line. After that hit "Save & Apply" and we are done.

Creating a logrotate config for Unbound

Sadly Unbound still doesn't deliver a logrotate config with its package. Therefore I just copy & paste from my previous article Howto properly split all logfile content based on timestamps - and realizing my own fallacy.

root@host:~# cat /etc/logrotate.d/unbound
/var/log/unbound/unbound.log {
        monthly
        missingok
        rotate 12
        compress
        delaycompress
        notifempty
        sharedscripts
        create 644
        postrotate
                /usr/sbin/unbound-control log_reopen
        endscript
}

Troubleshooting

fail01.dnssec.works timed out

The host fail01.dnssec.works tends to not answer requests sometimes. Others noticed this too. dig will only show the following message:

root@host:~# dig fail01.dnssec.works @127.0.0.1 -p 5335
;; communications error to 127.0.0.1#5335: timed out

; <<>> DiG 9.18.33-1~deb12u2-Raspbian <<>> fail01.dnssec.works @127.0.0.1 -p 5335 ;; global options: +cmd ;; no servers could be reached

If that is the case, just execute the command again. Usually it will work the second time. Or just wait a few minutes. Sometimes the line ;; communications error to 127.0.0.1#5335: timed out will be printed, but the dig query will work after that nonetheless.

Comments

Howto properly split all logfile content based on timestamps - and realizing my own fallacy

Photo by Mikhail Nilov: https://www.pexels.com/photo/person-in-black-hoodie-using-a-computer-6963061/

I use a Pi-hole for DNS based AdBlocking in my home network. Additionally I installed Unbound as recursive DNS resolver on it. Meaning: I can use the RaspberryPi in my network at home as the DNS server for all my devices. This way I don't have to use the DNS-Servers of my ISP granting me some additionally privacy. Additionally I can see which DNS queries are sent by each device. Leading to surprising revelations.

However recently my internet connection was interrupted and afterwards I noticed that I couldn't access any site or services where I used a domain or hostname to connect to. And while the problem itself (dnsmasq: Maximum number of concurrent DNS queries reached (max: 150)) was fixed easily with a simple restart of the unbound service, I noticed that the /var/log/unbound/unbound.log logfile was uncompressed, unrotated and 3.3 gigabyte in size. Whoops. That happens when no logrotate job is present.

Side gig: A logrotate config for Unbound

Fixing this issue was rather easy. A short search additionally revealed that unbound-control has a log_reopen option which is a good idea to trigger after the logrotate. This way Unbound properly closes old filehandles and uses the new logfile.

root@pihole:~# cat /etc/logrotate.d/unbound
/var/log/unbound/unbound.log {
        monthly
        missingok
        rotate 12
        compress
        delaycompress
        notifempty
        sharedscripts
        create 644
        postrotate
                /usr/sbin/unbound-control log_reopen
        endscript
}

But wait, there is more

However I had it on my list to dig deeper into the dnsmasq: Maximum number of concurrent DNS queries reached (max: 150) error in order to better understand the whole construct of Pi-hole, dnsmasq and Unbound.

However, the logfile was way too big to work conveniently with it. 49.184.687 lines are just too much. Especially on a RaspberryPi with the, in comparison, limited CPU power. Now I could have just split it up after n lines using split -l number-of-lines but that is:

  • Too easy and
  • Did I encounter the need for a script which splits logfile lines based on a range of timestamps more often in the recent time

How to properly split a logfile - and overcomplicating stuff

Most of the unbound logfile lines will have the Unix timestamp in brackets, followed by the process name, the log level the message belongs too and the actual message.

root@pihole:~# head -n 1 /var/log/unbound/unbound.log
[1700653509] unbound[499:0] debug: module config: "subnetcache validator iterator"

However some multi-line message wont follow this format:

[1700798246] unbound[1506:0] info: incoming scrubbed packet: ;; ->>HEADER<<- opcode: QUERY, rcode: NOERROR, id: 0
;; flags: qr aa ; QUERY: 1, ANSWER: 1, AUTHORITY: 0, ADDITIONAL: 0
;; QUESTION SECTION:
chat.cdn.whatsapp.net.  IN      A

;; ANSWER SECTION: chat.cdn.whatsapp.net. 60 IN A 157.240.252.61

;; AUTHORITY SECTION:

;; ADDITIONAL SECTION: ;; MSG SIZE rcvd: 55

[1700798246] unbound[1506:0] debug: iter_handle processing q with state QUERY RESPONSE STATE

This means we need the following technical approach:

  1. Generate the Unix-timestamp for the first day in a month at 00:00:00 o'clock
    • Alternatively formulated: The Unix-timestamp for the first second of a month
  2. Generate the Unix-timestamp for the last day of the month at 23:59:59 o'clock
    • The last second of a month
  3. Find the first occurrence of the timestamp from point 1
  4. Find the last occurrence of the timestamp from point 2
  5. Use sed to move the lines for each month into a separate logfile

I will however also show an awk command on how to filter based on the timestamps, useful for logfiles where every line is prefix with a timestamp.

Calculating with date

Luckily date is powerful and easy to use for date calculations. %s gives us the Unix timestamp. We do not need to specify hours:minutes:seconds as date automatically takes 00:00:00 for these values. Automatically giving us the first second of a day. And date also takes care of leap years and possible a lot of other nuisances when it comes to time and date calculations.

To get the last second of a month we simply take the first day of the month, add a month and subtract one second. It can't be easier.

# Unix timestamp for the first second in a month
user@host:~$ date -d "$(date +%Y/%m/01)" "+%Y/%m/%d %X - %s"
2024/11/01 00:00:00 - 1730415600

Unix timestamp for the last second in a month

user@host:~$ date -d "$(date +%Y/%m/01) + 1 month - 1 second" "+%Y/%m/%d %X - %s" 2024/11/30 23:59:59 - 1733007599

To verify the value we can use this for-loop. It will give us all the date and timestamps we need to confirm that our commands are correct.

user@host:~$ for YEAR in {2023..2024}; do for MONTH in {1..12}; do echo -n "$(date -d "$(date +$YEAR/$MONTH/01)" "+%Y/%m/%d %X - %s")  "; date -d "$(date +$YEAR/$MONTH/01) + 1 month - 1 second" "+%Y/%m/%d %X - %s"; done; done
2023/01/01 00:00:00 - 1672527600  2023/01/31 23:59:59 - 1675205999
2023/02/01 00:00:00 - 1675206000  2023/02/28 23:59:59 - 1677625199
2023/03/01 00:00:00 - 1677625200  2023/03/31 23:59:59 - 1680299999
2023/04/01 00:00:00 - 1680300000  2023/04/30 23:59:59 - 1682891999
2023/05/01 00:00:00 - 1682892000  2023/05/31 23:59:59 - 1685570399
2023/06/01 00:00:00 - 1685570400  2023/06/30 23:59:59 - 1688162399
2023/07/01 00:00:00 - 1688162400  2023/07/31 23:59:59 - 1690840799
2023/08/01 00:00:00 - 1690840800  2023/08/31 23:59:59 - 1693519199
2023/09/01 00:00:00 - 1693519200  2023/09/30 23:59:59 - 1696111199
2023/10/01 00:00:00 - 1696111200  2023/10/31 23:59:59 - 1698793199
2023/11/01 00:00:00 - 1698793200  2023/11/30 23:59:59 - 1701385199
2023/12/01 00:00:00 - 1701385200  2023/12/31 23:59:59 - 1704063599
2024/01/01 00:00:00 - 1704063600  2024/01/31 23:59:59 - 1706741999
2024/02/01 00:00:00 - 1706742000  2024/02/29 23:59:59 - 1709247599
2024/03/01 00:00:00 - 1709247600  2024/03/31 23:59:59 - 1711922399
2024/04/01 00:00:00 - 1711922400  2024/04/30 23:59:59 - 1714514399
2024/05/01 00:00:00 - 1714514400  2024/05/31 23:59:59 - 1717192799
2024/06/01 00:00:00 - 1717192800  2024/06/30 23:59:59 - 1719784799
2024/07/01 00:00:00 - 1719784800  2024/07/31 23:59:59 - 1722463199
2024/08/01 00:00:00 - 1722463200  2024/08/31 23:59:59 - 1725141599
2024/09/01 00:00:00 - 1725141600  2024/09/30 23:59:59 - 1727733599
2024/10/01 00:00:00 - 1727733600  2024/10/31 23:59:59 - 1730415599
2024/11/01 00:00:00 - 1730415600  2024/11/30 23:59:59 - 1733007599
2024/12/01 00:00:00 - 1733007600  2024/12/31 23:59:59 - 1735685999

To verify we can do the reverse (Unix timestamp to date) with the following command:

user@host:~$ date -d @1698793200
Wed  1 Nov 00:00:00 CET 2023

Solution solely working on timestamps

As the logfile timestamp is enclosed in brackets we need to tell awk to treat either [ or ] as a field separator. Then we can use awk to check if the second field is in a given time frame. For the first test run we define the variables manually in our shell and adjust the date commands to only output the Unix timestamp.

And as the logfile starts in November 2023 I set the values accordingly. awk then conveniently puts all lines whose timestamp is between these to values into a separate logfile.

user@host:~$ YEAR=2023
user@host:~$ MONTH=11
user@host:~$ FIRST_SECOND=$(date -d "$(date +$YEAR/$MONTH/01)" "+%s")
user@host:~$ LAST_SECOND=$(date -d "$(date +$YEAR/$MONTH/01) + 1 month - 1 second" "+%s")
user@host:~$ awk -F'[\\[\\]]' -v MIN=${FIRST_SECOND} -v MAX=${LAST_SECOND} '{if($2 >= MIN && $2 =< MAX) print}' /var/log/unbound/unbound.log >> /var/log/unbound/unbound-$YEAR-$MONTH.log

And this would already work fine, if every line would start with the timestamp. As this is not the case we need to add a bit more logic.

So the resulting script would look like this:

user@host:~$ cat date-split.sh
#!/bin/bash
# vim: set tabstop=2 smarttab shiftwidth=2 softtabstop=2 expandtab foldmethod=syntax :

Split a logfile based on timestamps

LOGFILE="/var/log/unbound/unbound.log" AWK="$(command -v awk)" GZIP="$(command -v gzip)"

for YEAR in {2023..2024}; do for MONTH in {1..12}; do

# Logfile starts November 2023 and ends November 2024 - don't grep for values before/after that time window
if  [[ "$YEAR" -eq 2023 &amp;&amp; "$MONTH" -gt 10 ]] ||  [[ "$YEAR" -eq 2024 &amp;&amp; "$MONTH" -lt 12 ]]; then

  # Debug
  echo "$YEAR/$MONTH"

  # Calculate first and last second of each month
  FIRST_SECOND="$(date -d "$(date +"$YEAR"/"$MONTH"/01)" "+%s")"
  LAST_SECOND="$(date -d "$(date +"$YEAR"/"$MONTH"/01) + 1 month - 1 second" "+%s")"

  # Export variables so the grep in the sub-shells have this value
  export FIRST_SECOND
  export LAST_SECOND

  # Split logfiles solely based on timestamps
  awk -F'[\\[\\]]' -v MIN=${FIRST_SECOND} -v MAX=${LAST_SECOND} '{if($2 &gt;= MIN &amp;&amp; $2 &lt;= MAX) print}' unbound.log &gt;&gt; "unbound-$YEAR-$MONTH.log"

  # Creating all those separate logfiles will probably fill up our diskspace
  #  therefore we gzip them immediately afterwards
  "$GZIP" "/var/log/unbound/unbound-$YEAR-$MONTH.log"

fi

done; done

However, this script is vastly over-engineered. Why? Read on.

StackOverflow to the rescue

I still had the problem with the multi-line log messages. At first I wanted to use grep to get the matching first and last line numbers with head and tail. But uh.. Yeah, I had a fallacy here. As still wouldn't have worked with multi-line logmessages without a timestamp. Also using grep like this is highly inefficient. While it would be fine for a one-time usage script I still hit a road block.

I just wasn't able to get awk to do what I wanted and I resorted to asking my question on StackOverflow. Better to get the input from others then wasting a lot of time.

awk to the rescue

It was only through the answer that I realized that my solution was a bit over-engineered. Why use date if you can use strftime to calculate the year and month from the timestamp directly? The initial answer was:

awk '
$1 ~ /^\[[0-9]+]$/ {
  f = "unbound-" strftime("%m-%Y", substr($1, 2, length($1)-2)) ".log"
  if (f != prev) close(f); prev = f
}
{
  print > f
}' unbound.log

How this works has been explained in detail on StackOverflow, so I just copy & paste it here.

For each line which first field is a [timestamp] (that is, matches regexp ^\[[0-9]+]$), we use substr and length to extract timestamp, strftime to convert it to a mm-YYYY string and assign "unbound-mm-YYYY.log" to variable f. In the second block, that applies to all lines, we print the current line in file f. Note: contrary to shell redirections, in awk, print > FILE appends to FILE.

Edit: as suggested by Ed Morton closing each file when we are done with it should significantly improve the performance if the total number of files is large. if (f != prev) close(f); prev = f added. Ed also noted that escaping the final ] in the regex is useless (and undefined behavior per POSIX). Backslash removed.

And this worked flawlessly. The generated monthly logfiles from my testfile matched exactly the line-numbers per month. Even multi-line log messages and empty lines were included.

All I then did was adding gzip to compress the files directly before the next file is created. Just to prevent filling up the disk completely. Additionally I change the filename from unbound-MM-YYYY.log to unbound-YYYY-MM.log. Yes, the logfile name won't work with logrotate. But I just need it to properly dig through the files and the Year-Month naming will be of great help here. Afterwards I don't need them anymore and will delete them. So this was none of my concern.

This was my new working solution:

awk '$1 ~ /^\[[0-9]+]$/ {
  f = "unbound-" strftime("%Y-%m", substr($1, 2, length($1)-2)) ".log"
  if (f != prev) {
    if (prev) system("gzip " prev)
    close(prev)
    prev = f
  }
}
{
  print > f
}
END {
  if (prev) system("gzip " prev)
}' unbound.log

No bash script with convoluted logic needed. And easily useable for other logfiles too. Just adopt the starting regular expression to match the one the logfile uses and adopt the logic for strftime so the proper timestamp can be created.

Sometimes it's better to ask other people. 😄

Comments