Feuerfest

Just the private blog of a Linux sysadmin

Bye bye Brave Browser

mthie wrote a short blog post in which he linked to the following XDA Developers article: https://www.xda-developers.com/brave-most-overrated-browser-dont-recommend/.

For me, personally, this article was a real eye-opener. I only knew about roughly half of the things that Brave has done over the years. I was especially unaware of the "Accepting donations for creators - who don't know anything about the Brave program" or the Honey-like "Let's replace referral codes in links and cookies with our own to steal the commission".

If a company pulls such stunts, it is not acting in good faith. Not acting in good faith makes you a bad actor.

Do you really want to use software from a bad actor? Yet alone have it installed on your mobile? It's the most private piece of technical equipment we own in these days.

Yeah, me neither. Hence Brave has been officially uninstalled from all my devices as of 20 minutes ago.

And I doubt I will miss it much, as Firefox on Android officially supports all extensions since end of 2023/beginning of 2024. Therefore extensions like uBlock Origin and uMatrix work perfectly fine. The fact that those were not supported back then was the main reason for choosing Brave in the first place.

Now with this reason being gone, so too is the crypto- and scam-infested Brave browser.

Comments

Blocking Googles AI answers in search results with uBlock Origin

If you have uBlock Origin installed as an extension in your browser there is a way to hide/block Googles AI answers.

  1. Click the uBlock Origin icon
  2. Click the button with the 3 wheels in the lower right
  3. Go to "My filters"
  4. Copy and paste the following into the field below: google.com##.hdzaWe
  5. Make sure the checkbox next to "Activate own filters" is set
  6. Hit "Apply changes" on top

Of course this only works until Google changes the name of the element, but if that happens there is usually a thread in https://www.reddit.com/r/uBlockOrigin/ with the new filter.

Or alternatively just put a swear word somewhere into your Google search query. Then the AI is also absent. 😂

Instead of: programname error-message
Google for: programname fucking error-message

😆

The udm=14 parameter

And the "cheat code" for AI free search with Google also still exists. Just add the udm=14 parameter.

https://tedium.co/2024/05/17/google-web-search-make-default/ has all the details and https://tenbluelinks.org shows you how to achieve that for various browsers.

Enjoy!

Comments

Installing Unbound as recursive DNS server on my PiHole

I run a Pi-hole installation on each of my Raspberry 3 & 4. As I do like to keep my DNS queries as much under my control as I can, I also installed Unbound to serve as recursive DNS server. This way all DNS queries will be handled by my Raspberry Pis.

Pi-hole is already installed using one of the following methods: https://github.com/pi-hole/pi-hole/#one-step-automated-install. If you don't have that done yet, do it first.

There is a good guide at the Pi-hole website which I will basically following.

https://docs.pi-hole.net/guides/dns/unbound/

root@host:~# apt install unbound

Regarding the configuration file I go with the one in the guide. However as I did have some problems in that past I needed to troubleshoot I include the following lines regarding loglevels and verbosity:

root@host:~# head /etc/unbound/unbound.conf.d/pihole.conf
server:
    # If no logfile is specified, syslog is used
    logfile: "/var/log/unbound/unbound.log"
    val-log-level: 2
    # Default is 1
    #verbosity: 4
    verbosity: 1

    interface: 127.0.0.1
    port: 5335
root@host:~# 

You can add that if you want but it's not needed to make Unbound work.

Next the guide tells us to download the root hints. A file maintained by Internic which contains information about the 13 DNS root name servers. Under Debian we don't need to download the named.root file from Internic as shown in the guide. Debian has its own package for that: dns-root-data.

It no only contains information about the 13 DNS root name servers but also the needed DNSSEC keys (also called root trust anchors). And together with unattended-upgrades we even automate updating that. Saving us the creation of a Cronjob or systemd timer.

root@host:~# apt install dns-root-data

In order for Unbound to have a directory and logfile to write into we need to create that:

root@host:~# mkdir -p /var/log/unbound
root@host:~# touch /var/log/unbound/unbound.log
root@host:~# chown unbound /var/log/unbound/unbound.log

As we are running under Debian we now need to tweak the Unbound config a little bit. Else we will get problems with DNSSEC. For this we are deleting a Debian generated file from Unbound and comment out the unbound_conf= line in /etc/resolvconf.conf so that it isn't included anymore.

root@host:~# sed -Ei 's/^unbound_conf=/#unbound_conf=/' /etc/resolvconf.conf
root@host:~# rm /etc/unbound/unbound.conf.d/resolvconf_resolvers.conf

Now all that is left is restarting Unbound.

root@host:~# systemctl restart unbound.service

Testing DNS resolution:

root@host:~# dig pi-hole.net @127.0.0.1 -p 5335

; <<>> DiG 9.18.33-1~deb12u2-Raspbian <<>> pi-hole.net @127.0.0.1 -p 5335
;; global options: +cmd
;; Got answer:
;; ->>HEADER<<- opcode: QUERY, status: NOERROR, id: 46191
;; flags: qr rd ra; QUERY: 1, ANSWER: 1, AUTHORITY: 0, ADDITIONAL: 1

;; OPT PSEUDOSECTION:
; EDNS: version: 0, flags:; udp: 1232
;; QUESTION SECTION:
;pi-hole.net.                   IN      A

;; ANSWER SECTION:
pi-hole.net.            300     IN      A       3.18.136.52

;; Query time: 169 msec
;; SERVER: 127.0.0.1#5335(127.0.0.1) (UDP)
;; WHEN: Sun May 25 18:21:25 CEST 2025
;; MSG SIZE  rcvd: 56

And to verify & falsify DNSSEC. This request must return an A-Record for dnssec.works.

root@host:~# dig dnssec.works @127.0.0.1 -p 5335

; <<>> DiG 9.18.33-1~deb12u2-Raspbian <<>> dnssec.works @127.0.0.1 -p 5335
;; global options: +cmd
;; Got answer:
;; ->>HEADER<<- opcode: QUERY, status: NOERROR, id: 14076
;; flags: qr rd ra ad; QUERY: 1, ANSWER: 1, AUTHORITY: 0, ADDITIONAL: 1

;; OPT PSEUDOSECTION:
; EDNS: version: 0, flags:; udp: 1232
;; QUESTION SECTION:
;dnssec.works.                  IN      A

;; ANSWER SECTION:
dnssec.works.           3600    IN      A       46.23.92.212

;; Query time: 49 msec
;; SERVER: 127.0.0.1#5335(127.0.0.1) (UDP)
;; WHEN: Sun May 25 18:22:52 CEST 2025
;; MSG SIZE  rcvd: 57

This request will not result in an A-Record.

root@host:~# dig fail01.dnssec.works @127.0.0.1 -p 5335

; <<>> DiG 9.18.33-1~deb12u2-Raspbian <<>> fail01.dnssec.works @127.0.0.1 -p 5335
;; global options: +cmd
;; Got answer:
;; ->>HEADER<<- opcode: QUERY, status: SERVFAIL, id: 1552
;; flags: qr rd ra; QUERY: 1, ANSWER: 0, AUTHORITY: 0, ADDITIONAL: 1

;; OPT PSEUDOSECTION:
; EDNS: version: 0, flags:; udp: 1232
;; QUESTION SECTION:
;fail01.dnssec.works.           IN      A

;; Query time: 19 msec
;; SERVER: 127.0.0.1#5335(127.0.0.1) (UDP)
;; WHEN: Sun May 25 18:23:41 CEST 2025
;; MSG SIZE  rcvd: 48

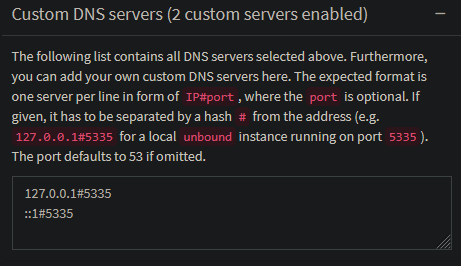
Now all that is left to connect our Pi-hole with Unbound. Logon to your Pi-hole website and navigate to Settings -> DNS. Expand the line Custom DNS servers and enter to IP and Port to our Unbound server. 127.0.0.1#5335 for IPv4 and ::1#5335 for IPv6. If you don't use one of these two just don't add the line. After that hit "Save & Apply" and we are done.
Creating a logrotate config for Unbound

Sadly Unbound still doesn't deliver a logrotate config with its package. Therefore I just copy & paste from my previous article Howto properly split all logfile content based on timestamps - and realizing my own fallacy.

root@host:~# cat /etc/logrotate.d/unbound
/var/log/unbound/unbound.log {
        monthly
        missingok
        rotate 12
        compress
        delaycompress
        notifempty
        sharedscripts
        create 644
        postrotate
                /usr/sbin/unbound-control log_reopen
        endscript
}

Troubleshooting

fail01.dnssec.works timed out

The host fail01.dnssec.works tends to not answer requests sometimes. Others noticed this too. dig will only show the following message:

root@host:~# dig fail01.dnssec.works @127.0.0.1 -p 5335
;; communications error to 127.0.0.1#5335: timed out

; <<>> DiG 9.18.33-1~deb12u2-Raspbian <<>> fail01.dnssec.works @127.0.0.1 -p 5335
;; global options: +cmd
;; no servers could be reached

If that is the case, just execute the command again. Usually it will work the second time. Or just wait a few minutes. Sometimes the line ;; communications error to 127.0.0.1#5335: timed out will be printed, but the dig query will work after that nonetheless.

Comments

uMatrix: Fehler 403 bei Aufruf von Links im web.de/GMX Webmailer beheben

Dall-E

Das Problem

Bekannte erhalten an ihre GMX-Mailadresse eine Mail. Diese enthält klickbare Links. Bei einem Klick landet man jedoch nicht auf der GMX-Weiterleitungsseite und anschließend auf der Seite auf die man eigentlich aufrufen möchte.
Stattdessen bekommt man die Fehlermeldung:

Ups, hier hat sich ein Fehler eingeschlichen...
Fehler-Code: 403

Bei einer web.de Adresse ist es genau so. Gut, das ist zu erwarten, da sowohl GMX als auch web.de zur gleichen Firma gehören und die Webmailer die gleichen sind. Lediglich etwas im Aussehen angepasst.

Stellt sich raus: Man verwendet nun endlich einen Adblocker. In diesem Fall uMatrix. Und uMatrix hat u.a. das Feature sog. HTTP-Referer für andere Seiten zu verbergen.
Normalerweise enthält der Referrer die Adresse der Webseite über die ich auf eine andere Webseite gekommen bin.

Suche ich z.B. auf Google nach einem Problem und klicke auf eine der Webseiten in den Ergebnissen, dann wird der Referrer an die aufrufende Webseite übermittelt. Somit kann man auswerten von wo ein Besucher auf die Webseite kam und wonach er gesucht hat. Durchaus relevante Informationen für viele Webseitenbetreiber. Aber natürlich unter Umständen ein Verlust an Privatsphäre für den Benutzer.

Daher ersetzt uMatrix den Referrer durch einen anderen Wert. Dies ist hier beschrieben: https://github.com/gorhill/uMatrix/wiki/Per-scope-switches#spoof-referer-header

Allerdings basiert die web.de/GMX Weiterleitung der Links auf dem HTTP-Referer. Da uMatrix diese Daten aber ersetzt, weiß die Weiterleitung nicht wohin sie weiterleiten soll und man erhält den Fehler 403 (welcher vermutlich für HTTP-403 Forbidden steht).

Die Lösung des Problems

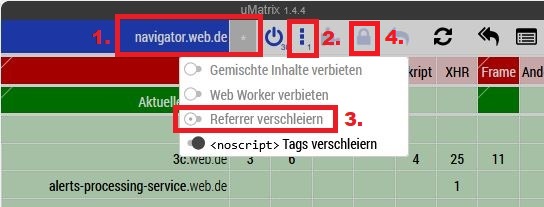
Die Option das der Referer ersetzt wird nennt sich "Referrer verschleiern" und findet sich im Menü von uMatrix. Dies ist über die 3 Punkte zu erreichen.

Konkret müssen wir bei web.de dies für die Domains navigator.web.de & deref-web.de deaktivieren.
Bei GMX analog für die Domain der Weboberfläche und von deref-gmx.de.

Zuerst öffnen wir die Übersicht von uMatrix indem wir auf das Symbol von uMatrix klicken (üblicherweise rechts neben der Adresszeile).

Schritt 1: Wir ändern den Bereich auf navigator.web.de so das die Änderungen exakt nur für diese Domain gilt. Als Standard ist hier web.de ausgewählt, das wollen wir aber nicht. Also sicherstellen dass das komplette Feld blau hervorgehoben ist.

Schritt 2: Wir klicken auf das 3 Punkte Menü

Schritt 3: Wir deaktivieren die "Referrer verschleiern" Option, so das diese, wie im Bild, ausgegraut ist.

Schritt 4: Anschließend auf das nun blau hervorgehobene Schloß-Symbol klicken um die Änderungen zu speichern.

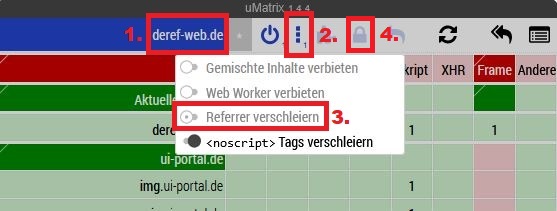
Nun müssen wir dies noch einmal exakt genau so für die Domain deref-web.de bzw. deref-gmx.de durchführen. Hierzu genügt es einfach auf einen Link in einer Mail zu klicken, so das sich die Seite mit der Fehlermeldung öffnet.

Schritt 1: Wir belassen den Bereich auf deref-web.de bzw. deref-gmx.de. Da wir hier keine Subdomain haben, ist dies bereits korrekt ausgewählt.

Schritt 2: Wir klicken auf das 3 Punkte Menü

Schritt 3: Wir deaktivieren die "Referrer verschleiern" Option, so das diese, wie im Bild, ausgegraut ist.

Schritt 4: Anschließend auf das nun blau hervorgehobene Schloß-Symbol klicken um die Änderungen zu speichern.

Nun am besten zur Sicherheit einmal den Browser komplett beenden, mindestens aber den Tab mit der web.de/GMX Weboberfläche neu laden.

Klickt man dann auf einen Link sollte der gewohnte Weiterleitungshinweis erscheinen und man nach wenigen Sekunden auf der eigentlichen Seite sein.

Comments