Feuerfest

Just the private blog of a Linux sysadmin

Integrating Isso into Bludit via Apache2 and WSGI

Photo by Sébastien BONNEVAL: https://www.pexels.com/photo/women-posting-notes-on-brown-board-7393948/

Isso is a comment system designed to be included in static sites. As Bludit is a static site generator and has no comment system on its own this is a perfect fit. 😀 Also the comments are stored in a local SQLite DB which means all data stays locally on this server and no external account registration is required.

Comment moderation is of course possible via a small admin backend.

Introduction

I actually tried to separate methods of setting up and integrating Isso in my Bludit instance.

The start was always a Python virtualenv as I didn't want to install all packages and libraries system-wide. After that, I tried two approaches as I wasn't sure which one I liked better.

First approach:

  • Python virtualenv
  • Isso started via Systemd Unit on localhost:8080
  • ProxyPass & ProxyPassReverse directives in the Apache vHost configuration forwarding the relevant URIs to Isso on http://localhost:8080

Second approach:

  • Python virtualenv
  • Isso integrated via mod_wsgi into Apache

In the end, I went with the second approach as it spared me a Systemd Unit and activating the mod_proxy & mod_proxy_http in Apache. Also the whole integration was done with one WSGI file and 8 lines in the vHost.

But as I got both to a working condition I document them here nonetheless.

Creating the Python virtualenv

Creating the virtualenv is a necessary step for both paths. Generally, you can omit it if you want to install the Python packages system-wide, but as I'm still testing the software I didn't want this.

Here I followed the Install from PyPi documentation from Isso.

root@admin ~# mkdir /opt/isso
root@admin ~# apt-get install python3-dev python3-virtualenv sqlite3 build-essential
# Switching back to our non-root user
root@admin ~# exit
user@admin:~$ cd /opt/isso
user@admin:/opt/isso$ virtualenv --download /opt/isso
user@admin:/opt/isso$ source /opt/isso/bin/activate
(isso) user@admin:/opt/isso$ pip install isso

# After that I ran an upgrade for isso to get the latest package
(isso) user@admin:/opt/isso$ pip install --upgrade isso

# Also we can already create an directory for the SQLite DB where the comments get stored
# Note: This MUST be writeable by the user running isso. So either the user the Systemd unit runs under, or, in my case: the Apache2 user
(isso) user@admin:/opt/isso$ mkdir /opt/isso/db

# To change the ownership I need to become root again
# I choose www-data:adm to allow myself write-access as the used non-root user is part of that group
root@admin ~# chown www-data:adm/opt/isso/db
root@admin ~# chmod 775 /opt/isso/db

With pip list we can get an overview of all installed packages and their versions.

(isso) user@admin:/opt/isso$ pip list
Package       Version
------------- -------
bleach        6.1.0
cffi          1.16.0
html5lib      1.1
isso          0.13.0
itsdangerous  2.2.0
jinja2        3.1.4
MarkupSafe    2.1.5
misaka        2.1.1
pip           20.3.4
pkg-resources 0.0.0
pycparser     2.22
setuptools    44.1.1
six           1.16.0
webencodings  0.5.1
werkzeug      3.0.3
wheel         0.34.2

Isso configuration file

My isso.cfg looked like the following. The documentation is here: https://isso-comments.de/docs/reference/server-config/

(isso) user@admin:/opt/isso$ cat isso.cfg
[general]
dbpath = /opt/isso/db/comments.db
host = https://admin.brennt.net/
max-age = 15m
log-file = /var/log/isso/isso.log
[moderation]
enabled = true
approve-if-email-previously-approved = false
purge-after = 30d
[server]
listen = http://localhost:8080/
public-endpoint = https://admin.brennt.net/isso
[guard]
enabled = true
ratelimit = 2
direct-reply = 3
reply-to-self = false
require-author = true
require-email = false
[markup]
options = strikethrough, superscript, autolink, fenced-code
[hash]
salt = Eech7co8Ohloopo9Ol6baimi
algorithm = pbkdf2
[admin]
enabled = true
password = YOUR-PASSWORD-HERE

This meant I needed to create the /var/log/isso directory and set the appropriate rights.

But I want to raise your attention towards the following line public-endpoint = https://admin.brennt.net/isso here I added /isso to the host as else we will run in problems as both Isso and Bludit are using the /admin URI for backend access.

While this can be changed in Isso when you hack the code and, as far as it could tell, also in Bludit. I didn't want to do this, as these are modifications which will always cause additional work when an update of either Isso or Bludit is done. Therefore I added the /isso URI and adapted the ReverseProxy/WSGI configuration accordingly. Then everything works out of the box.

Decide how to proceed

Now you need to decide if you want to go with the first or second approach. Depending on this either start with point 1a) Creating the Systemd unit file or 2) Apache2 + WSGI configuration

1a) Creating the Systemd unit file

The following unit file will start Isso. Store it under /etc/systemd/system/isso.service.

[Unit]
Description=Isso Comment Server

[Service]
Type=simple
User=user
WorkingDirectory=/opt/isso
ExecStart=/opt/isso/bin/isso -c /opt/isso/isso.cfg
Restart=on-failure
RestartSec=5

[Install]
WantedBy=multi-user.target

Then activate it and start the service.

root@admin /opt/isso # vi /etc/systemd/system/isso.service
root@admin /opt/isso # systemctl daemon-reload
root@admin /opt/isso # systemctl start isso.service
root@admin /opt/isso # systemctl status isso.service
● isso.service - Isso Comment Server
     Loaded: loaded (/etc/systemd/system/isso.service; enabled; vendor preset: enabled)
     Active: active (running) since Wed 2024-07-24 23:19:48 CEST; 1s ago
   Main PID: 1272753 (isso)
      Tasks: 2 (limit: 9489)
     Memory: 24.1M
        CPU: 191ms
     CGroup: /system.slice/isso.service
             └─1272753 /opt/isso/bin/python /opt/isso/bin/isso -c /opt/isso/isso.cfg

Jul 24 23:19:48 admin systemd[1]: Started Isso Comment Server.
Jul 24 23:19:48 admin isso[1272753]: 2024-07-24 23:19:48,475 INFO: Using configuration file '/opt/isso/isso.cfg'

The logfile should now also have an entry that the service is started:

root@admin /opt/isso # cat /var/log/isso/isso.log
Using database at '/opt/isso/db/comments.db'
connected to https://admin.brennt.net/

1b) Writing the Apache2 ReverseProxy configuration

This is the relevant part of the Apache ReverseProxy configuration.

Note: I used the ReverseProxy configuration before adding the /isso URI to the public-endpoint parameter in the isso.cfg. I adapted the ProxyPass and ProxyPassReverse rules accordingly, but these may not worked as displayed here and you have to troubleshoot it a bit yourself.

# Isso comments directory
<Directory /opt/isso/>
        Options -Indexes +FollowSymLinks -MultiViews
        Require all granted
</Directory>

<Proxy *>
        Require all granted
</Proxy>

ProxyPass "/isso/" "http://localhost:8080/isso/"
ProxyPassReverse "/isso/" "http://localhost:8080/isso/"
ProxyPass "/isso/isso-admin/" "http://localhost:8080/isso/admin/"
ProxyPassReverse "/isso/isso-admin/" "http://localhost:8080/isso/admin/"
ProxyPass "/isso/login" "http://localhost:8080/isso/login"
ProxyPassReverse "/isso/login" "http://localhost:8080/isso/login"

After a configtest we restart apache2.

root@admin ~# apache2ctl configtest
Syntax OK
root@admin ~# systemctl restart apache2.service

Now that this part is complete, continue with point 3) Integrating Isso into Bludit.

2) Apache2 + WSGI configuration

WSGI has the benefit that we can offer our Python application via Apache with no changes to the application and have it easily accessible via HTTP(S). As this is the first WSGI application on this server I need to install and activate mod_wsgi for Apache2 and create the isso.wsgi file which is used by mod_wsgi to load the application.

This is my changed /opt/isso/isso.wsgi file.

import os
import site
import sys

# Remember original sys.path.
prev_sys_path = list(sys.path)

# Add the new site-packages directory.
site.addsitedir("/opt/isso/lib/python3.9/site-packages")

# Reorder sys.path so new directories at the front.
new_sys_path = []
for item in list(sys.path):
    if item not in prev_sys_path:
        new_sys_path.append(item)
        sys.path.remove(item)
sys.path[:0] = new_sys_path

from isso import make_app
from isso import dist, config

application = make_app(
config.load(
    config.default_file(),
    "/opt/isso/isso.cfg"))

Installing mod_wsgi, as there is an apache2_invoke in Debian I don't need to activate the module via a2enmod wsgi.

root@admin ~# apt-get install libapache2-mod-wsgi-py3
Reading package lists... Done
Building dependency tree... Done
Reading state information... Done
The following NEW packages will be installed:
  libapache2-mod-wsgi-py3
0 upgraded, 1 newly installed, 0 to remove and 0 not upgraded.
Need to get 99.5 kB of archives.
After this operation, 292 kB of additional disk space will be used.
Get:1 http://deb.debian.org/debian bullseye/main amd64 libapache2-mod-wsgi-py3 amd64 4.7.1-3+deb11u1 [99.5 kB]                                                                                                       Fetched 99.5 kB in 0s (3,761 kB/s)
Selecting previously unselected package libapache2-mod-wsgi-py3.                                                                                                                                                     (Reading database ... 57542 files and directories currently installed.)
Preparing to unpack .../libapache2-mod-wsgi-py3_4.7.1-3+deb11u1_amd64.deb ...
Unpacking libapache2-mod-wsgi-py3 (4.7.1-3+deb11u1) ...
Setting up libapache2-mod-wsgi-py3 (4.7.1-3+deb11u1) ...
apache2_invoke: Enable module wsgi

Then we add the necessary Directory & WSGI directives to the vHost:

# Isso comments directory
<Directory /opt/isso/>
        Options -Indexes +FollowSymLinks -MultiViews
        Require all granted
</Directory>

# For isso comments
WSGIDaemonProcess isso user=www-data group=www-data threads=5
WSGIScriptAlias /isso /opt/isso/isso.wsgi

After an configtest we restart apache2.

root@admin ~# apache2ctl configtest
Syntax OK
root@admin ~# systemctl restart apache2.service

Now that this part is complete, continue with point 3) Integrating Isso into Bludit.

3) Integrating Isso into Bludit

Now we need to integrate Isso into Bludit in two places:

  1. The <script>-Tag containing the configuration and necessary Javascript code
  2. The <section>-Tag which will actually display the comments and comment form.

For 1. we need to find a place which is always loaded. No matter if we are on the main side or view a single article. For point 2 we must identify the part which renders single page articles and add it after the article.

These places are of course depending on the theme you use. As I use the Solen-Theme for Bludit I can use the following places:

  1. File bl-themes/solen-1.2/php/header-library.php, after line 28 add the <script>-Tag.
    • [...]
      <link rel="preload" href="https://fonts.googleapis.com/css2?family=Quicksand:wght@300;400;500;600;700&display=swap" as="style" onload="this.onload=null;this.rel='stylesheet'"><noscript><link href="https://fonts.googleapis.com/css2?family=Quicksand:wght@300;400;500;600;700&display=swap" rel="stylesheet"></noscript>
      
      <script data-isso="/isso/"
              data-isso-css="true"
              data-isso-css-url="null"
              data-isso-lang="en"
              data-isso-max-comments-top="10"
              data-isso-max-comments-nested="5"
              data-isso-reveal-on-click="5"
              data-isso-sorting="newest"
              data-isso-avatar="true"
              data-isso-avatar-bg="#f0f0f0"
              data-isso-avatar-fg="#9abf88 #5698c4 #e279a3 #9163b6 ..."
              data-isso-vote="true"
              data-isso-vote-levels=""
              data-isso-page-author-hashes="f124cf6b2f01,7831fe17a8cd"
              data-isso-reply-notifications-default-enabled="false"
              src="/isso/js/embed.min.js"></script>
      
      <!-- Load Bludit Plugins: Site head -->
      <?php Theme::plugins('siteHead'); ?>
  2. File bl-themes/solen-1.2/php/page.php, line 12. This file takes care of displaying the content for single page articles. To add the comments and comment form, we need to place the <section>-Tag after the <div class="article_spacer"></div>-Tag. By doing that we have a the Tag-List and a small horizontal line as optical separator between content and comments.
    • Change:

                      </article>
                      <div class="article_spacer"></div>
                  </div>
                  <div class="section_wrapper">
    • To:
                      </article>
                      <div class="article_spacer"></div>
                      <section id="isso-thread">
                          <noscript>Javascript needs to be activated to view comments.</noscript>
                      </section>
                  </div>
                  <div class="section_wrapper">

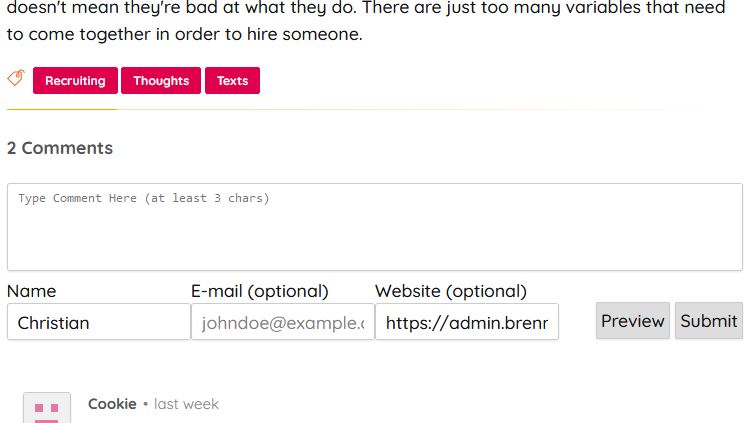
After a reload you should see the comment form below your article content, but above the article tags.

Like in this example screenshot:
Admin backend

A picture says more than a dozen sentences, so here is a screenshot of the Admin backend with a comment awaiting moderation. Using my configuration you can access it via http://host.domain.tld/isso/admin/.
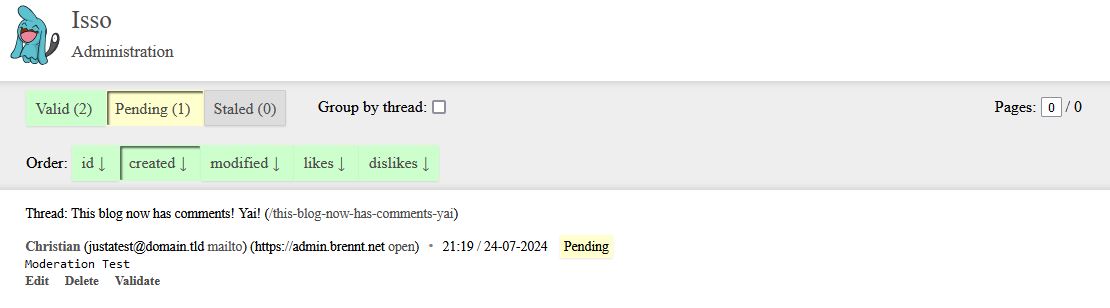
Screenshot from the Isso Admin backend

Changing the /admin URI for Isso

Issos admin backend is reachable via /admin per-default. If, for whatever reason, you can't set public-endpoint = https://host.domain.tld/prefix with a prefix of your choice, but have to use host.domain.tld, this can still be changed in the source code.

Note: The following line numbers are for version 0.13.0 and change can at anytime. Also I haven't tested this thoroughly, so go with this at your own risk.

Grep'ing for /admin we learn that this is defined in the site-packages/isso/views/comments.py (NOT site-packages/isso/db/comments.py) file.

# Finding the right comments.py
(isso) user@admin:/opt/isso$ find . -type f -wholename *views/comments.py
./lib/python3.9/site-packages/isso/views/comments.py

Now open ./lib/python3.9/site-packages/isso/views/comments.py with your texteditor of choice and navigate to line 113 and 1344.

Line 113:
Change: ('admin', ('GET', '/admin/'))
    To: ('admin', ('GET', '/isso-admin/'))
Line 1344:
Change: '/admin/',
    To: '/isso-admin/',

Of course you can change /isso-admin/ to anything you like. But keep in mind this will be overwritten once you update Isso.

Troubleshooting

AH01630: client denied by server configuration

[authz_core:error] [pid 1257781:tid 1257781] AH01630: client denied by server configuration: /opt/isso/isso.wsgi

This error was easy to fix. I simply forgot the needed Directory directive in my Apaches vHost configuration.

Adding the following block to the vHost fixed that:

# Isso comments directory
<Directory /opt/isso/>
        Options -Indexes +FollowSymLinks -MultiViews
        Require all granted
</Directory>

ModuleNotFoundError: No module named 'isso'

This one is easy to fix and was just an oversight on my end. I forgot to change the example path to the site-packages directory from my virtualenv. Hence the install isso package couldn't be located.

[wsgi:error] [pid 1258908:tid 1258908] mod_wsgi (pid=1258908): Failed to exec Python script file '/opt/isso/isso.wsgi'.
[wsgi:error] [pid 1258908:tid 1258908] mod_wsgi (pid=1258908): Exception occurred processing WSGI script '/opt/isso/isso.wsgi'.
[wsgi:error] [pid 1258908:tid 1258908] Traceback (most recent call last):
[wsgi:error] [pid 1258908:tid 1258908]   File "/opt/isso/isso.wsgi", line 3, in <module>
[wsgi:error] [pid 1258908:tid 1258908]     from isso import make_app
[wsgi:error] [pid 1258908:tid 1258908] ModuleNotFoundError: No module named 'isso'

I changed the following:

# Add the new site-packages directory.
site.addsitedir("/path/to/isso_virtualenv")

To the correct path:

# Add the new site-packages directory.
site.addsitedir("/opt/isso/lib/python3.9/site-packages")

Your path can of course be different. Just execute an find . -type d -name site-packages inside your virtualenv and you should get the correct path as result.

SyntaxError: unexpected EOF while parsing

On https://isso-comments.de/docs/reference/deployment/#mod-wsgi Isso lists some WSGI example config files to work with. However all but one have a crucial syntax error: A missing closing bracket at the end.

If you get an error like this:

[wsgi:error] [pid 1259079:tid 1259079] mod_wsgi (pid=1259079, process='', application='admin.brennt.net|/isso'): Failed to parse Python script file '/opt/isso/isso.wsgi'.
[wsgi:error] [pid 1259079:tid 1259079] mod_wsgi (pid=1259079): Exception occurred processing WSGI script '/opt/isso/isso.wsgi'.
[wsgi:error] [pid 1259079:tid 1259079]    File "/opt/isso/isso.wsgi", line 14
[wsgi:error] [pid 1259079:tid 1259079] 
[wsgi:error] [pid 1259079:tid 1259079]     ^
[wsgi:error] [pid 1259079:tid 1259079] SyntaxError: unexpected EOF while parsing

Be sure to check if every opening bracket has a closing one. Usually you just need to add one ) at the end of the last line and that's it.

SystemError: ffi_prep_closure(): bad user_data (it seems that the version of the libffi library seen at runtime is different from the 'ffi.h' file seen at compile-time)

This one baffled me at first and I had to search for an answer. Luckily StackOverflow came to the rescue: https://stackoverflow.com/a/70694565

The solution was rather easy. First install the libffi-dev package, than recompile the cffi with the command in the answer inside the virtualenv. After that the error was gone.

root@admin /opt/isso # apt-get install libffi-dev
Reading package lists... Done
Building dependency tree... Done
Reading state information... Done
The following NEW packages will be installed:
  libffi-dev
0 upgraded, 1 newly installed, 0 to remove and 0 not upgraded.
Need to get 56.5 kB of archives.
After this operation, 308 kB of additional disk space will be used.
Get:1 http://deb.debian.org/debian bullseye/main amd64 libffi-dev amd64 3.3-6 [56.5 kB]
Fetched 56.5 kB in 0s (2,086 kB/s)
Selecting previously unselected package libffi-dev:amd64.
(Reading database ... 57679 files and directories currently installed.)
Preparing to unpack .../libffi-dev_3.3-6_amd64.deb ...
Unpacking libffi-dev:amd64 (3.3-6) ...
Setting up libffi-dev:amd64 (3.3-6) ...
Processing triggers for man-db (2.9.4-2) ...

Then switch back to the non-root user for the virtualenv and recompile the package.

(isso) user@admin:/opt/isso$ pip install --force-reinstall --no-binary :all: cffi
Collecting cffi
  Using cached cffi-1.16.0.tar.gz (512 kB)
  Installing build dependencies ... done
  Getting requirements to build wheel ... done
    Preparing wheel metadata ... done
Collecting pycparser
  Using cached pycparser-2.22.tar.gz (172 kB)
Skipping wheel build for pycparser, due to binaries being disabled for it.
Building wheels for collected packages: cffi
Building wheel for cffi (PEP 517) ... done
  Created wheel for cffi: filename=cffi-1.16.0-cp39-cp39-linux_x86_64.whl size=379496 sha256=cd91c1e57d0f3b6e5d23393c0aa436da657cd738262ab29d13ab665b2ad2a66c
Stored in directory: /home/user/.cache/pip/wheels/49/dd/bc/ce13506ca37e8052ad8f14cdfc175db1b3943e5d7bce7718e3
Successfully built cffi
Installing collected packages: pycparser, cffi
  Attempting uninstall: pycparser
    Found existing installation: pycparser 2.22
    Uninstalling pycparser-2.22:
      Successfully uninstalled pycparser-2.22
    Running setup.py install for pycparser ... done
  Attempting uninstall: cffi
    Found existing installation: cffi 1.16.0
    Uninstalling cffi-1.16.0:
      Successfully uninstalled cffi-1.16.0
Successfully installed cffi-1.16.0 pycparser-2.22

TypeError: load() got an unexpected keyword argument 'multiprocessing'

On https://isso-comments.de/docs/reference/deployment/#mod-wsgi Isso lists some WSGI example config files to work with. Using them brought up this error message.

To my shame I couldn't fix this one. From my understanding the syntax, etc. was correct but I couldn't find any really helpful answer. Therefore I remove that from the provided WSGI files and the error vanished.

Note: The missing closing bracket at the end has already been added here.

import os
import site
import sys

# Remember original sys.path.
prev_sys_path = list(sys.path)

# Add the new site-packages directory.
site.addsitedir("/path/to/isso_virtualenv")

# Reorder sys.path so new directories at the front.
new_sys_path = []
for item in list(sys.path):
    if item not in prev_sys_path:
        new_sys_path.append(item)
        sys.path.remove(item)
sys.path[:0] = new_sys_path

from isso import make_app
from isso import dist, config

application = make_app(
config.load(
    config.default_file(),
    "/path/to/isso.cfg"))

Other articles

Alternatives

I also found Remark42 (Official Website, GitHub) and might try that at a later time. So if Isso isn't after your liking, maybe have a look at that one.

Comments

This blog now has comments! Yai!

Photo by Teddy Yang: https://www.pexels.com/photo/people-inside-stadium-2263410/

I used Isso (Official Website, GitHub) to integrate comments into this block. This was a feature which I missed dearly as I value the input from others, but wouldn't go all the way in using a Wordpress installation or similar blogging software.

Isso integrates nicely, just two small changes to my blogs templates and done. All comments are stored in a SQLite DB on this host. This means no data sharing with services like Discourse, Google or the like. Additionally this has the benefit that no registration is required. As I hate it when I have to create yet another account to just write one or two sentences of feedback. More often than not I refrained from commenting because of this.

Comments have to pass a moderation for spam reasons though.

Comments

Linkdump July 2024

Photo by Element5 Digital: https://www.pexels.com/photo/person-holding-book-from-shelf-1370298/

The last Linkdump was in January 2024? How time flies..

https://www.simplermachines.com/why-you-need-a-wtf-notebook/: A nice method to collect things were you think "WTF?" when being in a new team/at a new customer. Just collect first, learn, list, take notes. Then after sometime start crossing points off the list for various reasons and work on the "real WTF ones".

https://www.spacebar.news/stop-using-brave-browser/: A text about what is wrong about everything around the Brave Browser.

https://privacytests.org/: A side run by a Brave employee listing/comparing the various browser privacy features.

https://github.com/fork-maintainers/iceraven-browser: A fork of Firefox for Android giving you more options. Most notably: about:config support!

https://developer.chrome.com/blog/resuming-the-transition-to-mv3: Yep, google really pushes on with it's Manifest v3 which will considerably limit the technical capabilities of AdBlocking addons in Chrome. The main reason why I switched back to Firefox.

https://github.com/ratatui-org/ratatui: "Ratatui is a crate for cooking up terminal user interfaces in Rust. It is a lightweight library that provides a set of widgets and utilities to build complex Rust TUIs. Ratatui was forked from the tui-rs crate in 2023 in order to continue its development." Just bookmarked that one in case I need it in the future.

https://anytype.io/: The Everything App. Haven't used it, but someone said he is looking forward to replacing Microsoft Teams with that App in his company.

https://jamesg.blog/advent-of-technical-writing/: Lots and lots of articles from a technical writer who shares what he has learned of the years.
From the same author there is also a book "Software Technical Writing: A Guidebook" available as PDF from his site: https://jamesg.blog/book.pdf

https://www.netways.de/blog/2024/01/19/check-system-basics/: One Icinga CheckPlugin to rule them all! This plugin bundles the checks for Memory, Filesystem, PSI, Load, Sensors, Netdev

https://www.kernel.org/doc/html/latest/accounting/psi.html: Documentation for the Pressure Stall Information (PSI) interface. If enabled in your kernel, reachable via /proc/pressure/. Apparently I didn't know about this and just learned of this throught the Netways check_system_basics plugin.

https://docs.cwtch.im/docs/intro/: "Cwtch (/kʊtʃ/ - a Welsh word roughly translating to “a hug that creates a safe place”) is a decentralized, privacy-preserving, metadata resistant messaging app." I don't use it yet, but bookmarked it to see how the project develops. I would really love to uninstall Whatsapp and Telegram from my mobile...

https://bios-pw.org/: Forget your BIOS password? This generator will tell you the Master password of your BIOS if your provide the manufacturer and shown hash.

https://archief.ntr.nl/tuinderlusten/en.html: Ever wanted to explore Jheronimus Bosch's painting "The Garden of Earthly Delights"? Now you can in detail with audio explanations. Really impressive.

https://www.wheresyoured.at/the-men-who-killed-google/: An article about Googles shift from better search results to more revenue and user engagement and how that came to be.

https://medium.com/@maciej.pocwierz/how-an-empty-s3-bucket-can-make-your-aws-bill-explode-934a383cb8b1: Imagine your S3 bucket gets hit with 100.000 of requests each hour, as your bucket name is listed as default config in some OpenSource tool. Imagine then that the tool actually makes requests to your S3 bucket.
Now imagine the surprised face of the person from that text, when he found out he has to pay for all the denied traffic which resulted in HTTP-4xx errors.
Hot takeaway from this: 1. Include some random chars into your bucket name. 2. If your are evil, you can increase the bill for every S3 bucket..

https://www.youtube.com/watch?v=OQoqlBog7UI: Cooking content! I'd searched for a new anti-sticking cooking pan and came around Hexclad. However as they claim to have develop a new anti-sticking material - not using polytetrafluoroethylene (PTFE) or in short: Teflon - I was sceptical. After all there is a reason why Teflon is used since decades. Turns out:The pans work, but only for 2 years. Heavily depending on usage. After 2 years you will have to send your pan in and get a free replacement because of the lifetime guarantee. Ok, good customerservice on one hand, but terrible for the environment on the other hand. Also.. I don't consider pans with a lifespan of just 2 years just to be of high quality.. And I found many Youtubers who made videos such as this one. Therefore this isn't a single incident, no, it's a flow in the material/product itself. There is also a nice text from someone (which I forgot to bookmark..) who wrote about how these pans were used in a series of Gordon Ramsay's "Hells Kitchen" and there the pans really showed that the new material is not that durable after all. There was a nice scene were one could see how Gordon Ramsay quarrels with himself as a dish couldn't be prepared properly because evidently the pan lost its anti-sticking capability in some region of the surface. Yep.. I bought a Teflon pan. 😅

https://jan.wildeboer.net/2023/02/Jekyll-Mastodon-Comments/: "Client-side comments with Mastodon on a static Jekyll website" Jan Wildeboer did that and I found the implementation interesting.

https://slate.com/technology/2024/05/deviantart-what-happened-ai-decline-lawsuit-stability.html: DeviantArt was one of the many sites of the relatively early Internet which got a lot of attention. Providing a community for artists to share their pictures. Over the years DeviantArt took a big hit. Instagram, Facebook.. Many sites gnawed at their userbase. In the last years they made a small revival. Adding long sought-after features, etc.
And now they throw everything in the trash bin by jumping right onto the AI hypetrain and not doing much to combat the growing army of bots using the original art of it's users to create hundreds of fake profiles with AI generated art, then circle-boosting themself - all to make the original artist vanish in the search results.
Seems like that was it for DeviantArt if they don't do anything against it. After all.. Which artist would join such a site?
(But to be fair: That problem exists everywhere, Youtube, Tiktok, etc.)

https://mpv.io/: An OpenSource video player for the command-line.

https://www.udm14.com/: You want a Google search result free of AI generated content? Add the search parameter "&udm=14". Which is now lovingly called "the disenshittification Konami code".

https://tedium.co/2024/05/17/google-web-search-make-default/: A text about the "disenshittification Konami code".

https://endoflife.date/: A nice website listing all of those EOL dates for software. Handy!

https://12factor.net/: This one was listed in a job-ad as a "nice to have/know" point. As "The Twelve-Factor App" didn't rign a bell, I searched for it and found the website. Basically 12 design principles about how to structure your build environment, design your software architecture and other processes.
And yes, I know some projects who would be benefit from following these.

Comments

Der Faktor Mensch in der Softwareentwicklung

Photo by cottonbro studio: https://www.pexels.com/photo/man-kissing-a-gypsum-head-3693078/

Durch Zufall heute auf den Youtube-Channel von David Tielke aufmerksam geworden.
Und nach 2 Videos auf seinem Kanal schlug mir Youtube seine Keynote von der DWX23 vor. Titel: "Der Faktor Mensch in der Softwareentwicklung"

Ist eine Stunde, die aber wirklich unterhaltsam und lehrreich ist.
Und seine Aussagen mehr auf seine Kollegen zu achten bzgl. Work-Life-Balance, Burnout, Depression und im Leben (privat wie beruflich) nicht nur die IT zu haben. Die kann ich voll und ganz unterschreiben.

Ich war 2x für mehrere Monate aufgrund von Depressionen in der Tagesklinik, zwar wegen bis dato nicht diagnostiziertem Aufmerksamkeits-Defizit-Syndrom (da ist Depression das häufigste Symptom bei Erwachsenen) und nicht wegen Überarbeitung etc.
Dennoch habe ich aufgrund dessen Dinge in meinem Leben geändert. Mir Hobbies und Freunde abseits der IT gesucht.

Und gerade weil ich damit so gute Erfahrungen gemacht habe, bin ich damit so offen & auch offensiv. Depression, Burnout, etc. sind keine lebenslangen Stigmata. Mit der richtigen Hilfe und etwas Umstellung lässt sich das meistens sehr gut in den Griff bekommen. (Klar, jeder Fall ist anders & individuell.) Aber ich sehe eine psychische Erkrankung nicht als K.O.-Kriterium für eine Karriere oder gar als Charakterschwäche. Menschen die so denken wünsche ich, wirklich(!), von ganzem Herzen das sie niemals selbst in so eine Situation geraten. Denn die Kraft die man aufbringen muss, während man selbst am Boden liegt, es sich anfühlt als ob die Welt auf einen einprügelt und man dann noch Zirkuskunststückchen vollführen darf... Nur um mal irgendwann nach etlichen Wochen oder Monaten einen Termin bei einem/-r Psychologen/-therapeuten zu bekommen..
Diese Kraft traue ich auch manchem gesunden Menschen nicht zu.

Also: Passt auf euch auf. Kein Job ist wichtiger als euer Leben. Egal wie geil euer Arbeitgeber ist.

Das Video ist unten eingebettet. Oder hier direkt als Link: https://www.youtube.com/watch?v=Eh-UaaxBYDk

Comments

Icinga2 error "check command does not exist" because of missing constant

Photo by Christina Morillo: https://www.pexels.com/photo/software-engineer-standing-beside-server-racks-1181354/

Apparently this problem kept me busy far too long, as I kept looking into the Icinga2 Master logfiles only. Main due to the service definition for my icinga CheckCommand still being from a time when it was only one Master without any Agents. This lead to it being executed on the Master and hence I never saw the problems on the agent..

Additionally the cluster and cluster-health checks only check if all endpoints are connected. Which was the case all the time. Therefore I got no error there too.

But what happened?

I defined a new CheckCommand. It worked fine on the master. Then I re-rewrote the service apply-Rule so that it matches for all Linux hosts being monitored. And then I got Check command not found for all these new service checks on all agent hosts.

I deleted the API config sync directories and restarted Icinga2 on the agents to trigger a new sync:

root@agent:/etc/icinga2# rm /var/lib/icinga2/api/zones-stage/* -rf && rm /var/lib/icinga2/api/zones/* -rf
root@agent:/etc/icinga2# systemctl restart icinga2.service

And suddenly all CheckCommands which are not part of the Icinga Template Library stopped working on the agents.

Uhm, ok. At this point I suspected I had somehow messed up my /etc/icinga2/zones.conf file some time ago. Turns out, this wasn't the case.

The root cause

Some weeks ago I defined a service check which is only executed on my Icinga2 master. However I stored the CheckCommand and Service-Configuration under /etc/icinga2/zones.d/master anyway as you never know when this comes in handy. (This has since been corrected in the article.) But the Telegram API requires a Token. And I defined that in /etc/icinga2/constants.conf - but this file isn't synced as it is outside of /etc/icinga2/zones.d/master. Something which I did on purpose, as I didn't want to sync the Token to all agents.

This apparently caused the config file sync to run into an syntax error as the constant for the Token couldn't be resolved.
But again.. This was only logged in the logfiles on the agents..

root@agent:/etc/icinga2# cat /var/log/icinga2/icinga2.log
[...]
[2024-07-17 22:39:04 +0200] information/ApiListener: Received configuration for zone 'global-templates' from endpoint 'master.domain.tld'. Comparing the timestamp and checksums.
[2024-07-17 22:39:04 +0200] information/ApiListener: Stage: Updating received configuration file '/var/lib/icinga2/api/zones-stage/global-templates//_etc/eventcommands.conf' for zone 'global-templates'.
[2024-07-17 22:39:04 +0200] information/ApiListener: Stage: Updating received configuration file '/var/lib/icinga2/api/zones-stage/global-templates//_etc/groups.conf' for zone 'global-templates'.
[2024-07-17 22:39:04 +0200] information/ApiListener: Stage: Updating received configuration file '/var/lib/icinga2/api/zones-stage/global-templates//_etc/host-templates.conf' for zone 'global-templates'.
[2024-07-17 22:39:04 +0200] information/ApiListener: Stage: Updating received configuration file '/var/lib/icinga2/api/zones-stage/global-templates//_etc/notifications.conf' for zone 'global-templates'.
[2024-07-17 22:39:04 +0200] information/ApiListener: Stage: Updating received configuration file '/var/lib/icinga2/api/zones-stage/global-templates//_etc/service-templates.conf' for zone 'global-templates'.
[2024-07-17 22:39:04 +0200] information/ApiListener: Stage: Updating received configuration file '/var/lib/icinga2/api/zones-stage/global-templates//_etc/telegrambot-notifications.conf' for zone 'global-templates'.
[2024-07-17 22:39:04 +0200] information/ApiListener: Stage: Updating received configuration file '/var/lib/icinga2/api/zones-stage/global-templates//_etc/templates.conf' for zone 'global-templates'.
[2024-07-17 22:39:04 +0200] information/ApiListener: Stage: Updating received configuration file '/var/lib/icinga2/api/zones-stage/global-templates//_etc/timeperiods.conf' for zone 'global-templates'.
[2024-07-17 22:39:04 +0200] information/ApiListener: Stage: Updating received configuration file '/var/lib/icinga2/api/zones-stage/global-templates//_etc/users.conf' for zone 'global-templates'.
[2024-07-17 22:39:04 +0200] information/ApiListener: Applying configuration file update for path '/var/lib/icinga2/api/zones-stage/global-templates' (6688 Bytes).
[2024-07-17 22:39:04 +0200] information/ApiListener: Received configuration updates (2) from endpoint 'master.domain.tld' are different to production, triggering validation and reload.
[2024-07-17 22:39:04 +0200] critical/ApiListener: Config validation failed for staged cluster config sync in '/var/lib/icinga2/api/zones-stage/'. Aborting. Logs: '/var/lib/icinga2/api/zones-stage//startup.log'
[...]

The /var/lib/icinga2/api/zones-stage/startup.log has the details:

root@agent:/etc/icinga2# cat /var/lib/icinga2/api/zones-stage/startup.log
[2024-07-17 23:36:19 +0200] information/cli: Icinga application loader (version: r2.12.3-1)
[2024-07-17 23:36:19 +0200] information/cli: Loading configuration file(s).
[2024-07-17 23:36:19 +0200] information/ConfigItem: Committing config item(s).
[2024-07-17 23:36:19 +0200] critical/config: Error: Error while evaluating expression: Tried to access undefined script variable 'TelegramBotToken'
Location: in /var/lib/icinga2/api/zones-stage//global-commands/_etc/telegrambot-commands.conf: 46:26-46:41
/var/lib/icinga2/api/zones-stage//global-commands/_etc/telegrambot-commands.conf(44):     HOSTDISPLAYNAME = "$host.display_name$"
/var/lib/icinga2/api/zones-stage//global-commands/_etc/telegrambot-commands.conf(45):     SERVICEDISPLAYNAME = "$service.display_name$"
/var/lib/icinga2/api/zones-stage//global-commands/_etc/telegrambot-commands.conf(46):     TELEGRAM_BOT_TOKEN = TelegramBotToken
                                                                                                               ^^^^^^^^^^^^^^^^
/var/lib/icinga2/api/zones-stage//global-commands/_etc/telegrambot-commands.conf(47):     TELEGRAM_CHAT_ID = "$user.vars.telegram_chat_id$"
/var/lib/icinga2/api/zones-stage//global-commands/_etc/telegrambot-commands.conf(48):

[2024-07-17 23:36:19 +0200] critical/config: Error: Error while evaluating expression: Tried to access undefined script variable 'TelegramBotToken'
Location: in /var/lib/icinga2/api/zones-stage//global-commands/_etc/telegrambot-commands.conf: 20:26-20:41
/var/lib/icinga2/api/zones-stage//global-commands/_etc/telegrambot-commands.conf(18):     NOTIFICATIONCOMMENT = "$notification.comment$"
/var/lib/icinga2/api/zones-stage//global-commands/_etc/telegrambot-commands.conf(19):     HOSTDISPLAYNAME = "$host.display_name$"
/var/lib/icinga2/api/zones-stage//global-commands/_etc/telegrambot-commands.conf(20):     TELEGRAM_BOT_TOKEN = TelegramBotToken
                                                                                                               ^^^^^^^^^^^^^^^^
/var/lib/icinga2/api/zones-stage//global-commands/_etc/telegrambot-commands.conf(21):     TELEGRAM_CHAT_ID = "$user.vars.telegram_chat_id$"
/var/lib/icinga2/api/zones-stage//global-commands/_etc/telegrambot-commands.conf(22):

[2024-07-17 23:36:19 +0200] critical/config: 2 errors
[2024-07-17 23:36:19 +0200] critical/cli: Config validation failed. Re-run with 'icinga2 daemon -C' after fixing the config.

However... The tricky part is that a config validation will succeed!

root@agent:/etc/icinga2# icinga2 daemon -C
[2024-07-18 00:00:16 +0200] information/cli: Icinga application loader (version: r2.12.3-1)
[2024-07-18 00:00:16 +0200] information/cli: Loading configuration file(s).
[2024-07-18 00:00:16 +0200] information/ConfigItem: Committing config item(s).
[2024-07-18 00:00:16 +0200] information/ApiListener: My API identity: agent.domaint.tld
[2024-07-18 00:00:16 +0200] information/ConfigItem: Instantiated 1 CheckerComponent.
[2024-07-18 00:00:16 +0200] information/ConfigItem: Instantiated 5 Zones.
[2024-07-18 00:00:16 +0200] information/ConfigItem: Instantiated 1 IcingaApplication.
[2024-07-18 00:00:16 +0200] information/ConfigItem: Instantiated 2 Endpoints.
[2024-07-18 00:00:16 +0200] information/ConfigItem: Instantiated 1 FileLogger.
[2024-07-18 00:00:16 +0200] information/ConfigItem: Instantiated 235 CheckCommands.
[2024-07-18 00:00:16 +0200] information/ConfigItem: Instantiated 1 ApiListener.
[2024-07-18 00:00:16 +0200] information/ScriptGlobal: Dumping variables to file '/var/cache/icinga2/icinga2.vars'
[2024-07-18 00:00:16 +0200] information/cli: Finished validating the configuration file(s).

And this was the reason why I was too focused on the master..

What I learned later is, that you can utilize the following command to validate the configuration from the stage-dir.
Documentation for the Config Sync: Receive Config is here.

root@agent:/var/log/icinga2# icinga2 daemon -C --define System.ZonesStageVarDir=/var/lib/icinga2/api/zones-stage/
[2024-07-21 16:28:51 +0200] information/cli: Icinga application loader (version: r2.12.3-1)
[2024-07-21 16:28:51 +0200] information/cli: Loading configuration file(s).
[2024-07-21 16:28:51 +0200] information/ConfigItem: Committing config item(s).
[2024-07-21 16:28:51 +0200] critical/config: Error: Error while evaluating expression: Tried to access undefined script variable 'TelegramBotToken'
Location: in /var/lib/icinga2/api/zones-stage//global-commands/_etc/telegrambot-commands.conf: 20:26-20:41
/var/lib/icinga2/api/zones-stage//global-commands/_etc/telegrambot-commands.conf(18):     NOTIFICATIONCOMMENT = "$notification.comment$"
/var/lib/icinga2/api/zones-stage//global-commands/_etc/telegrambot-commands.conf(19):     HOSTDISPLAYNAME = "$host.display_name$"
/var/lib/icinga2/api/zones-stage//global-commands/_etc/telegrambot-commands.conf(20):     TELEGRAM_BOT_TOKEN = TelegramBotToken
                                                                                                               ^^^^^^^^^^^^^^^^
/var/lib/icinga2/api/zones-stage//global-commands/_etc/telegrambot-commands.conf(21):     TELEGRAM_CHAT_ID = "$user.vars.telegram_chat_id$"
/var/lib/icinga2/api/zones-stage//global-commands/_etc/telegrambot-commands.conf(22):

[2024-07-21 16:28:51 +0200] critical/config: Error: Error while evaluating expression: Tried to access undefined script variable 'TelegramBotToken'
Location: in /var/lib/icinga2/api/zones-stage//global-commands/_etc/telegrambot-commands.conf: 46:26-46:41
/var/lib/icinga2/api/zones-stage//global-commands/_etc/telegrambot-commands.conf(44):     HOSTDISPLAYNAME = "$host.display_name$"
/var/lib/icinga2/api/zones-stage//global-commands/_etc/telegrambot-commands.conf(45):     SERVICEDISPLAYNAME = "$service.display_name$"
/var/lib/icinga2/api/zones-stage//global-commands/_etc/telegrambot-commands.conf(46):     TELEGRAM_BOT_TOKEN = TelegramBotToken
                                                                                                               ^^^^^^^^^^^^^^^^
/var/lib/icinga2/api/zones-stage//global-commands/_etc/telegrambot-commands.conf(47):     TELEGRAM_CHAT_ID = "$user.vars.telegram_chat_id$"
/var/lib/icinga2/api/zones-stage//global-commands/_etc/telegrambot-commands.conf(48):

[2024-07-21 16:28:51 +0200] critical/config: 2 errors
[2024-07-21 16:28:51 +0200] critical/cli: Config validation failed. Re-run with 'icinga2 daemon -C' after fixing the config.

The solution

On the master I moved the 2 files from /etc/icinga2/zones.d to /etc/icinga2/conf.d and restarted the service.

root@master:/etc/icinga2# mv /etc/icinga2/zones.d/global-commands/telegrambot-commands.conf /etc/icinga2/conf.d/
root@master:/etc/icinga2# mv /etc/icinga2/zones.d/global-templates/telegrambot-notifications.conf /etc/icinga2/conf.d/
root@master:/etc/icinga2# systemctl restart icinga2.service

On the agent a simple restart is enough:

root@agent:/etc/icinga2# systemctl restart icinga2.service

And after that everything worked again.

Another problem detected - an even deeper rooted cause

In the aftermath I was curious why & how Icinga didn't notify me that the config in the stage-dir couldn't be validated. Shouldn't there be some kind of included check for this?

Yes, turns out the built-in Icinga CheckCommand does exactly this. But it was never executed on my agent. As I still had a service definition from a time when I didn't have any agents. Initially the configuration was the following:

// Checks the agent health
apply Service "icinga" {
  import "generic-service"

  check_command = "icinga"

  assign where (host.address || host.address6) && host.vars.os == "Linux"
}

This was still a remnant of having only the Icinga Master and no agents. But this lead to it being executed on the Master. Which is... Not smart if you want to validate the configuration on the Agent.

After changing it to the following:

// Checks the agent health - must be executed on the agent
apply Service "icinga" {
  import "generic-service"

  check_command = "icinga"

  command_endpoint = host.vars.agent_endpoint

  assign where host.vars.agent_endpoint
}

The check worked as intended.

Oh, and I opened a pull request to enhance Icinga's documentation regarding the config sync: https://github.com/Icinga/icinga2/pull/10101. Let's see if it get's accepted.

Comments

Using and configuring unattended-upgrades under Debian Bookworm - Part 1: Preparations

Photo by Markus Winkler: https://www.pexels.com/photo/wood-writing-mathematics-typography-19915915/

Preface

At the time of this writing Debian Bookworm is the stable release of Debian. It utilizes Systemd timers for all automation tasks like the updating of the package lists and execution of the actual apt-get upgrade. Therefore we won't need to configure APT-Parameters in files like /etc/apt/apt.conf.d/02periodic. In fact some of these files don't even exist on my systems. Keep that in mind if you read this article along with others, who might do things differently - or for older/newer releases of Debian.

Part 2 can be found here: Using and configuring unattended-upgrades under Debian Bookworm - Part 2: Practise

unattended-upgrades is not your enemy

I've read and heard my fair share of people condemning unattended-upgrades as it:

  • Made things unnecessary complicated
  • Broke the system
  • Ignored APT-Pinnings and caused problems because of that
  • Just didn't work
  • Caused problems with High Availability (HA) services
  • Made the database fail
  • Split-Brains occurred only due to unattended-upgrades restarting services
  • Restarted services during work hours causing disruptions and annoyances

You should get the gist. And then there is my experience, running unattended-upgrades on over 6000 Debian servers running all sort of services. From Apaches, Tomcats, JBoss and HAProxy to DRBD, GlusterFS, Corosync, Pacemaker some NoSQL-DBs and services like keepalived and ipvsadm for Layer2/3-Loadbalancing or Quagga/FRR for BGP-Route announcements. And in all those years unattended-upgrades wasn't the root cause of a single problem, outage or incident.

Therefore I suspect that many of the people whose complaints I've read just installed it and never cared about it again. Or, at least, didn't care enough. Presumably they just wanted a quick solution to help them get their systems updated. Well yes, unattended-upgrades is the right tool for this. But as always:

Know your system and plan accordingly!

Things to consider beforehand

Let me give you a list of things to consider before you even install unattended-upgrades.

  1. Are all of your APT-Repositories in order?
    • GPG-keys valid and present?
    • Correct repository for your Debian release?
    • Do you use only official Debian repositories?
    • Do you use Debian repositories from other projects/vendors?
    • Are your repositories in sync on all your servers?
      • Preferably you use the same Debian Mirror on all of your systems. At least make sure you don't use different repositories for security and system updates across all your Debian systems.
      • This prevents problems from outdated mirrors. Happens rarely, but can happen.
        • Trust me: When 2 machines out of a cluster of 5 behave differently, your first thought or troubleshooting step won't be to check if the different Apt-Repositories have the same content
      • Remember: Those are often provided as-is by volunteers. They are NOT a commercial service. And yet most of these volunteers do an exceptional & awesome job despite not being paid for it.
      • Best case scenario: Your company has an internal Debian Mirror. Saving you money on bandwidth usage.
      • Have a look at https://www.debian.org/mirror/ftpmirror.en.html or Aptly if you plan on setting up a mirror.
    • Basically: If an apt-get update prints out anything other then your configured repositories, followed by the line Reading package lists... Done: Fix your repositories!
    • Yes, you can have vendors with broken Debian repositories. Most often the Release file will be buggy or missing at all. If you can't get your vendor to fix it, well, then the best option is to not specify the repository at all and ensure you have another form of automation to update those packages.
      • Sadly a wget http://some-company.tld/some.deb && dpkg -i some.deb is still considered valuable quality work at far too many enterprise software companies out there..
        • Or you just work around that nuisance, create an internal repository yourself and upload the packages there.
      • A good time to remind them that you pay them and that you need a fully working Debian repository, following the Debian guidelines so you can automatically patch all your systems.
    • Do NOT continue otherwise. You have been warned.
  2. What kind of services does your system provide?
    • Here it is essential to know what the system does. Technically and organizationally.
    • What services are provided, why, to whom?
    • Are there any Service Level Agreements (SLAs) in place?
      • Do downtimes of a service need to be scheduled first?
      • Or can service restarts happen at any time?
      • Also automatically? Or is human supervision required by law/standards? (Looking at you PCI DSS (Wikipedia) 😉)
      • Or is there already an agreed upon maintenance window during which the service is allowed to be unresponsive?
    • Do all services have High Availability (HA)?
      • Do the service(s) survive if the primary/master/main system is shut down?
      • How many systems can be unavailable at the same time?
      • Or do other tasks need to be done (manually) on secondary/slave/standby systems?
      • Does your failover work?
      • Is the failover tested regularly?
    • How are you informed if the service(s) stop responding?
      • Is your monitoring set to check right after updates did happen? (You can specify the time when unattended-upgrades does install the updates.)
  3. This will enable you to classify all your installed packages into the following categories for unattended-upgrades:
    • Can be updated anytime
    • Can be updated at certain times / Only a certain number of systems is allowed to be unavailable at any time
      • See: systemctl list-timers especially apt-daily-upgrade.timer and maybe apt-daily.timer
    • Only manual updates (Blacklisting)
      • Unattended-Upgrade::Package-Blacklist in /etc/apt/apt.conf.d/50unattended-upgrades is your friend
      • Then execute apt-get update && apt-get upgrade manually to update the blacklisted packages
    • Never update this package / We need a specific version
      • This will need blacklisting AND APT-Pinnings to be in place
      • As an apt-get update && apt-get upgrade can still be executed manually
  4. In certain situations (HA-Nodes, manually triggered fail-over, etc.) you will need to run specific commands which need to be executed before or after an package update.
    • This is something unattended-upgrades can't help you with
    • Sometimes these are commands which should be included in the Debian package itself. Namely in the preinst, prerm, postinst and postrm files. The so-called package maintainer scripts (Official Debian documentation).
      • But more often the commands are customer/environment specific and adding them to the maintainer script makes no sense or can even cause disruptions in the service.
    • A feasible workaround is the utilisation of a drop-in file if your service is started via a Systemd Unit-File, see https://www.freedesktop.org/software/systemd/man/latest/systemd.unit.html and search for "drop-in". The ArchWiki also has a good article: https://wiki.archlinux.org/title/systemd#Drop-in_files - but keep in mind that Arch is based on Gentoo and hence maybe has different paths than Debian
    • If the correct procedure is missing from the package, or isn't suitable for your environment.. Then its best to exclude the packages from unattended-upgrades and get yourself some tool like Ansible, Puppet or Rundeck to automate the execution of manual tasks. (Good how I love Rundeck. 🥰) There you are able to ensure everything is valid and verified before switching your primary cluster node and running package updates.
  5. If you have some kind of ITIL ChangeManagement process in place this, of course, also can't be checked by unattended-upgrades
    • The only viable solution would be to have different repositories based on your environment classifications (development, QA testing, production) or approval classifications (untested, testing, approved) and push packages to the corresponding repository once the ChangeManagement process is completed
    • Then you can install the updates automatically from there
  6. Unattended-Upgrades is great! But you can't automate every single scenario by just using it!
    • Sometimes this even means to go back to the drawing board and optimise your internal company processes first. Especially in situations where approvals have to be given manually by real humans
  7. When you start rolling out unattended-upgrades it's better to have an overview first on how many patches are missing on each server. The more updates you install, the more likely it is that things will change or even break. Or may it even just those informal log messages that some parameter or option will be deprecated in the next major release.
    • I advise to start with non-critical systems first
    • Ideally systems which are somewhat up-to-date so you can identify & troubleshoot problems easier
    • It's perfectly fine to update all systems manually first and only then enable unattended-upgrades
      • As then you will have a common ground for all your systems and bugs are easier to identify as the same bug will affect all systems at somewhat the same time
  8. You need to have a quick & easy, bureaucracy-free process to add packages to the blacklist
    • There once were broken corosync and keepalived packages in Debian in the early 2010s
    • Once we saw that, we immediately added them to the blacklist and downgraded the other systems where the update was already installed
    • You don't want to spent one hour on the phone frantically trying to reach a member of your Change Advisory Board to greenlight the change which lets you modify the blacklist while unattended-upgrades happily wrecks one system after another
  9. Point 8 sets a requirement: How do you roll out a new blacklist/config for unattended-upgrades to 6000 servers in under 15 minutes?
    • You are too slow to do that manually, no matter how fast you can type
    • for HOST in $(cat host-list.txt); do ssh $HOST some-command; done? Yeah... No. It works, sure... But.. Come on, really? And this does only one host at a time.. Still taking too long.
    • You do want something like Puppet, Ansible or Rundeck for this very reason.
      • Change the configuration in hiera
      • Commit it to git
      • Log in to Rundeck and execute the "Do a manually triggered Puppet/Ansible run" job
      • Then drink a coffee while you watch Rundeck doing it's job and can care for the 10 or so servers who will fail for various other reasons.

Understanding apt-cache policy

The next thing that will help you vastly in providing a smoothly running unattended-upgrades service is understanding and using the apt-cache tool, especially with the policy argument: apt-cache policy. Even more if you use Debian-Repositories from other projects or vendors.

Why? unattended-upgrades comes with some default configured Origins-Pattern in /etc/apt/apt.conf.d/50unattended-upgrades. These are useable for the official Debian Security updates and when new point releases of Debian are published (12.5, 12.6, etc.). These incorporate all updates since the last point release. Non-Security Updates for installed packages between point releases won't be installed with the default configuration.

If you want these when they are ready, you have to uncomment the line for "origin=Debian,codename=${distro_codename}-updates";.

${distro_codename}-proposed-updates are updates which may not be stable yet. Read https://wiki.debian.org/StableProposedUpdates for the details. Personally I keep it disabled. Especially on production systems.

For Debian Bookworm the default Origins-Pattern are:

Unattended-Upgrade::Origins-Pattern {
[...]
//      "origin=Debian,codename=${distro_codename}-updates";
//      "origin=Debian,codename=${distro_codename}-proposed-updates";
        "origin=Debian,codename=${distro_codename},label=Debian";
        "origin=Debian,codename=${distro_codename},label=Debian-Security";
        "origin=Debian,codename=${distro_codename}-security,label=Debian-Security";
[...]
};

This means only packages matching these Origins-Pattern will be updated. Therefore you have to verify that these patterns include all packages you want to update and, additionally, that packages you do not wish to update are excluded. Although the use of the blacklist might be easier here, as this simply works on the name of the package.

Also note that codename=${distro_codename} is always part of an Origins-Pattern. It is important to not just use terms like stable or oldstable as these do not identify a unique distribution. Those change whenever a new major Debian release happens. (This is also true if you are referencing OS images in things like Docker. debian:latest is most certainly a bad idea, debian-bookworm:latest is better.)

Matching Origin-Patterns to apt-cache policy's output

How do you translate these Origins-Patterns into the lines apt-cache policy gives us?

Short side-note: apt-cache uses the metadata (repository information) obtained via apt-get update. Therefore it also works if the configured repositories are offline, but can also show outdated data if you haven't updated the package list information via apt-get update recently.

If executed you will see output like the following:

root@lanadmin:~# apt-cache policy
Package files:
 100 /var/lib/dpkg/status
     release a=now
 500 http://debian.tu-bs.de/debian bookworm-updates/non-free-firmware amd64 Packages
     release v=12-updates,o=Debian,a=stable-updates,n=bookworm-updates,l=Debian,c=non-free-firmware,b=amd64
     origin debian.tu-bs.de
 500 http://debian.tu-bs.de/debian bookworm-updates/main amd64 Packages
     release v=12-updates,o=Debian,a=stable-updates,n=bookworm-updates,l=Debian,c=main,b=amd64
     origin debian.tu-bs.de
 500 http://security.debian.org/debian-security bookworm-security/non-free-firmware amd64 Packages
     release v=12,o=Debian,a=stable-security,n=bookworm-security,l=Debian-Security,c=non-free-firmware,b=amd64
     origin security.debian.org
 500 http://security.debian.org/debian-security bookworm-security/main amd64 Packages
     release v=12,o=Debian,a=stable-security,n=bookworm-security,l=Debian-Security,c=main,b=amd64
     origin security.debian.org
 500 http://debian.tu-bs.de/debian bookworm/non-free-firmware amd64 Packages
     release v=12.5,o=Debian,a=stable,n=bookworm,l=Debian,c=non-free-firmware,b=amd64
     origin debian.tu-bs.de
 500 http://debian.tu-bs.de/debian bookworm/main amd64 Packages
     release v=12.5,o=Debian,a=stable,n=bookworm,l=Debian,c=main,b=amd64
     origin debian.tu-bs.de
Pinned packages:
root@lanadmin:~#

For the sake of easiness, let us look at just this single line:

 500 http://security.debian.org/debian-security bookworm-security/non-free-firmware amd64 Packages
     release v=12,o=Debian,a=stable-security,n=bookworm-security,l=Debian-Security,c=non-free-firmware,b=amd64
     origin security.debian.org

I wont go over each and every single listed value. If you want to know more: man apt_preferences probably has all the details and apt-cache policy packagename lists all policies for a single package.

We want to pay attention to the 2nd line starting with release. Here we have the relevant values. These are defined in the Release-File for each Debian Release/Repository. A documentation can be found here: https://wiki.debian.org/DebianRepository/Format#A.22Release.22_files

But what do they mean? man apt_preferences also explains them, but as they are relevant, let's make a short table.

Field Alias unattended-upgrades variable Description
Version v N/A Contains the release version
Origin o ${distro_id} Originator of the packages. (Debian if used for packages from the Debian project. If you have commercial packages most likely the company or product name will show up here.)
Archive or Suite a N/A Names the archive to which all the packages in the directory tree belong (on the repository server)
Codename n ${distro_codename} Codename of the Debian release. In our case: bookworm
Label l N/A Names the label of the packages in the directory tree of the Release file.
Component c N/A The licensing component associated with the packages in the directory tree. You may know this as: main, contrib, non-free-firmware, etc.
Architecture b N/A The processor architecture for which a package is compiled. (amd64, i386, arm, etc.)
Site N/A N/A FQDN for the APT-Repository. Useful when fields like Archive/Suite/Label are empty or ambiguous. (Example with component: "site=www.example.com,component=main";)

All this information is usually listed in the first 30 lines of /etc/apt/apt.conf.d/50unattended-upgrades. Therefore: Read it, to ensure you get the currently valid information.

Understanding this makes it easy to match the configured Origin-Patterns to your configure Debian-Repositories.

If you are in doubt: Browse your Debian repository via HTTP/HTTPS and have a look at the Release file, for example: http://debian.tu-bs.de/debian/dists/bookworm/Release. The first 5 lines are:

Origin: Debian
Label: Debian
Suite: stable
Version: 12.5
Codename: bookworm

Filling in the variables we see that only the following Origin-Pattern matches:

"origin=Debian,codename=${distro_codename},label=Debian";

All others either have a different label and/or codename.

Looking at http://debian.tu-bs.de/debian/dists/bookworm-updates/Release we can see that this matches the following commented out Origin-Pattern:

"origin=Debian,codename=${distro_codename}-updates";

This means:

http://debian.tu-bs.de/debian/dists/bookworm/ holds all packages for the current point release of Debian Bookworm.
http://debian.tu-bs.de/debian/dists/bookworm-updates/ has all published updates which came out before a new point release is made. That is the reason why I always enable this repository too. But depending on your operating strategy going only with updates when a new point release is published is also fine.

Security updates are always published via the http://security.debian.org/debian-security/ repository and will be installed when available. 

Key points / Story time

What you should have understood is:

  1. Each repository must be uniquely identifiable.
    • This means: Each Origins-Pattern should only match one of all your configured repositories
    • Of course you can have multiple repositories matching the same Origins-Pattern, but keep the possible implications in mind!
  2. Packages that share the same name must have the same content
    • And by content I mean: Their hashsums must be identical for each given version

If it doesn't you are potentially in for a wild ride.

At a former company we used many internal repositories. And this was fine for a long time. Suddenly some developer started pushing Debian packages with the exact same name as official Debian packages to those internal repositories. We immediately complained. Laying out how that could wreck havoc on our infrastructure as we have to use those repositories and at the same time we can't blacklist that package, as blacklisting works solely on name of a package.

You can't do things like: "Blacklist package test-foo, but only if its coming from repository on repo.coolhost.tld"

We urged him to simply rename those packages or upload them to another repository - as those packages had to share the same name as they contained a not-yet included fix for a bug the company encountered. He wouldn't as he saw no problem with his approach. "Just don't use them." (Yeah thanks.. That's not how it works with automation.. Especially not if you - sort of - hijack repositories which are used for something entirely different..)

The workaround we made was by utilizing the apt priority for each repository, so packages from our internal official Debian mirror took priority. And that worked, but it was still annoying.

Some weeks later those packages caused an incident and in the root cause analysis the problem was identified and those packages were moved to a separate repository.

Lesson learned. Care for your repositories.

And this ends the first part of this post. The next part will focus on the practical side. We will look at the Systemd Unit- and Timer-File, how we can add new repositories to unattended-upgrades, for example to also upgrade our Proxmox installation using the Proxmox Debian repositories, how to blacklist packages and more.

Comments