Photo by Markus Winkler: https://www.pexels.com/photo/the-word-update-is-spelled-out-in-scrabble-tiles-18524143/
Preface
At the time of this writing Debian Bookworm is the stable release of Debian. It utilizes Systemd timers for all automation tasks such as the updating of the package lists and execution of the actual apt-get upgrade. Therefore we won't need to configure APT-Parameters in files like /etc/apt/apt.conf.d/02periodic. In fact some of these files don't even exist on my systems. Keep that in mind if you read this article along with others, who might do things differently - or for older/newer releases of Debian.
Part 1 where I talk about the basics and prerequisites of unattended-upgrades along with many questions you should have answered prior using it is here: Using and configuring unattended-upgrades under Debian Bookworm - Part 1: Preparations
Note: As it took me considerably longer than expected to write this post please ignore discrepances in timestamps and versions.
Installing unattended-upgrades - however it's (most likely) not active yet
Enough with theory, let's switch to the shell. The installation is rather easy, a simple apt-get install unattended-upgrades is enough. However if you run the installation in an interactive way like this unattended-upgrades isn't configured to run automatically. The file /etc/apt/apt.conf.d/20auto-upgrades is missing. So check if it is present!
Note: That's one reason why you want to set the environment variable export DEBIAN_FRONTEND=noninteractive prior to the installation in your Ansible Playbooks/Puppet Manifest/Runbooks/Scripts, etc. or execute an dpkg-reconfigure -f noninteractive unattended-upgrades after the installation. Of course placing the file also solves the problem.😉
If you want to re-configure unattended-upgrades manually execute: dpkg-reconfigure unattended-upgrades and select yes at the prompt. But I advise you not just do it right yet.
root@host:~# apt-get install unattended-upgrades
Reading package lists... Done
Building dependency tree... Done
Reading state information... Done
The following additional packages will be installed:
gir1.2-glib-2.0 libgirepository-1.0-1 python3-dbus python3-distro-info python3-gi
Suggested packages:
python-dbus-doc bsd-mailx default-mta | mail-transport-agent needrestart powermgmt-base
The following NEW packages will be installed:
gir1.2-glib-2.0 libgirepository-1.0-1 python3-dbus python3-distro-info python3-gi unattended-upgrades
0 upgraded, 6 newly installed, 0 to remove and 50 not upgraded.
Need to get 645 kB of archives.
After this operation, 2,544 kB of additional disk space will be used.
Do you want to continue? [Y/n]
Get:1 http://debian.tu-bs.de/debian bookworm/main amd64 libgirepository-1.0-1 amd64 1.74.0-3 [101 kB]
Get:2 http://debian.tu-bs.de/debian bookworm/main amd64 gir1.2-glib-2.0 amd64 1.74.0-3 [159 kB]
Get:3 http://debian.tu-bs.de/debian bookworm/main amd64 python3-dbus amd64 1.3.2-4+b1 [95.1 kB]
Get:4 http://debian.tu-bs.de/debian bookworm/main amd64 python3-distro-info all 1.5+deb12u1 [6,772 B]
Get:5 http://debian.tu-bs.de/debian bookworm/main amd64 python3-gi amd64 3.42.2-3+b1 [219 kB]
Get:6 http://debian.tu-bs.de/debian bookworm/main amd64 unattended-upgrades all 2.9.1+nmu3 [63.3 kB]
Fetched 645 kB in 0s (1,618 kB/s)
Preconfiguring packages ...
Selecting previously unselected package libgirepository-1.0-1:amd64.
(Reading database ... 33397 files and directories currently installed.)
Preparing to unpack .../0-libgirepository-1.0-1_1.74.0-3_amd64.deb ...
Unpacking libgirepository-1.0-1:amd64 (1.74.0-3) ...
Selecting previously unselected package gir1.2-glib-2.0:amd64.
Preparing to unpack .../1-gir1.2-glib-2.0_1.74.0-3_amd64.deb ...
Unpacking gir1.2-glib-2.0:amd64 (1.74.0-3) ...
Selecting previously unselected package python3-dbus.
Preparing to unpack .../2-python3-dbus_1.3.2-4+b1_amd64.deb ...
Unpacking python3-dbus (1.3.2-4+b1) ...
Selecting previously unselected package python3-distro-info.
Preparing to unpack .../3-python3-distro-info_1.5+deb12u1_all.deb ...
Unpacking python3-distro-info (1.5+deb12u1) ...
Selecting previously unselected package python3-gi.
Preparing to unpack .../4-python3-gi_3.42.2-3+b1_amd64.deb ...
Unpacking python3-gi (3.42.2-3+b1) ...
Selecting previously unselected package unattended-upgrades.
Preparing to unpack .../5-unattended-upgrades_2.9.1+nmu3_all.deb ...
Unpacking unattended-upgrades (2.9.1+nmu3) ...
Setting up python3-dbus (1.3.2-4+b1) ...
Setting up libgirepository-1.0-1:amd64 (1.74.0-3) ...
Setting up python3-distro-info (1.5+deb12u1) ...
Setting up unattended-upgrades (2.9.1+nmu3) ...
Creating config file /etc/apt/apt.conf.d/50unattended-upgrades with new version
Created symlink /etc/systemd/system/multi-user.target.wants/unattended-upgrades.service → /lib/systemd/system/unattended-upgrades.service.
Synchronizing state of unattended-upgrades.service with SysV service script with /lib/systemd/systemd-sysv-install.
Executing: /lib/systemd/systemd-sysv-install enable unattended-upgrades
Setting up gir1.2-glib-2.0:amd64 (1.74.0-3) ...
Setting up python3-gi (3.42.2-3+b1) ...
Processing triggers for man-db (2.11.2-2) ...
Processing triggers for libc-bin (2.36-9+deb12u3) ...
root@host:~#
After the installation we have a new Systemd service called unattended-upgrades.service however, if you think that stopping this service will disable unattended-upgrades you are mistaken. This unit-file solely exists to check if an unattended-upgrades run is in progress and ensure it isn't killed mid-process, for example, during a shutdown.
To disable unattended-upgrades we need to change the values in /etc/apt/apt.conf.d/20auto-upgrades to zero. But as written above: This file currently isn't present in our system yet.
root@host:~# ls -lach /etc/apt/apt.conf.d/20auto-upgrades
ls: cannot access '/etc/apt/apt.conf.d/20auto-upgrades': No such file or directory
However, as we want to have a look at the internals first, we do not fix this yet. Instead, let us have a look at the relevant Systemd unit and timer-files.
The Systemd unit and timer files unattended-upgrades relies upon
An systemctl list-timers --all will show you all in-/active timer files on our system along with the unit-file which is triggered by the timer. On every Debian system utilizing Systemd you will most likely have the following unit and timers files per-default. Even when unattended-upgrades is not installed.
root@host:~# systemctl list-timers --all
NEXT LEFT LAST PASSED UNIT ACTIVATES
Sat 2024-10-26 00:00:00 CEST 15min left Fri 2024-10-25 00:00:00 CEST 23h ago dpkg-db-backup.timer dpkg-db-backup.service
Sat 2024-10-26 00:00:00 CEST 15min left Fri 2024-10-25 00:00:00 CEST 23h ago logrotate.timer logrotate.service
Sat 2024-10-26 06:39:59 CEST 6h left Fri 2024-10-25 06:56:26 CEST 16h ago apt-daily-upgrade.timer apt-daily-upgrade.service
Sat 2024-10-26 10:27:42 CEST 10h left Fri 2024-10-25 08:18:00 CEST 15h ago man-db.timer man-db.service
Sat 2024-10-26 11:13:30 CEST 11h left Fri 2024-10-25 21:06:00 CEST 2h 38min ago apt-daily.timer apt-daily.service
Sat 2024-10-26 22:43:26 CEST 22h left Fri 2024-10-25 22:43:26 CEST 1h 0min ago systemd-tmpfiles-clean.timer systemd-tmpfiles-clean.service
Sun 2024-10-27 03:10:37 CET 1 day 4h left Sun 2024-10-20 03:11:00 CEST 5 days ago e2scrub_all.timer e2scrub_all.service
Mon 2024-10-28 01:12:51 CET 2 days left Mon 2024-10-21 01:40:06 CEST 4 days ago fstrim.timer fstrim.service
9 timers listed.
Relevant are apt-daily.timer which activates apt-daily.service. This unit-file will execute /usr/lib/apt/apt.systemd.daily update. The script takes care of reading the necessary APT parameters and performing an apt-get update to update the package lists.
The timer apt-daily-upgrade.timer triggers the service apt-daily-upgrade.service. The unit-file will perform an /usr/lib/apt/apt.systemd.daily install and this is where the actual "apt-get upgrade-magic" happens. If the appropriate APT-values are set outstanding updates will be downloaded and installed.
Notice the absence of a specific unattended-upgrades unit-file or timer as unattended-upgrades is really just a script to automate the APT package system.
This effectively means: You are able to configure when package-list updates will be done and updates are installed by modifying the OnCalendar= parameter via drop-in files for the apt-daily(-upgrade).timer files.
The Systemd.timer documentation and man 7 systemd.time (systemd.time documentation) have all the glorious details.
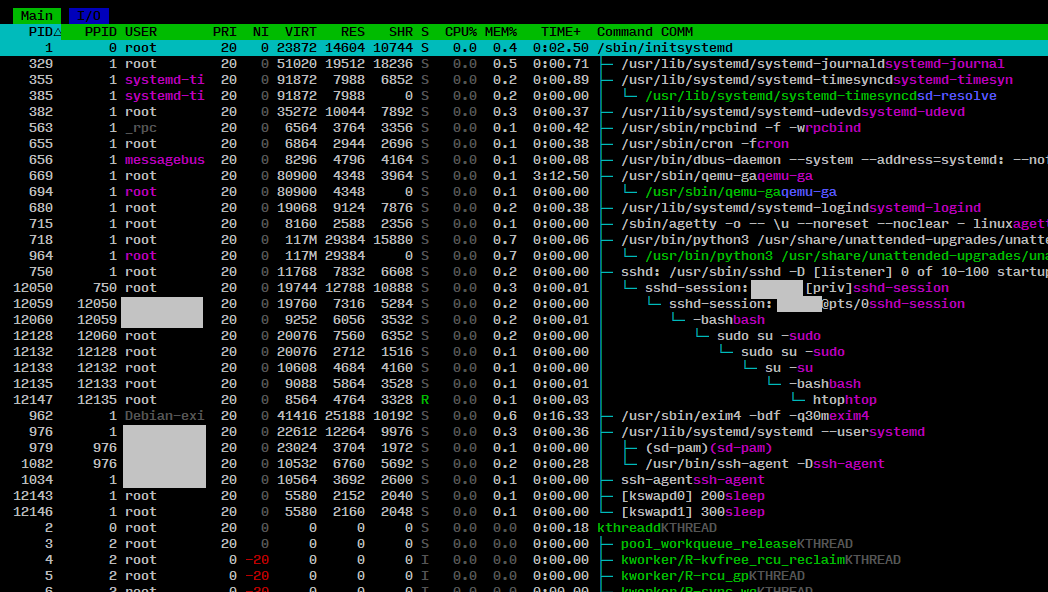
I wont go into further detail regarding the /usr/lib/apt/apt.systemd.daily script. If you want to know more I recommend executing the script with bash's -x parameter (also called debug mode). This way commands and values are printed out as the script is run.
root@host:~# bash -x /usr/lib/apt/apt.systemd.daily update
# Read the output, view the script, trace the parameters and then execute:
root@host:~# bash -x /usr/lib/apt/apt.systemd.daily lock_is_held update
Or if you are more interested in the actual "How are the updates installed?"-part, perform the following:
root@host:~# bash -x /usr/lib/apt/apt.systemd.daily install
# Read the output, view the script, trace the parameters and then execute:
root@host:~# bash -x /usr/lib/apt/apt.systemd.daily lock_is_held install
It's a good lesson in understanding APT-internals/what Debian is running "under the hood".
But again: I advise you to make sure that no actual updates are installed when you do so. In order to learn how to make sure read along. 😇
How does everything work together? What makes unattended-upgrades being unattended?
Let us recapitulate. We installed the unattended-upgrades package, checked the relevant Systemd unit & timer files and had a brief look at the /usr/lib/apt/apt.systemd.daily script which is responsible for triggering the appropriate APT and unattended-upgrades commands.
APT itself is configured via the file in /etc/apt/apt.conf.d/. How can APT (or any human) know the setting of a specific parameter? Sure, you can grep through all the files - but that would also most likely include files with syntax errors etc.
Luckily there is apt-config this allows us to query APT and read specific values. This also makes sure of validating everything. If you've configured an APT-parameter in a file but apt-config doesn't reflect this - it's simply not applied and you must start to search where the error is.
Armed with this knowledge we can execute the following two commands to check if our package-lists will be updated automatically via the apt-daily.service and if unattended-upgrades will install packages. If there is no associated value, apt-config won't print out anything.
The two settings which are set inside /etc/apt/apt.conf.d/20auto-upgrades are APT::Periodic::Update-Package-Lists and APT::Periodic::Unattended-Upgrade. The first activates the automatic package-list updates while the later enables the automatic installation of updates. If we check them on our system with the manually installed unattended-upgrades package we will get the following:
root@host:~# apt-config dump APT::Periodic::Update-Package-Lists
root@host:~# apt-config dump APT::Periodic::Unattended-Upgrade
This means no package-list updates, no installation of updates. And currently this is what we want to keep experimenting a little bit before we are ready to hit production.
A working unattended-upgrades will give the following values:
root@host:~# apt-config dump APT::Periodic::Update-Package-Lists
APT::Periodic::Update-Package-Lists "1";
root@host:~# apt-config dump APT::Periodic::Unattended-Upgrade
APT::Periodic::Unattended-Upgrade "1";
First dry-run
Time to start our first unattended-upgrades dry-run. This way we can watch what would be done without actually modifying anything. I recommend utilizing the -v parameter in addition to --dry-run as else the following first 8 lines from the unattended-upgrades output itself will be omitted. Despite them being the most valuable ones for most novice users.
root@host:~# unattended-upgrades --dry-run -v
Checking if system is running on battery is skipped. Please install powermgmt-base package to check power status and skip installing updates when the system is running on battery.
Starting unattended upgrades script
Allowed origins are: origin=Debian,codename=bookworm,label=Debian, origin=Debian,codename=bookworm,label=Debian-Security, origin=Debian,codename=bookworm-security,label=Debian-Security
Initial blacklist:
Initial whitelist (not strict):
Option --dry-run given, *not* performing real actions
Packages that will be upgraded: base-files bind9-dnsutils bind9-host bind9-libs dnsutils git git-man initramfs-tools initramfs-tools-core intel-microcode libc-bin libc-l10n libc6 libc6-i386 libcurl3-gnutls libexpat1 libnss-systemd libpam-systemd libpython3.11-minimal libpython3.11-stdlib libssl3 libsystemd-shared libsystemd0 libudev1 linux-image-amd64 locales openssl python3.11 python3.11-minimal qemu-guest-agent systemd systemd-sysv systemd-timesyncd udev
Writing dpkg log to /var/log/unattended-upgrades/unattended-upgrades-dpkg.log
/usr/bin/dpkg --status-fd 10 --no-triggers --unpack --auto-deconfigure --recursive /tmp/apt-dpkg-install-o5g9u2
/usr/bin/dpkg --status-fd 10 --no-triggers --configure libsystemd0:amd64 libsystemd-shared:amd64 systemd:amd64
/usr/bin/dpkg --status-fd 10 --no-triggers --unpack --auto-deconfigure /var/cache/apt/archives/systemd-sysv_252.30-1~deb12u2_amd64.deb /var/cache/apt/archives/udev_252.30-1~deb12u2_amd64.deb /var/cache/apt/archives/libudev1_252.30-1~deb12u2_amd64.deb
/usr/bin/dpkg --status-fd 10 --no-triggers --configure libudev1:amd64
/usr/bin/dpkg --status-fd 10 --configure --pending
Preconfiguring packages ...
Preconfiguring packages ...
/usr/bin/dpkg --status-fd 10 --no-triggers --unpack --auto-deconfigure /var/cache/apt/archives/libc6-i386_2.36-9+deb12u8_amd64.deb /var/cache/apt/archives/libc6_2.36-9+deb12u8_amd64.deb
/usr/bin/dpkg --status-fd 10 --no-triggers --configure libc6:amd64
/usr/bin/dpkg --status-fd 10 --no-triggers --unpack --auto-deconfigure /var/cache/apt/archives/libc-bin_2.36-9+deb12u8_amd64.deb
/usr/bin/dpkg --status-fd 10 --no-triggers --configure libc-bin:amd64
/usr/bin/dpkg --status-fd 10 --no-triggers --unpack --auto-deconfigure /var/cache/apt/archives/libc-l10n_2.36-9+deb12u8_all.deb /var/cache/apt/archives/locales_2.36-9+deb12u8_all.deb
/usr/bin/dpkg --status-fd 10 --configure --pending
/usr/bin/dpkg --status-fd 10 --no-triggers --unpack --auto-deconfigure /var/cache/apt/archives/intel-microcode_3.20240813.1~deb12u1_amd64.deb
/usr/bin/dpkg --status-fd 10 --configure --pending
/usr/bin/dpkg --status-fd 10 --no-triggers --unpack --auto-deconfigure /var/cache/apt/archives/python3.11_3.11.2-6+deb12u3_amd64.deb /var/cache/apt/archives/libpython3.11-stdlib_3.11.2-6+deb12u3_amd64.deb /var/cache/apt/archives/python3.11-minimal_3.11.2-6+deb12u3_amd64.deb /var/cache/apt/archives/libpython3.11-minimal_3.11.2-6+deb12u3_amd64.deb
/usr/bin/dpkg --status-fd 10 --configure --pending
/usr/bin/dpkg --status-fd 10 --no-triggers --unpack --auto-deconfigure /var/cache/apt/archives/git_1%3a2.39.5-0+deb12u1_amd64.deb /var/cache/apt/archives/git-man_1%3a2.39.5-0+deb12u1_all.deb
/usr/bin/dpkg --status-fd 10 --configure --pending
/usr/bin/dpkg --status-fd 10 --no-triggers --unpack --auto-deconfigure /var/cache/apt/archives/base-files_12.4+deb12u7_amd64.deb
/usr/bin/dpkg --status-fd 10 --no-triggers --configure base-files:amd64
/usr/bin/dpkg --status-fd 10 --configure --pending
/usr/bin/dpkg --status-fd 10 --no-triggers --unpack --auto-deconfigure /var/cache/apt/archives/initramfs-tools_0.142+deb12u1_all.deb /var/cache/apt/archives/initramfs-tools-core_0.142+deb12u1_all.deb
/usr/bin/dpkg --status-fd 10 --configure --pending
/usr/bin/dpkg --status-fd 10 --no-triggers --unpack --auto-deconfigure /var/cache/apt/archives/bind9-dnsutils_1%3a9.18.28-1~deb12u2_amd64.deb /var/cache/apt/archives/bind9-host_1%3a9.18.28-1~deb12u2_amd64.deb /var/cache/apt/archives/bind9-libs_1%3a9.18.28-1~deb12u2_amd64.deb /var/cache/apt/archives/dnsutils_1%3a9.18.28-1~deb12u2_all.deb
/usr/bin/dpkg --status-fd 10 --configure --pending
/usr/bin/dpkg --status-fd 10 --no-triggers --unpack --auto-deconfigure /var/cache/apt/archives/libexpat1_2.5.0-1+deb12u1_amd64.deb
/usr/bin/dpkg --status-fd 10 --configure --pending
/usr/bin/dpkg --status-fd 10 --no-triggers --unpack --auto-deconfigure /var/cache/apt/archives/qemu-guest-agent_1%3a7.2+dfsg-7+deb12u7_amd64.deb
/usr/bin/dpkg --status-fd 10 --configure --pending
/usr/bin/dpkg --status-fd 10 --no-triggers --unpack --auto-deconfigure /var/cache/apt/archives/libssl3_3.0.14-1~deb12u2_amd64.deb /var/cache/apt/archives/openssl_3.0.14-1~deb12u2_amd64.deb
/usr/bin/dpkg --status-fd 10 --configure --pending
/usr/bin/dpkg --status-fd 10 --no-triggers --unpack --auto-deconfigure /var/cache/apt/archives/libcurl3-gnutls_7.88.1-10+deb12u7_amd64.deb
/usr/bin/dpkg --status-fd 10 --configure --pending
/usr/bin/dpkg --status-fd 10 --no-triggers --unpack --auto-deconfigure /var/cache/apt/archives/linux-image-6.1.0-26-amd64_6.1.112-1_amd64.deb /var/cache/apt/archives/linux-image-amd64_6.1.112-1_amd64.deb
/usr/bin/dpkg --status-fd 10 --configure --pending
All upgrades installed
The list of kept packages can't be calculated in dry-run mode.
root@host:~#
We get told which configured origins will be used (see part 1), all packages on the black- and whitelist and which actual packages will be upgraded. Just like if you are executing apt-get upgrade manually.
Also there is the neat line Writing dpkg log to /var/log/unattended-upgrades/unattended-upgrades-dpkg.log informing us of a logfile being written. How nice!
The dpkg-commands are what normally happens in the background to install and configure the packages. In 99% of all cases this is irrelevant. Nevertheless they become invaluable when an update goes sideways or dpkg/apt can't properly configure a package.
Where do we find this information afterwards?
Logfiles
There are two logfiles being written:
/var/log/unattended-upgrades/unattended-upgrades-dpkg.log/var/log/unattended-upgrades/unattended-upgrades.log
And how do they differ?
/var/log/unattended-upgrades/unattended-upgrades-dpkg.log has all output from dpkg/apt itself. You remember all these Preparing to unpack... packagename, Unpacking packagename, Setting up packagename lines? The lines you encounter when you execute apt-get manually? Who weren't present in the output from our dry-run? This gets logged into that file. So if you are wondering when a certain packages was installed or what went wrong, this is the logfile to look into.
/var/log/unattended-upgrades/unattended-upgrades.log contains the output from unattended-upgrades itself. This makes it possible to check what allowed origins/blacklists/whitelists, etc. were used in a run. Conveniently the output also includes the packages which are suitable for upgrading.
Options! Give me options!
Now that we know how we can execute a dry-run and retrace what happened it's time to have a look at the various options unattended-upgrades offers.
I recommend reading the config file /etc/apt/apt.conf.d/50unattended-upgrades once completely as the various options to fine-tune the behaviour are listed at the end. If you want unattended-upgrades to send mails, or only install updates on shutdown/reboot this is your way to go.
Or do you want an automatic reboot after unattended-upgrades has done its job (see: Unattended-Upgrade::Automatic-Reboot)? Ensuring the new kernel and system libraries are instantly used? This is your way to go.
Adding the Proxmox Repository to unattended-upgrades
Enabling updates for packages in different repositories means we have to add a new Repository to unattended-upgrades first. Using our knowledge from Part 1 and looking at the Release file for the Proxmox pve-no-subscription Debian Bookworm repository we can build the following origins-pattern:
"origin=Proxmox,codename=${distro_codename},label=Proxmox Debian Repository,a=stable";
A new dry-run will show us that the packages proxmox-default-kernel and proxmox-kernel-6.5 will be upgraded.
root@host:~# unattended-upgrades -v --dry-run
Checking if system is running on battery is skipped. Please install powermgmt-base package to check power status and skip installing updates when the system is runnin on battery.
Checking if connection is metered is skipped. Please install python3-gi package to detect metered connections and skip downloading updates.
Starting unattended upgrades script
Allowed origins are: origin=Debian,codename=bookworm,label=Debian, origin=Debian,codename=bookworm,label=Debian-Security, origin=Debian,codename=bookworm-security,labl=Debian-Security, origin=Proxmox,codename=bookworm,label=Proxmox Debian Repository,a=stable
Initial blacklist:
Initial whitelist (not strict):
Option --dry-run given, *not* performing real actions
Packages that will be upgraded: proxmox-default-kernel proxmox-kernel-6.5
Writing dpkg log to /var/log/unattended-upgrades/unattended-upgrades-dpkg.log
/usr/bin/dpkg --status-fd 10 --no-triggers --unpack --auto-deconfigure /var/cache/apt/archives/proxmox-kernel-6.8.8-2-pve-signed_6.8.8-2_amd64.deb /var/cache/apt/archves/proxmox-kernel-6.8_6.8.8-2_all.deb /var/cache/apt/archives/proxmox-default-kernel_1.1.0_all.deb
/usr/bin/dpkg --status-fd 10 --configure --pending
/usr/bin/dpkg --status-fd 10 --no-triggers --unpack --auto-deconfigure /var/cache/apt/archives/proxmox-kernel-6.5.13-5-pve-signed_6.5.13-5_amd64.deb /var/cache/apt/arhives/proxmox-kernel-6.5_6.5.13-5_all.deb
/usr/bin/dpkg --status-fd 10 --configure --pending
All upgrades installed
The list of kept packages can't be calculated in dry-run mode.
In the next step we will use this to see how blacklisting works.
Note: Enabling unattended-upgrades for the Proxmox packages on the Proxmox host itself is a controversial topic. In clustered & productive setups I wouldn't recommend it too. But given this is my single-node, homelab Proxmox I have no problem with it.
However I have no problem with enabling OS updates as this is no different from what Proxmox themselves do/recommend: https://pve.proxmox.com/pve-docs/pve-admin-guide.html#system_software_updates
Blacklisting packages
Excluding a certain package from the automatic updates can be done in two different ways. Either you don't include the repository into the Unattended-Upgrade::Origins-Pattern block - effectively excluding all packages in the repository. Or you exclude only single packages by listing them inside the Unattended-Upgrade::Package-Blacklist block. The configuration file has examples for the various patterns needed (exact match, name beginning with a certain string, escaping, etc.)
The following line will blacklist all packages starting with proxmox- in their name.
Unattended-Upgrade::Package-Blacklist {
// The following matches all packages starting with linux-
// "linux-";
// Blacklist all proxmox- packages
"proxmox-";
[...]
};
Executing a dry-run again will give the following result:
root@host:~# unattended-upgrades -v --dry-run
Checking if system is running on battery is skipped. Please install powermgmt-base package to check power status and skip installing updates when the system is running on battery.
Checking if connection is metered is skipped. Please install python3-gi package to detect metered connections and skip downloading updates.
Starting unattended upgrades script
Allowed origins are: origin=Debian,codename=bookworm,label=Debian, origin=Debian,codename=bookworm,label=Debian-Security, origin=Debian,codename=bookworm-security,label=Debian-Security, origin=Proxmox,codename=bookworm,label=Proxmox Debian Repository,a=stable
Initial blacklist: proxmox-
Initial whitelist (not strict):
No packages found that can be upgraded unattended and no pending auto-removals
The list of kept packages can't be calculated in dry-run mode.
"The following packages have been kept back" - What does this mean? Will unattended-upgrades help me?
Given is the following output from a manual apt-get upgrade run.
root@host:~# apt-get upgrade
Reading package lists... Done
Building dependency tree... Done
Reading state information... Done
Calculating upgrade... Done
The following packages have been kept back:
proxmox-default-kernel proxmox-kernel-6.5
0 upgraded, 0 newly installed, 0 to remove and 2 not upgraded.
The message means that the packages are part of so-called PhasedUpdates. Sadly documentation regarding this in Debian is a bit sparse. The manpage for apt_preference(5) has a paragraph about it but that's pretty much it.
Ubuntu has a separate Wiki article about it, as their update manager honors the setting: https://wiki.ubuntu.com/PhasedUpdates
What it means is that some updates won't be rolled out to all servers immediately. Instead a random number is generated which determines if the update is applied or not.
Quote from apt_preferences(5):
"A system's eligibility to a phased update is determined by seeding random number generator with the package source name, the version number, and /etc/machine-id, and then calculating an integer in the range [0, 100]. If this integer is larger than the Phased-Update-Percentage, the version is pinned to 1, and thus held back. Otherwise, normal policy rules apply."
Unattended-upgrades however will ignore this and install the updates. If that is good or bad depends on your situation. Luckily there was some recent activity in the GitHub Issue regarding this topic, so it may be resolved soon-ish: unattended-upgrades on GitHub, issue 259: Please honor Phased-Update-Percentage for package versions
Enabling unattended-upgrades
Now it's finally time to enable unattended-upgrades for our system. Execute dpkg-reconfigure -f noninteractive unattended-upgrades and check that the /etc/apt/apt.conf.d/20auto-upgrades file is present with the following content:
root@host:~# cat /etc/apt/apt.conf.d/20auto-upgrades
APT::Periodic::Update-Package-Lists "1";
APT::Periodic::Unattended-Upgrade "1";
After that verify that APT has indeed the correct values for those parameters:
root@host:~# apt-config dump APT::Periodic::Update-Package-Lists
APT::Periodic::Update-Package-Lists "1";
root@host:~# apt-config dump APT::Periodic::Unattended-Upgrade
APT::Periodic::Unattended-Upgrade "1";
You are then able to determine when the first run will happen by checking via systemctl list-timers apt-daily.timer apt-daily-upgrade.timer.
root@host:~# systemctl list-timers apt-daily.timer apt-daily-upgrade.timer
NEXT LEFT LAST PASSED UNIT ACTIVATES
Sat 2024-10-26 03:39:58 UTC 16min left Fri 2024-10-25 09:12:58 UTC 18h ago apt-daily.timer apt-daily.service
Sat 2024-10-26 06:21:30 UTC 2h 58min left Fri 2024-10-25 06:24:40 UTC 20h ago apt-daily-upgrade.timer apt-daily-upgrade.service
Set yourself a reminder in your calendar to check the logfiles and enjoy your automatic updates!
How to check the health of a Debian mirror
Remember how I, in part 1 of this series, mentioned that Debian mirrors are rarely out-of-sync, etc.? Yep, and now it happened while I was typing this post. The perfect opportunity to show you how to check your Debian mirror.
The error I got was the following:
root@host:~# apt-get update
Hit:1 http://security.debian.org/debian-security bookworm-security InRelease
Hit:2 http://debian.tu-bs.de/debian bookworm InRelease
Get:3 http://debian.tu-bs.de/debian bookworm-updates InRelease [55.4 kB]
Reading package lists... Done
E: Release file for http://debian.tu-bs.de/debian/dists/bookworm-updates/InRelease is expired (invalid since 16d 0h 59min 33s). Updates for this repository will not be applied.
The reason is that the InRelease file contains a Valid-Until timestamp. And currently it has the following value:
Valid-Until: Sat, 22 Jun 2024 20:12:12 UTC
As this error originates on a remote host there is nothing I can do apart from switching to another Debian repository.
But how can you actually check that? https://mirror-master.debian.org/status/mirror-status.html lists the status of all Debian Mirrors. If we search for debian.tu-bs.de we can see that the mirror indeed has problems and since when the error exists.
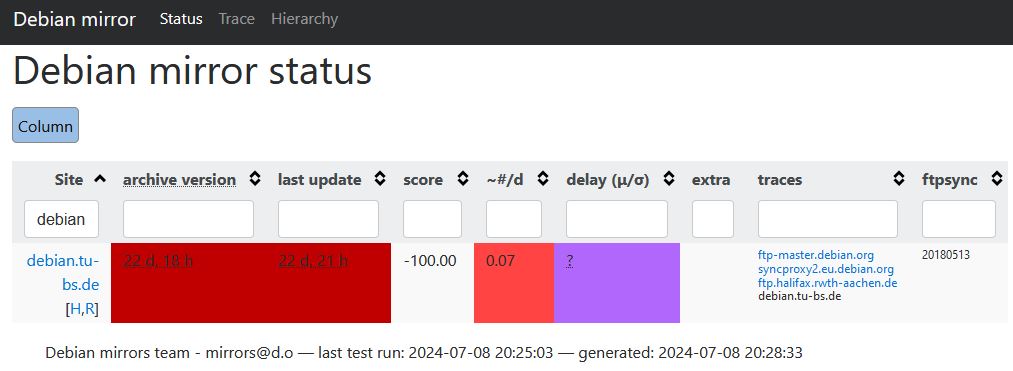
Side note: Checking the mirror hierarchy can also be relevant sometimes: https://mirror-master.debian.org/status/mirror-hierarchy.html
Also.. 22 days without noticing that the Debian mirror I use is broken? Yeah.. Let's define a monitoring check for that. Something I didn't do for my setup at home.
As this would make this article unnecessarily larger I made a separate blog post about it. So feel free to read this next: How to monitor your APT-repositories with Icinga
 Click to enlarge in a new window.